Export Leads From Sales Navigator
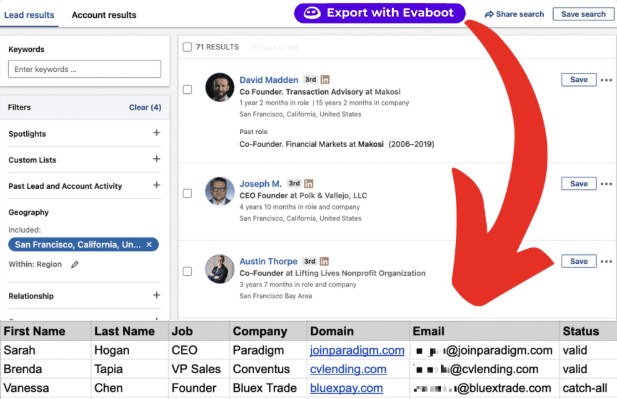
Create a clean B2B email list from LinkedIn Sales Navigator in just one click with the Evaboot Chrome Extension.
Export Leads From Sales Navigator

Create a clean B2B email list from LinkedIn Sales Navigator in just one click with the Evaboot Chrome Extension.
Contents
LinkedIn Sales Navigator has become an indispensable asset for salespeople worldwide.
You’re wasting your money if you have LinkedIn Sales Navigator but don’t know how to use it.
So, how can you unlock the full potential of this advanced tool?
In this article, I’ll be providing practical tips and insights on:
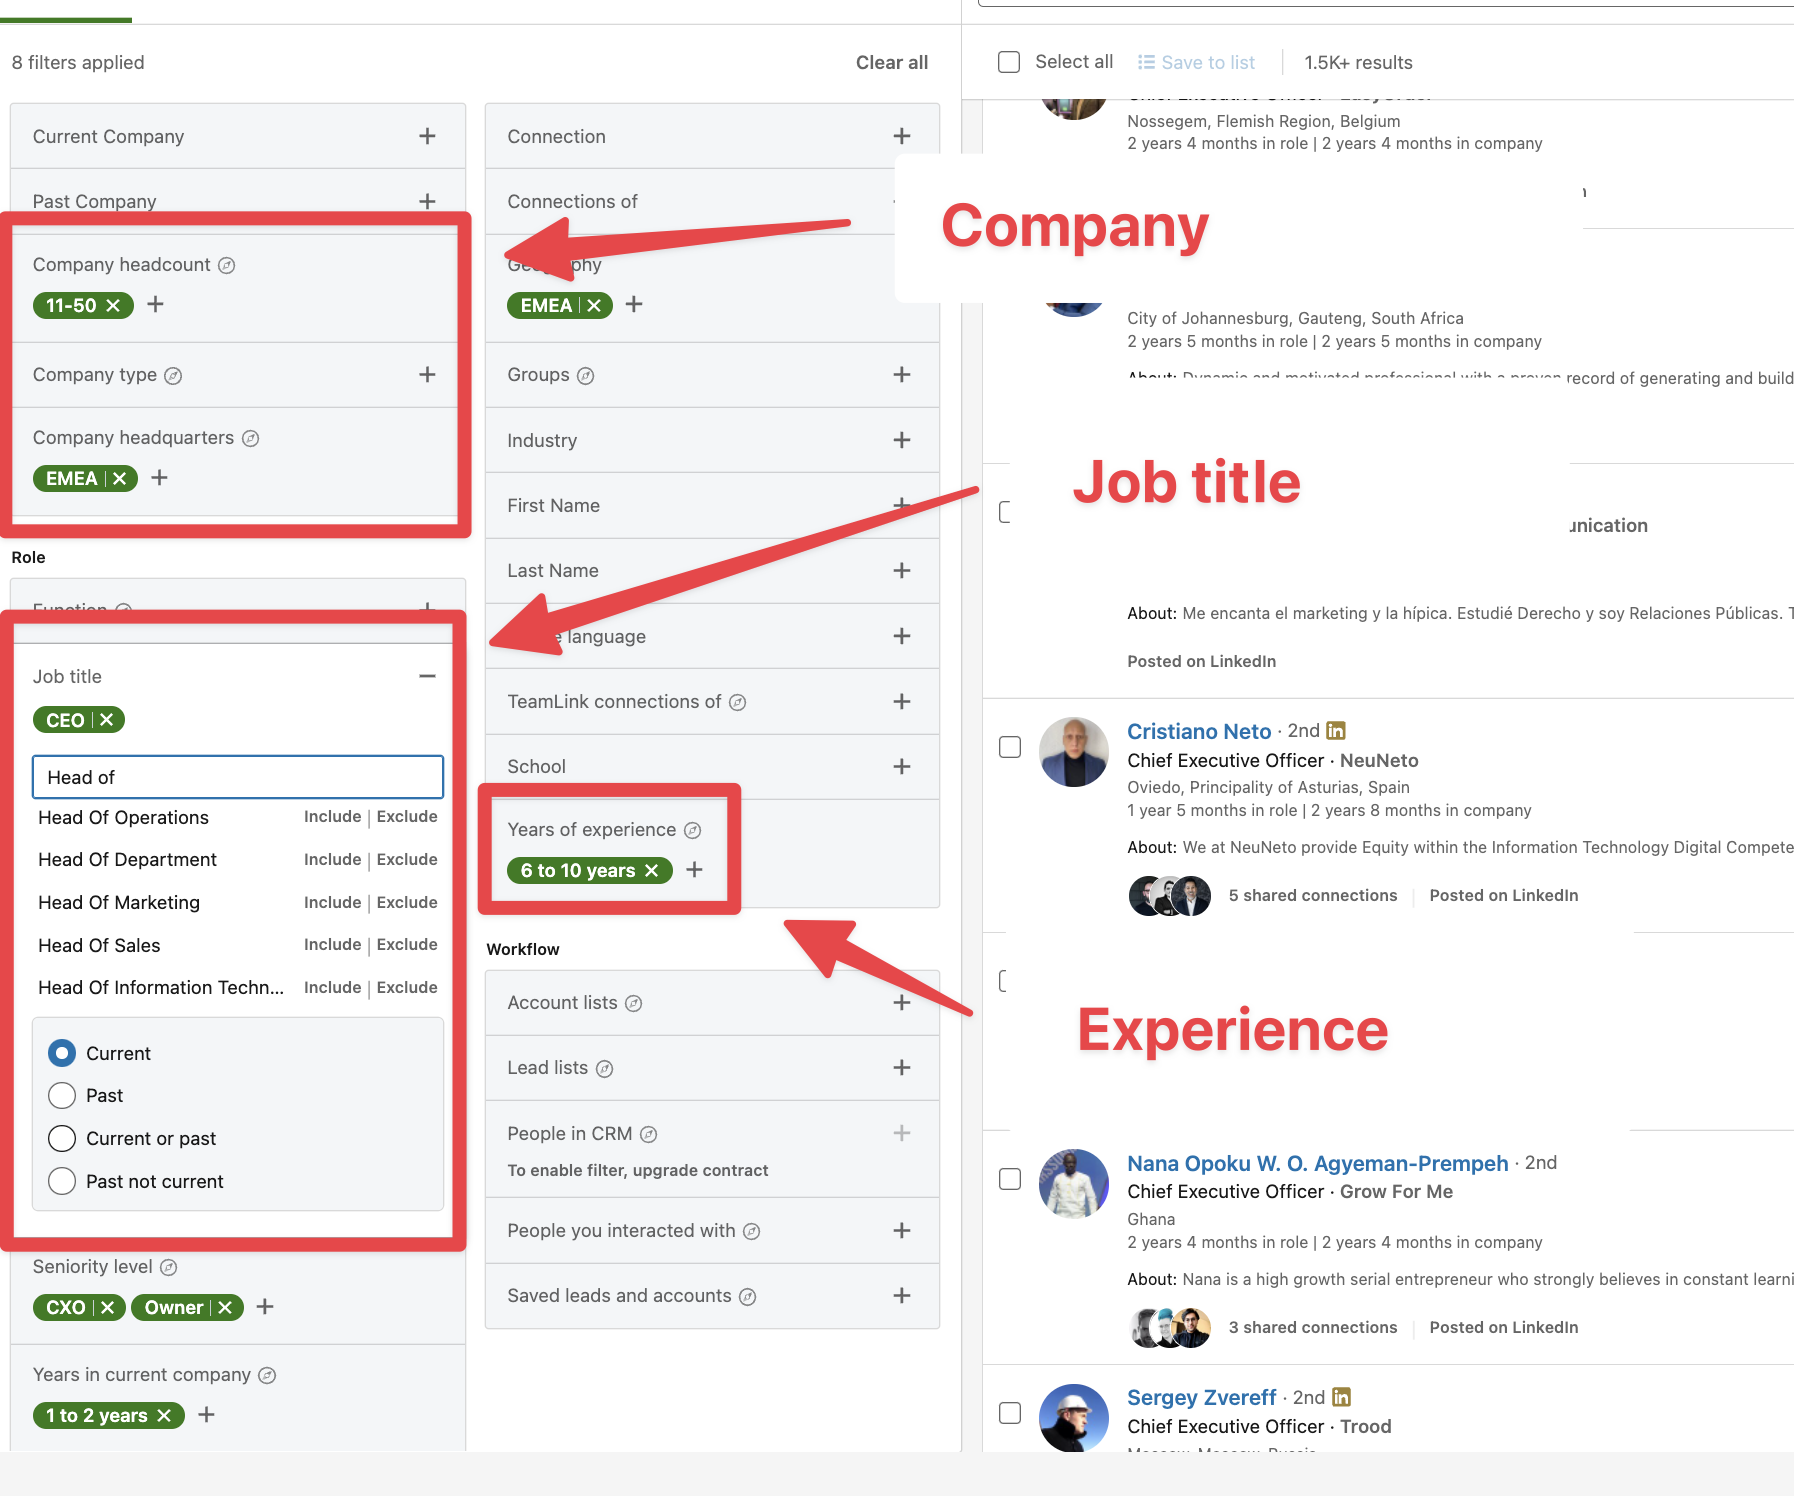
This in-depth guide will help you navigate LinkedIn Sales Navigator like a pro and find the best LinkedIn Plan to transform your lead generation process and boost your sales performance.
Ready to get your LinkedIn game to the next level?
Let’s roll into it.
LinkedIn Sales Navigator allows sales experts to nurture relationships and drive sales.
Several benefits make it a must-have tool for sales professionals:
![How To Use LinkedIn Sales Navigator To Generate Leads? [2026 Tutorial] 1 linkedin sales navigator data example](https://evaboot.com/wp-content/uploads/2024/05/CleanShot-at-@-x-108-1024x649.png)
Sales Navigator collects all the key prospect information that sales professionals need and continually updates this data.
Later, we’ll see how to scrape that data and use it to generate leads.
Here are 9 ways you can use Sales Navigator for lead generation:
Sales Navigator is a LinkedIn Premium product that gives sales professionals access to advanced search features with more than 30 search criteria to find their target audience.
Unlike the basic LinkedIn search, there is no limitation on the number of searches for Sales Navigator users.
With a Sales Navigator account, you can do as many searches as you want.
Filters are divided into several categories:
The recent updates filter is interesting as it includes dynamic filters that detect job changes, mentions in the news, and shared posts.
![How To Use LinkedIn Sales Navigator To Generate Leads? [2026 Tutorial] 2 how to use linkedin sales navigator search filters](https://evaboot.com/wp-content/uploads/2024/05/CleanShot-at-@-x-109.png)
They are the best filters for finding leads on LinkedIn because they provide good icebreakers for your messages.
You can mention:
All this data is useful for writing personalized sales messages for your prospects.
Another interesting filter is “Posted Content”.
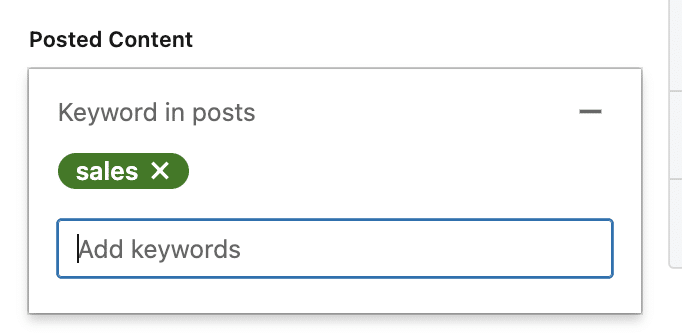
This will give all LinkedIn profiles that have posted or commented on a post containing a specific keyword.
You can see the post by clicking “Posted on LinkedIn” below the About section.

If someone is creating or engaging with content related to your niche, it will likely be a good prospect.
Knowing how the Sales Navigator search filters work was the first step.
Now, let’s go more into advanced techniques.
Sales Navigator Boolean search is a simple programmatic language that makes your searches more precise.
It works with combinations of logical connectors and punctuation:
Here’s a video that guides you through it.
Boolean can be used in 2 places: the keyword and the job title search bar.
![How To Use LinkedIn Sales Navigator To Generate Leads? [2026 Tutorial] 3 where to use linkedin sales navigator boolean search](https://evaboot.com/wp-content/uploads/2022/05/where-to-use-boolean-search-linkedin-sales-navigator-1024x658.png)
The global keyword search will look for the keyword in the whole profile:
![How To Use LinkedIn Sales Navigator To Generate Leads? [2026 Tutorial] 4 present job experience tag](https://evaboot.com/wp-content/uploads/2022/05/present-experience-tag-1024x521.png)
The job title filter will only look for your keywords into the current job experiences of your prospects.
Now, let’s see how to use each Boolean operator.
![How To Use LinkedIn Sales Navigator To Generate Leads? [2026 Tutorial] 5 5 boolean operators on linkedin sales navigator](https://evaboot.com/wp-content/uploads/2024/05/image-19.png)
There are 5 Boolean operators you should know about:
Here’s a simple template you can follow for your Boolean searches:
(Seniority Keywords) AND (Function Keywords) NOT (Blacklist) Let’s say I am looking for decision-makers in Sales and Marketing.
I can add all the seniority-related keywords in the parentheses:
(VP OR "Vice-President" OR "V.P" OR "Vice President" OR Head OR Manager OR Chief) Then, all the field related keywords in the second parenthesis
(Sales OR Marketing)And then all my blacklist in the last parenthesis
(Assistant OR "Right Arm" OR Founder OR "Co-Founder" OR Cofounder)Then, put all together into the same Boolean query
(VP OR "Vice-President" OR "V.P" OR "Vice President" OR Head OR Manager OR Chief) AND (Sales OR Marketing) NOT (Assistant OR "Right Arm" OR Founder OR "Co-Founder" OR Cofounder)This expression will look for a lot of job titles:
![How To Use LinkedIn Sales Navigator To Generate Leads? [2026 Tutorial] 6 linkedin sales navigator boolean search](https://evaboot.com/wp-content/uploads/2023/07/linkedin-sales-navigator-boolean-search-1024x426.png)
This template is super convenient to stay organized as your Boolean query gets bigger and bigger.
Want to skip the manual work?
Try our LinkedIn Boolean Search Generator to create perfectly structured queries in seconds with AI.
![How To Use LinkedIn Sales Navigator To Generate Leads? [2026 Tutorial] 7 linkedin boolean search generator](https://evaboot.com/wp-content/uploads/2025/02/CleanShot-at--1024x665.png)
Simply type a prompt describing your target audience, and select whether you want a Lead Search or an Account Search.
Once your search results are ready, you might want to handpick some leads to save them into a list.
Here’s how to create a lead list on Sales Navigator:
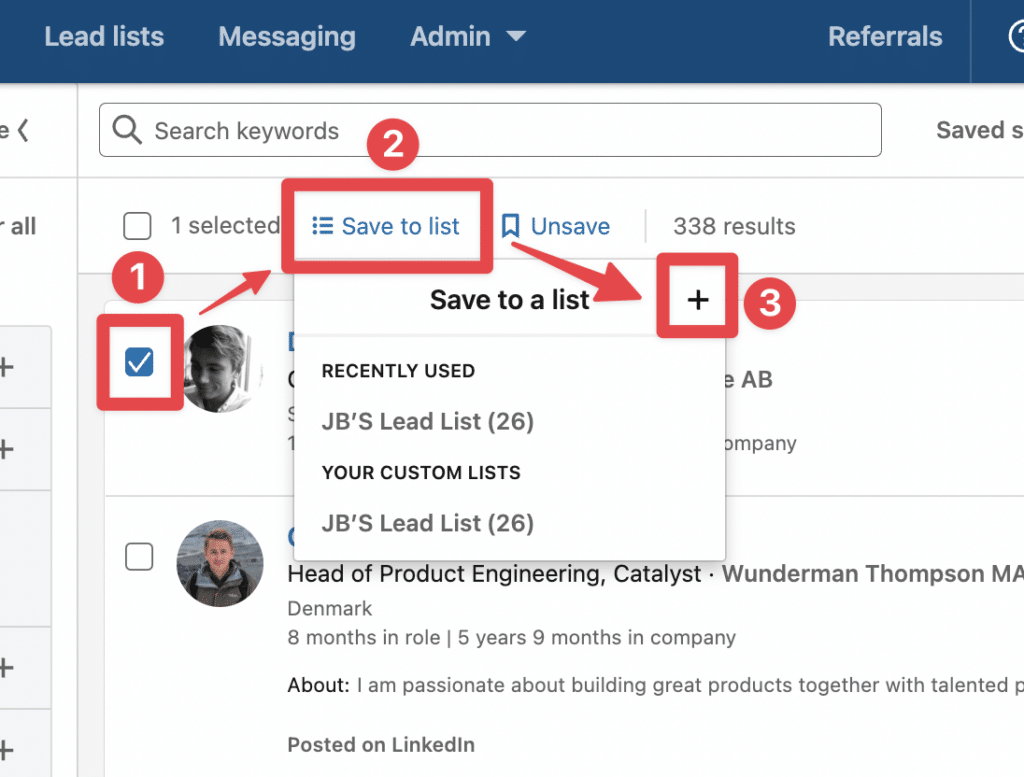
Once your leads are saved into a list, you can access them through the “Lead List” tab.
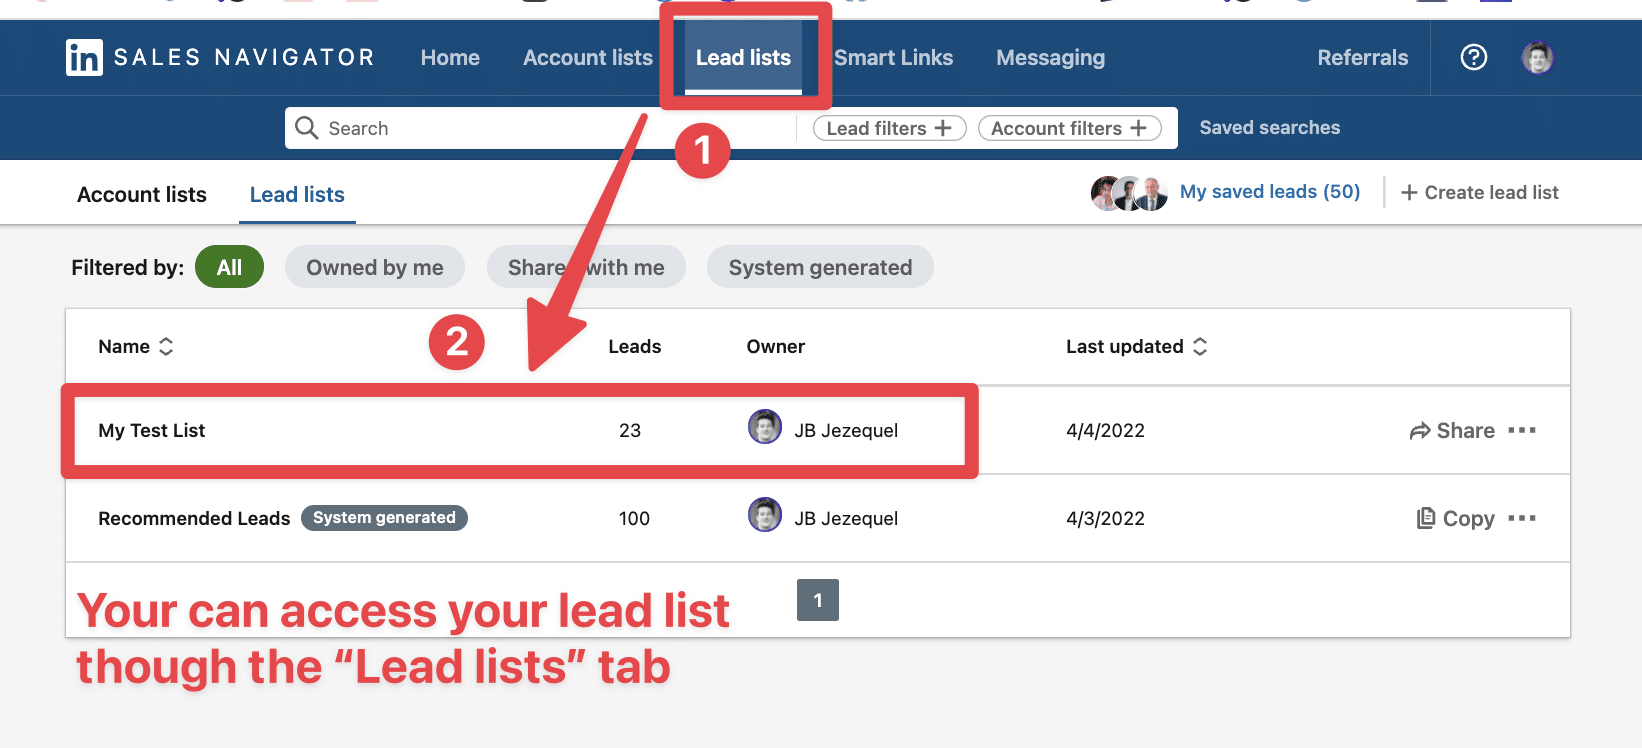
Once your leads are added to a list, you can send connection requests and InMails directly from the interface.
![How To Use LinkedIn Sales Navigator To Generate Leads? [2026 Tutorial] 8 send inmails and connection request from sales navigator](https://evaboot.com/wp-content/uploads/2022/08/send-inmails-and-connection-request-from-sales-navigator-1024x721.png)
LinkedIn InMails are premium messages that allow you to skip the connection request.
That way, you and your messages can land in the inbox, even if you’re not part of their LinkedIn connection yet.
Monthly you get 50 Sales Navigator InMail credits , so you use them carefully.
Send a connection request first, and use InMail messages as a last resort if your connection request is not accepted.
The lead list feature allows you to take notes on your leads and keep track of the InMails sent to them.
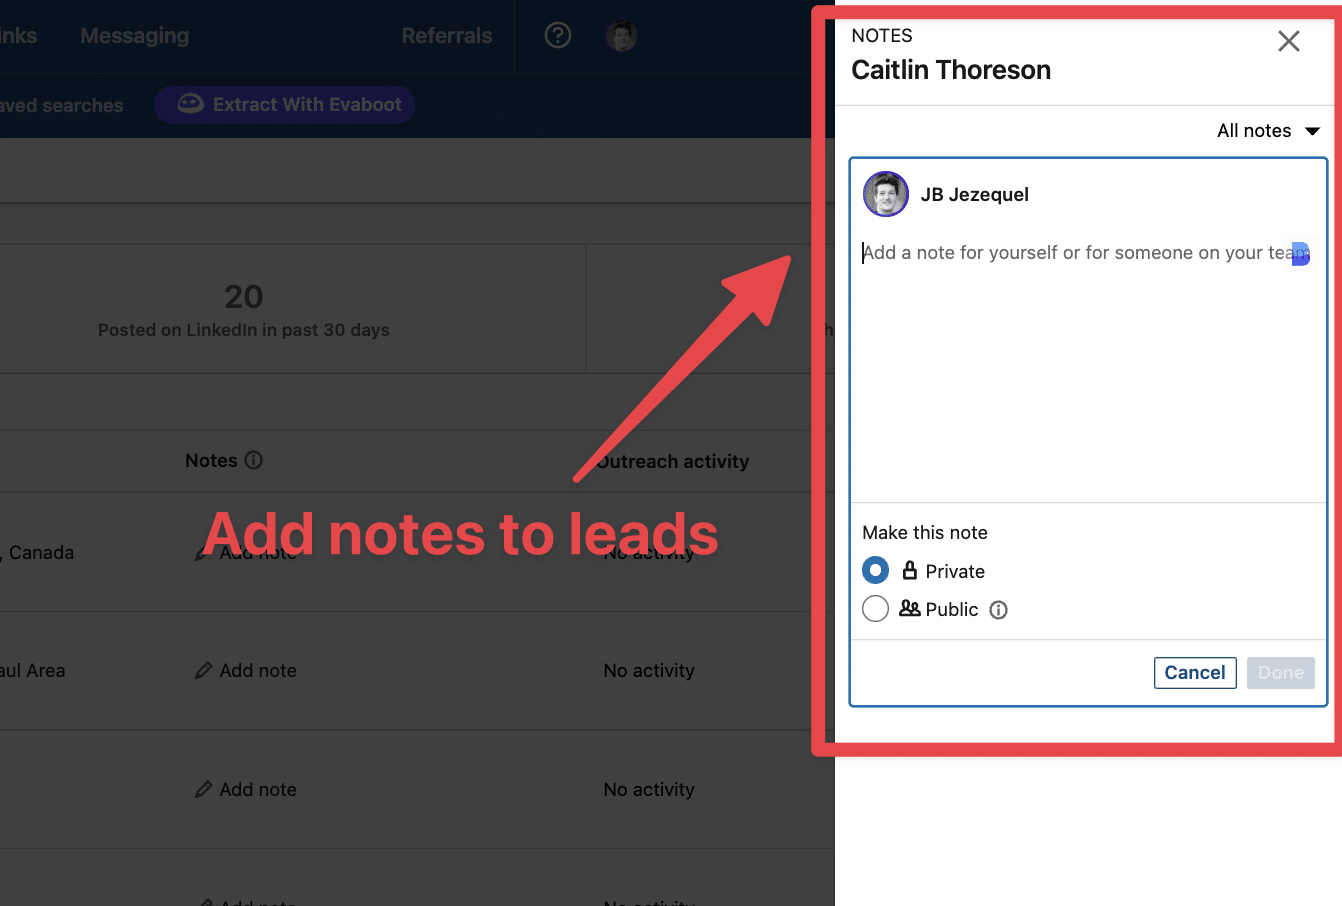
Wondering where Sales Navigator messages go? Here’s how it works:
This dual-inbox setup can be confusing, but once you understand it, it’s easy to manage your outreach workflows effectively.
In fact, if most of your leads are on LinkedIn, your sales team can use the Sales Navigator interface as your outreach CRM.
To get the most out of InMails, check our guide LinkedIn InMail best practices.
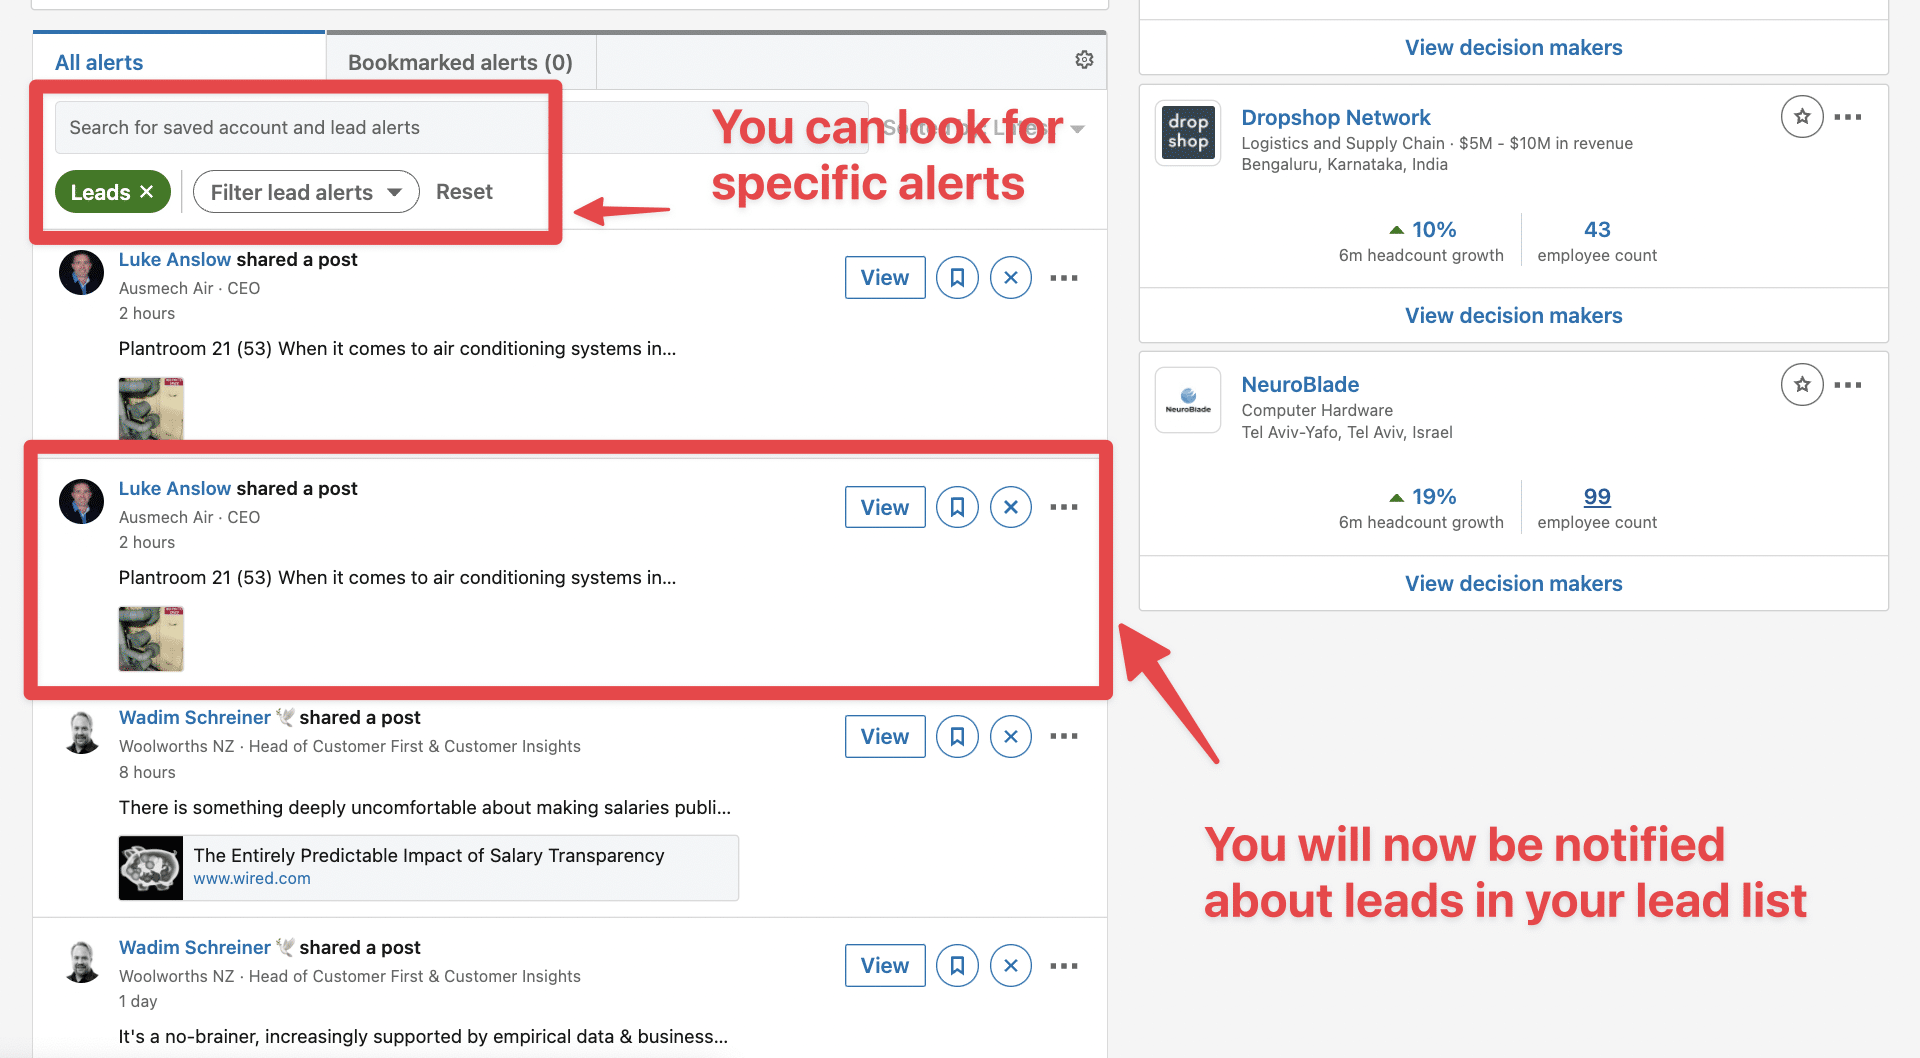
Once you add a lead to a list, Sales Navigator alerts will track their activity on LinkedIn and send you updates like:
This social selling feature is really valuable for sending personalized follow-up messages.
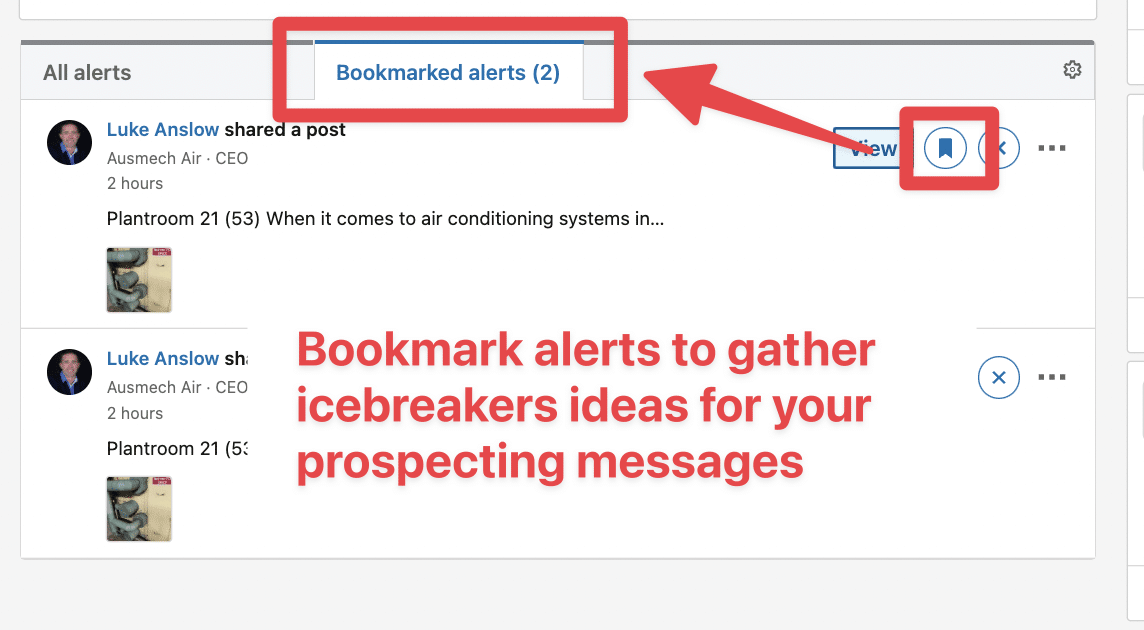
You can bookmark alerts to save them for later.
If you click View, the LinkedIn post will open on the left, and you can like and comment directly from LinkedIn Sales Navigator.
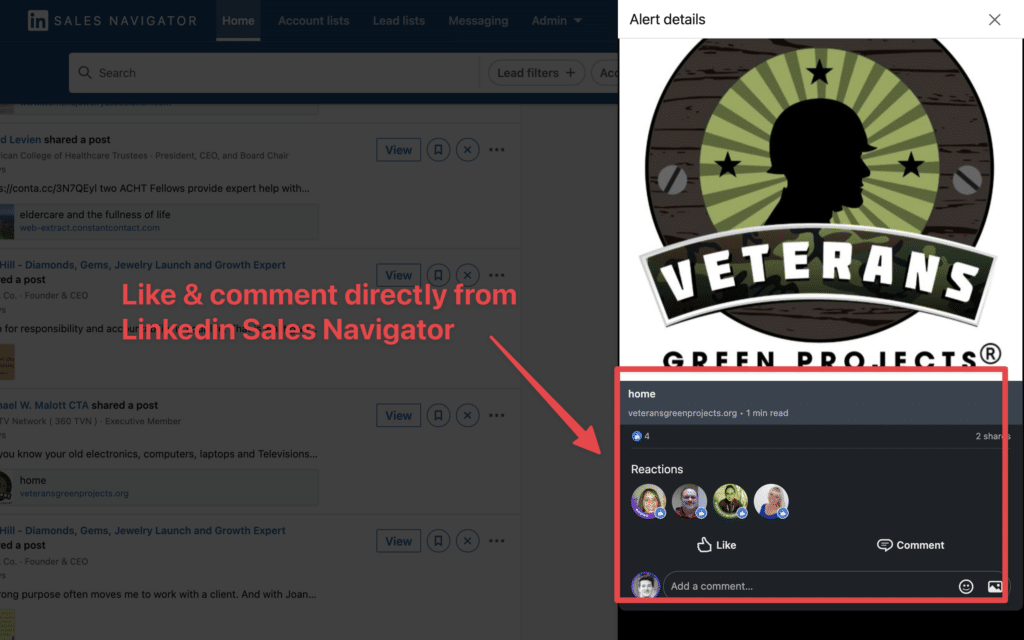
This is convenient for B2B sales if you want to break the ice or follow up with your prospect by commenting on the content they publish.
Do you use Salesforce, HubSpot, or Pipedrive and want to convert your lead list into a CSV file to upload to your CRM?
Sales Navigator is a great tool, but it doesn’t allow you to export leads to CSV files and find their emails.
For that, you will need to use a Chrome extension like Evaboot. Here’s how it works:
Evaboot is highly recommended by the Reddit community to export lead lists from Sales Navigator:
When you search on the platform, you can see a maximum of:
But sometimes, your search has more than 2.5K leads or 1K accounts.
![How To Use LinkedIn Sales Navigator To Generate Leads? [2026 Tutorial] 9 search results limitation on sales navigator](https://evaboot.com/wp-content/uploads/2022/04/CleanShot-2022-04-06-at-15.33.17@2x.png)
If you want to export more than 2500 leads from a Sales Navigator search, you need to split your search into several chunks.
Here’s a video tutorial that explains the process:
Using Evaboot is an easy way to build email lists from Sales Navigator.
If you also want to get phone numbers from Sales Navigator, you can combine Evaboot and Datagma.
Another benefit of Evaboot is that the tool automatically converts Sales Navigator URLs into LinkedIn URLs.
Evaboot will also:
Combining Sales Navigator’s advanced search filters and Evaboot is a great combo to start getting results with LinkedIn prospecting.
Ok, so you made your first searches and extracted the results…
Great.
But what happens after that?
People will change jobs and accounts will grow.
The LinkedIn database is alive. All you need to do is follow up on your searches.
And LinkedIn built a tool for that: Saved Searches.
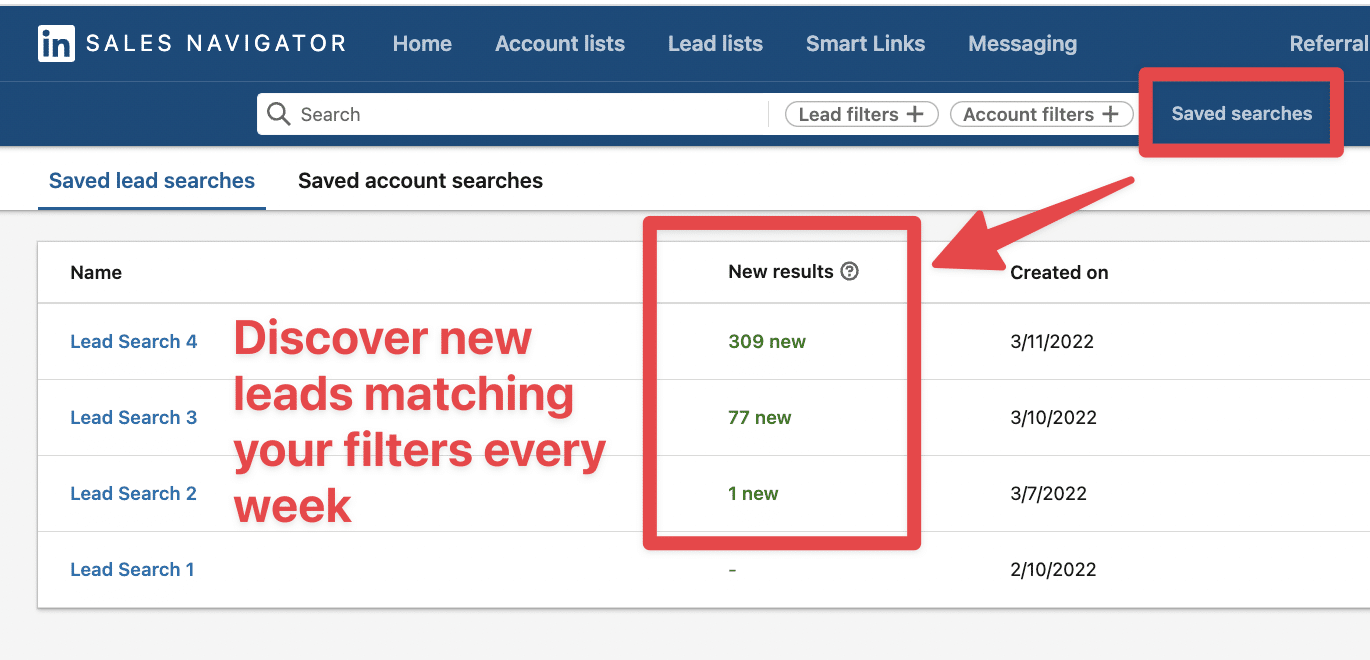
The Save Search feature allows you to get notified when new people match your search results.
It’s one of best lead search automation tools.
It’s a great way to identify new ideal customers, get lead recommendations from Sales Navigator, and reach out to people as soon as they get into their new position.
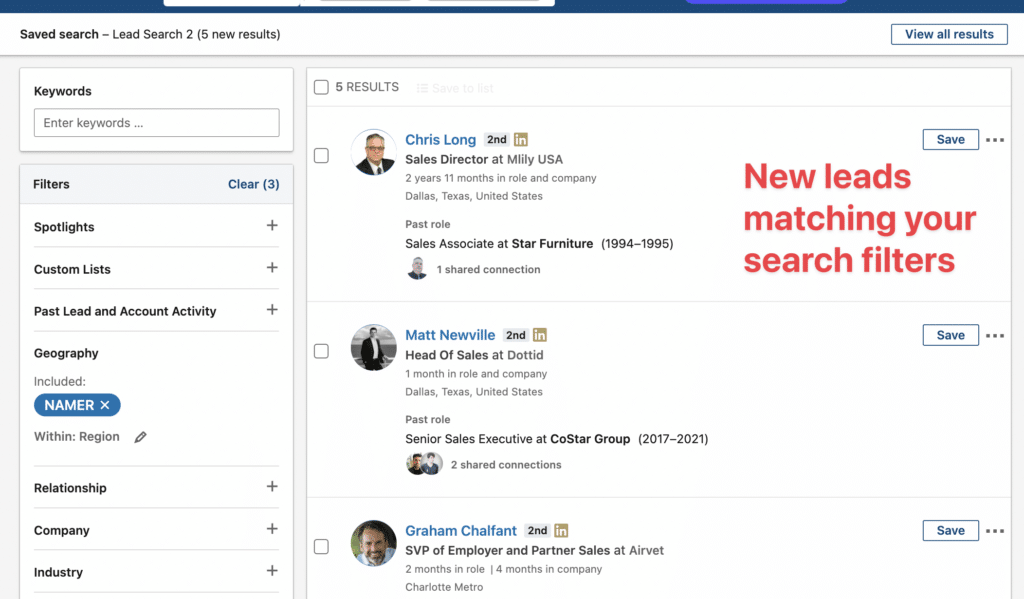
If you click on New, you will get access to the list of leads that recently matched your search filters.
To save a search, it’s really simple.
Just click “Save Search” on the top right of the search interface.
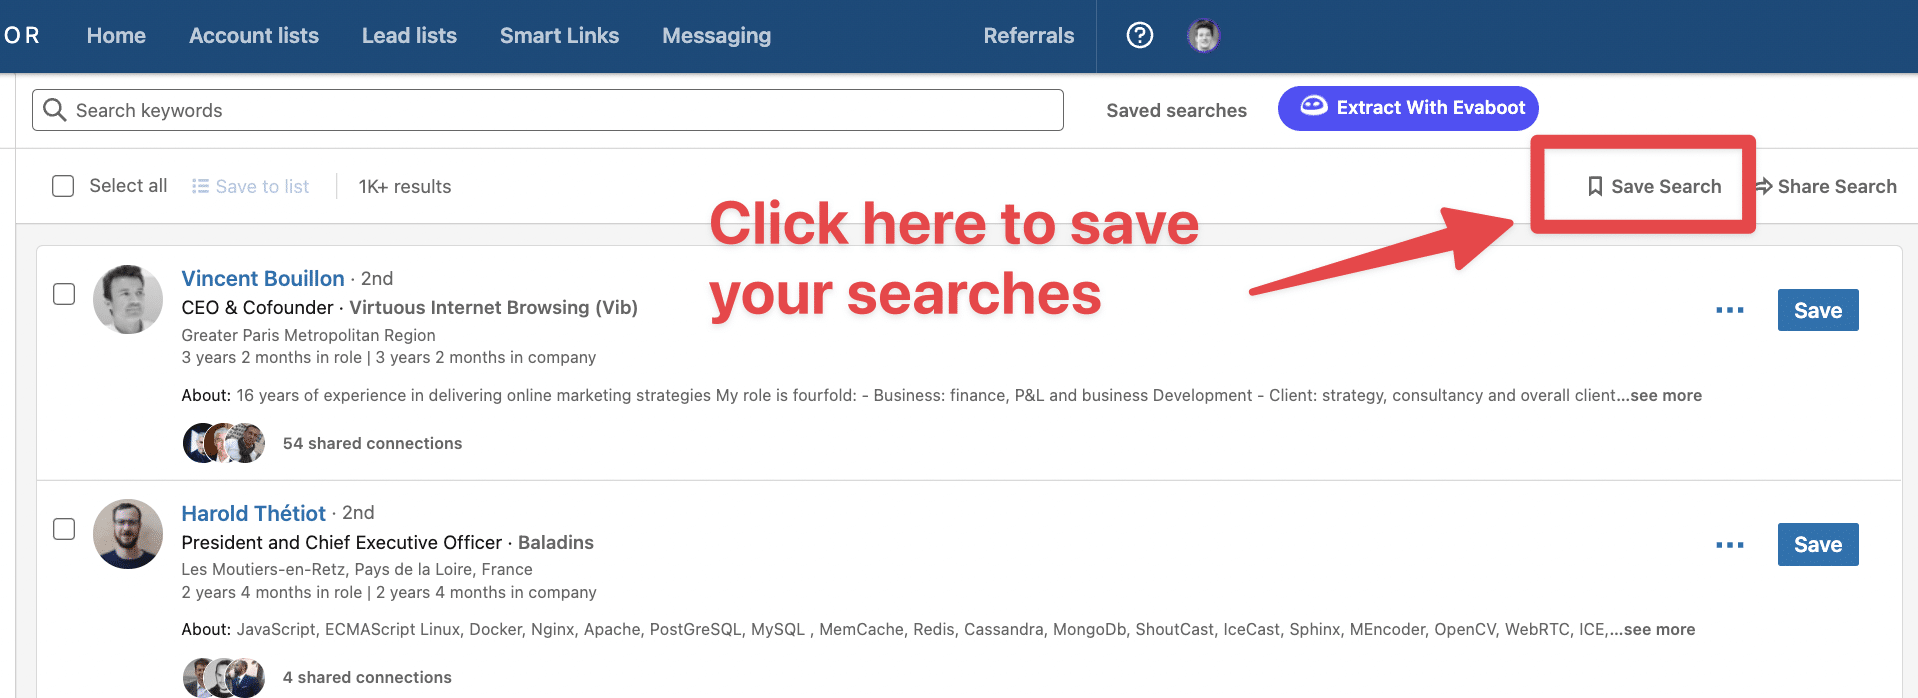
This feature is underestimated yet so useful for LinkedIn outreach.
You won’t need to look for new leads every week; they will come directly at you.
When prospecting, you want to avoid contacting your past or current clients and competitors.
To do that:
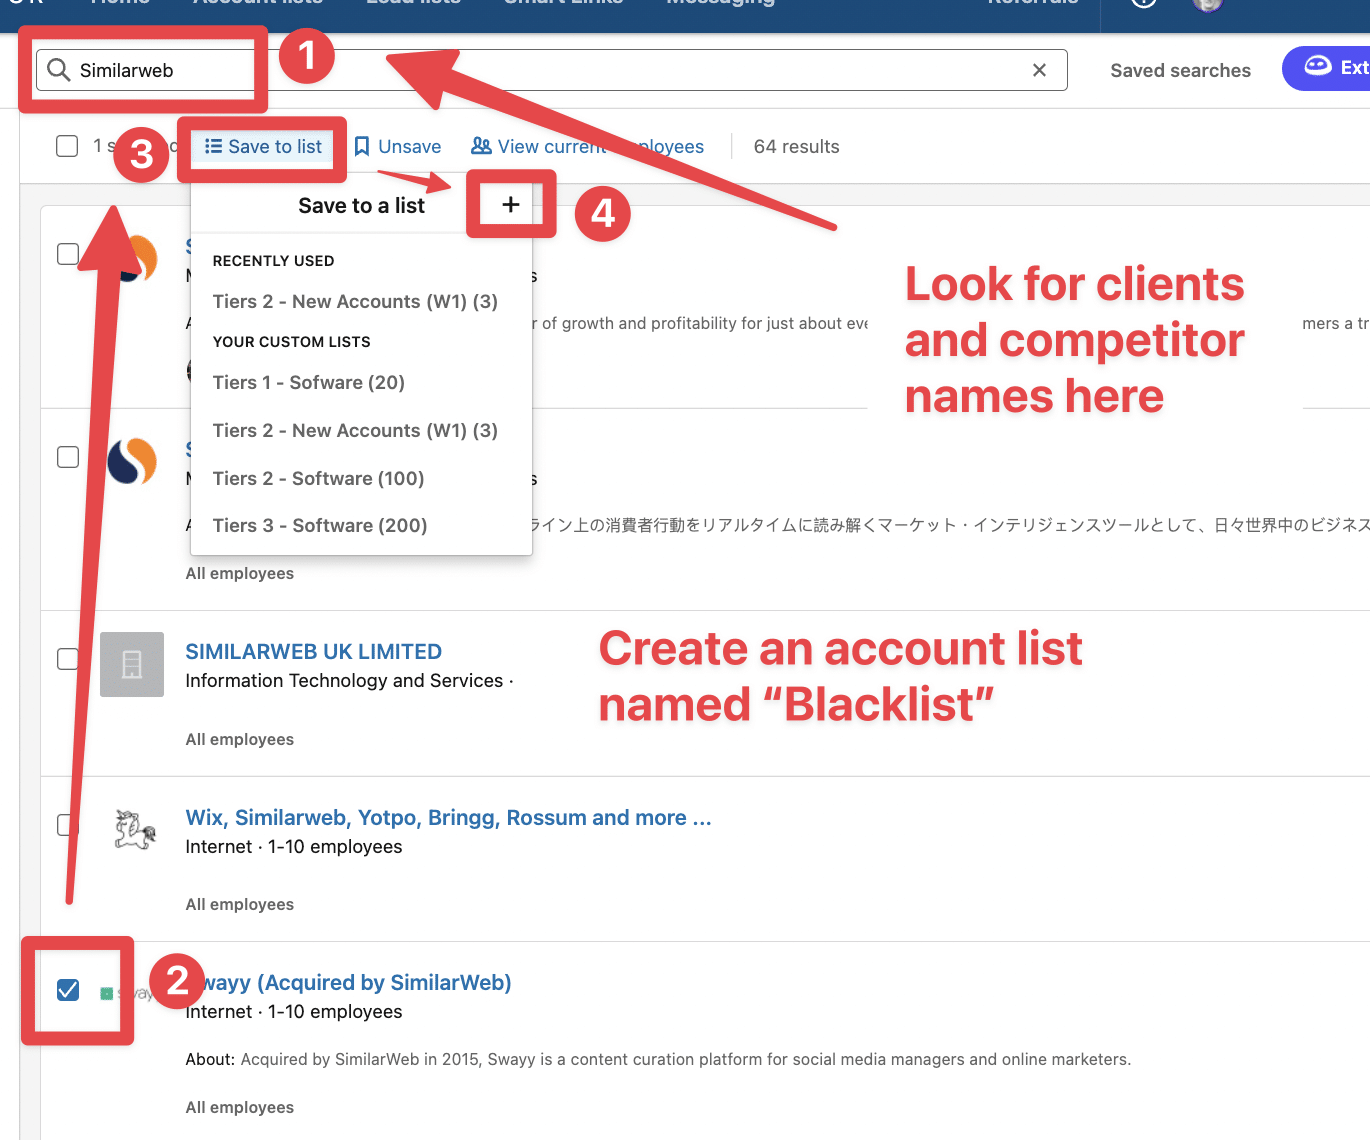
Then, when you’re on the lead search:
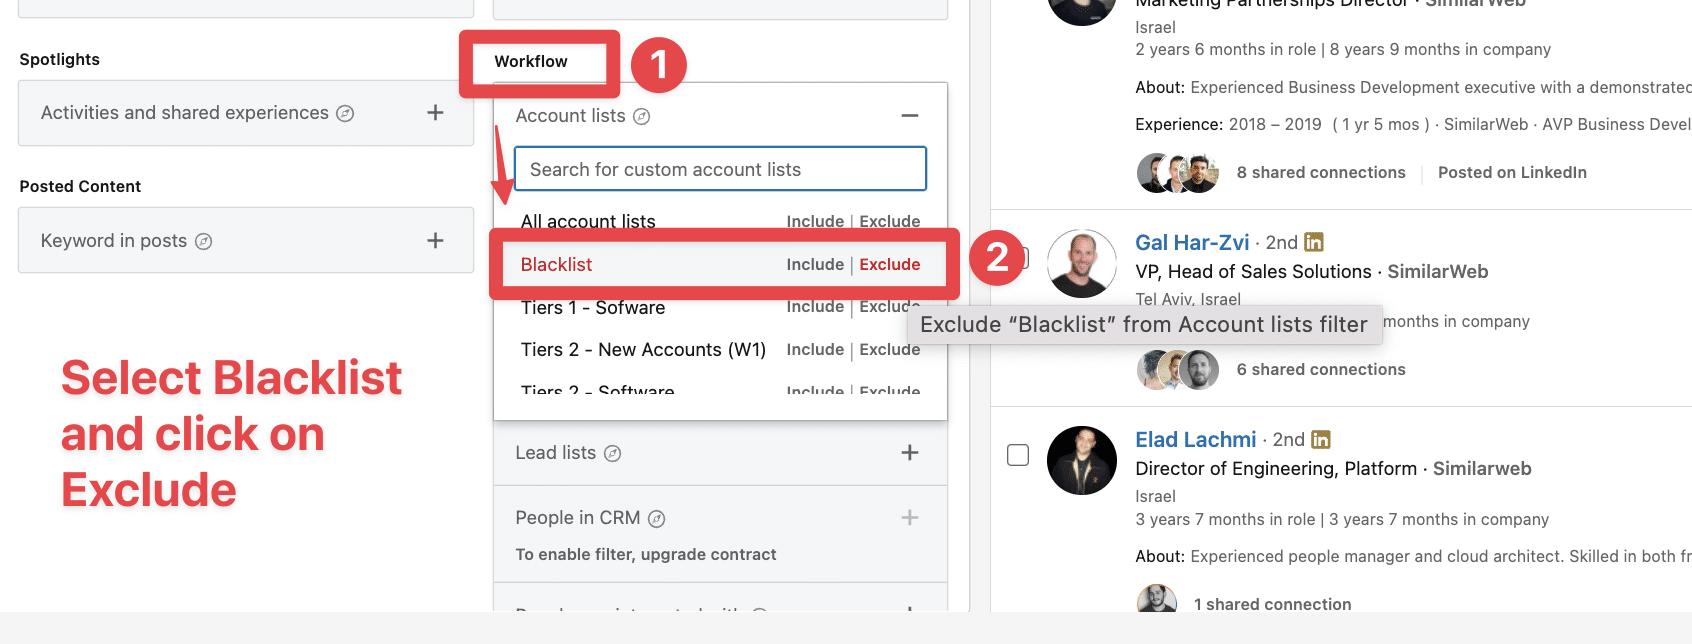
All those working in the companies on your account list will be excluded.
Sales Navigator comes with 50 InMail credits per month.
InMail is a message you can send to people you’re not connected with to skip the connection request step.
This amount is way too low if you want to prospect on LinkedIn at scale. So, in this video, you will find 3 tips for unlimited InMails on LinkedIn.
Ok.
So now, you know the basics.
But to really be among the top 1% of Sales Navigator users, you still need to learn a few things.
Especially on how the search engine works.
Sales Navigator has many benefits. It’s one of the best tools for prospecting on LinkedIn.
However, if you trust it blindly, you will contact people with nothing to do with your Persona.
We did a study on more than 100k searches. On average, 31% of your search results don’t match your filters.
Here’s a post I’ve seen on Reddit confirming the study:

The consequence is that many sales spend hours cleaning lists of prospects.
Still, LinkedIn is the best B2B database in the world.
So we have to deal with it.
Let’s see 5 best practices for using Sales Navigator search filters and how Evaboot can help you with that:
The LinkedIn Sales Navigator keyword search will look into the entire profile of your prospect.

So, if you type ” Marketing” in your search, you will get every person whose profile mentions “Marketing” at least once.
Here’s an example of a lead that came out on a “Marketing” keyword search:

You can see that using this filter can bring a lot of irrelevant leads to your search results, so you need to use it cautiously.
What Evaboot does to fix this
Our double check the profile to see if your keywords are presents in the current job description or job title of your prospects.
Using Evaboot, this profile above would have been automatically detected as an unqualified lead.
The most common error is to use the keyword filter to look for job titles.
Keep that for the title filter.
Here is an example.
I have compared the results of the same search using the keyword and title filters with Evaboot.
You can see that the error rate is higher with keyword searches.

If you are looking for job titles, you should always use the Title filter and forget about the keywords.
So, how do you use the keyword filter?
The best way to use it is to look for niche keywords that will not appear in the job title but in the job or company description.
Like offline marketing, for example.
Probably no one will mention this in their job title, but it can appear in a job description.

You may have unqualified leads even if you use the job title filter correctly.
This is because they don’t update their profile correctly.
Let me show you the problem.
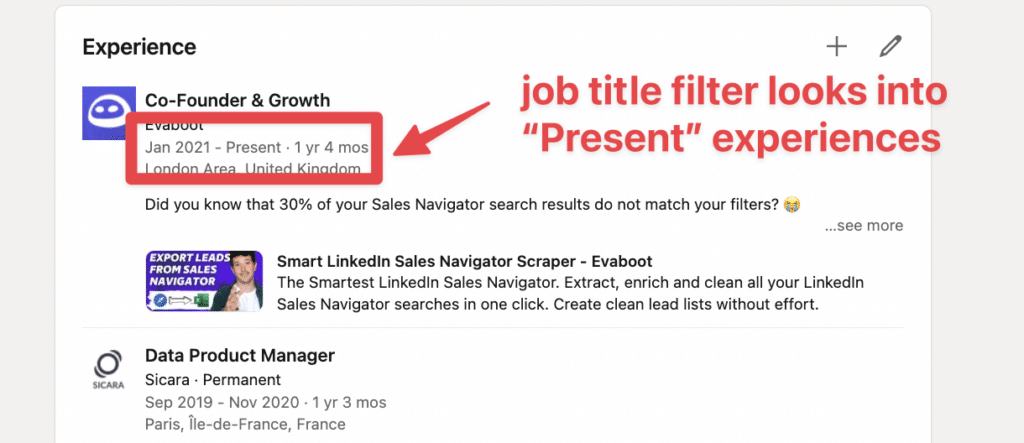
When you use the job title filter, LinkedIn will search within all the job experiences marked as Present.
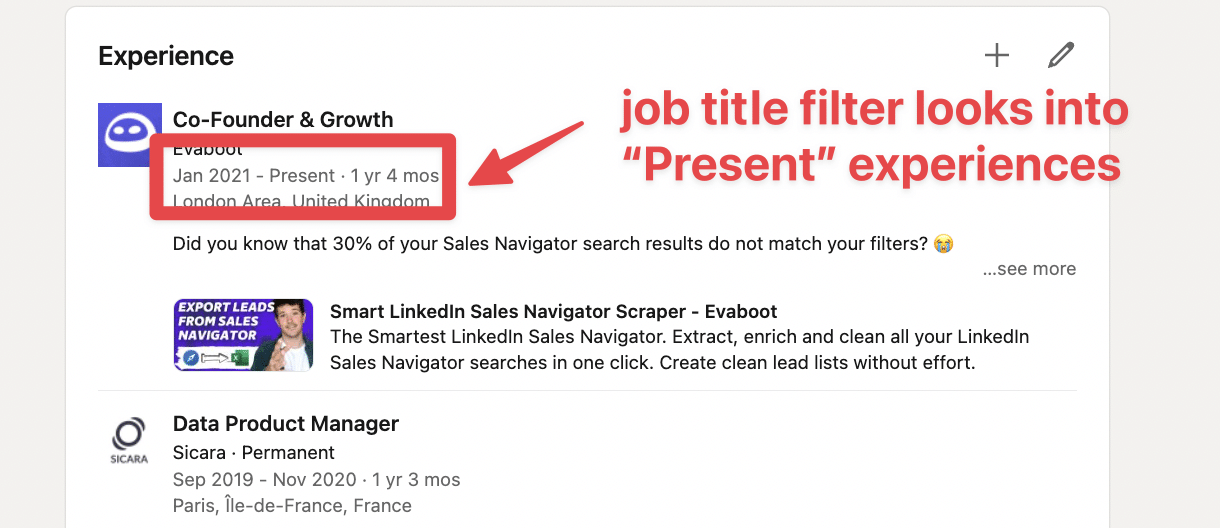
The thing is, many people forget to update their job position when they change jobs correctly.
They create a new experience but don’t close the previous one, which is still marked as present.
Ex: here’s a prospect in a search for the keyword CEO
What Evaboot does to fix this
We detect the real current experience of the people and check if this experience match the job titles you were looking for.
Many people think the industry filter on the lead search looks for their company’s industry.
But it’s looking for the industry of the profile.
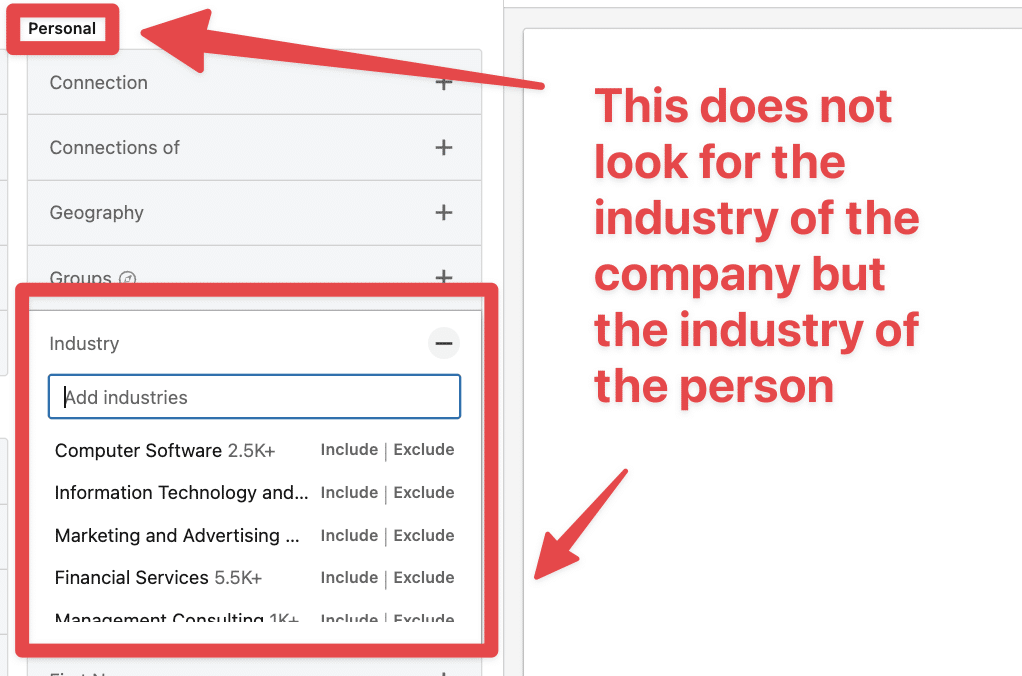
But what’s the industry of the profile?
This is the industry you can change here:
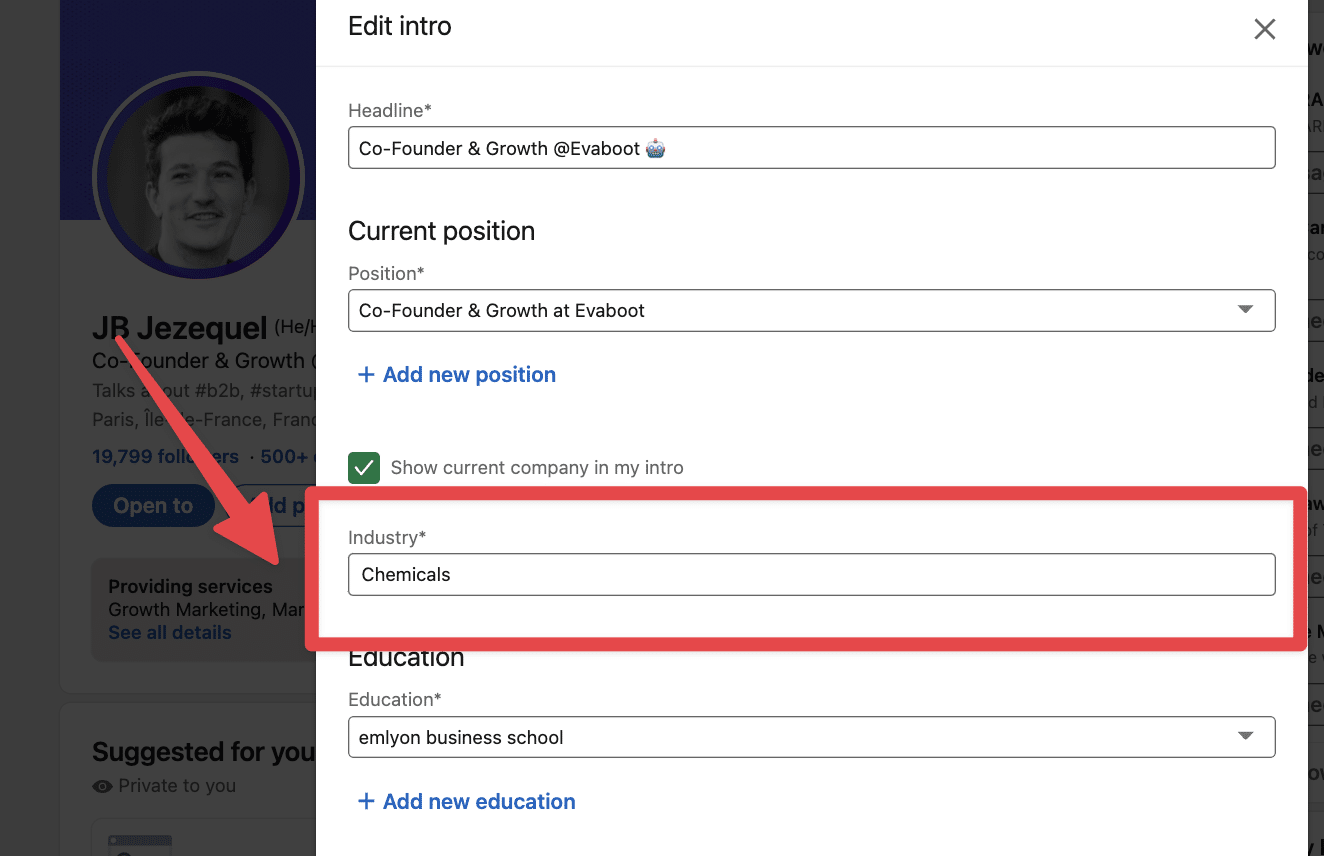
Most users consider this field as a Department and enter Sales if they work in Sales, even if they work in a Software company.
Ex: I have changed my industry from Computer Software to Chemicals, which is what happens.
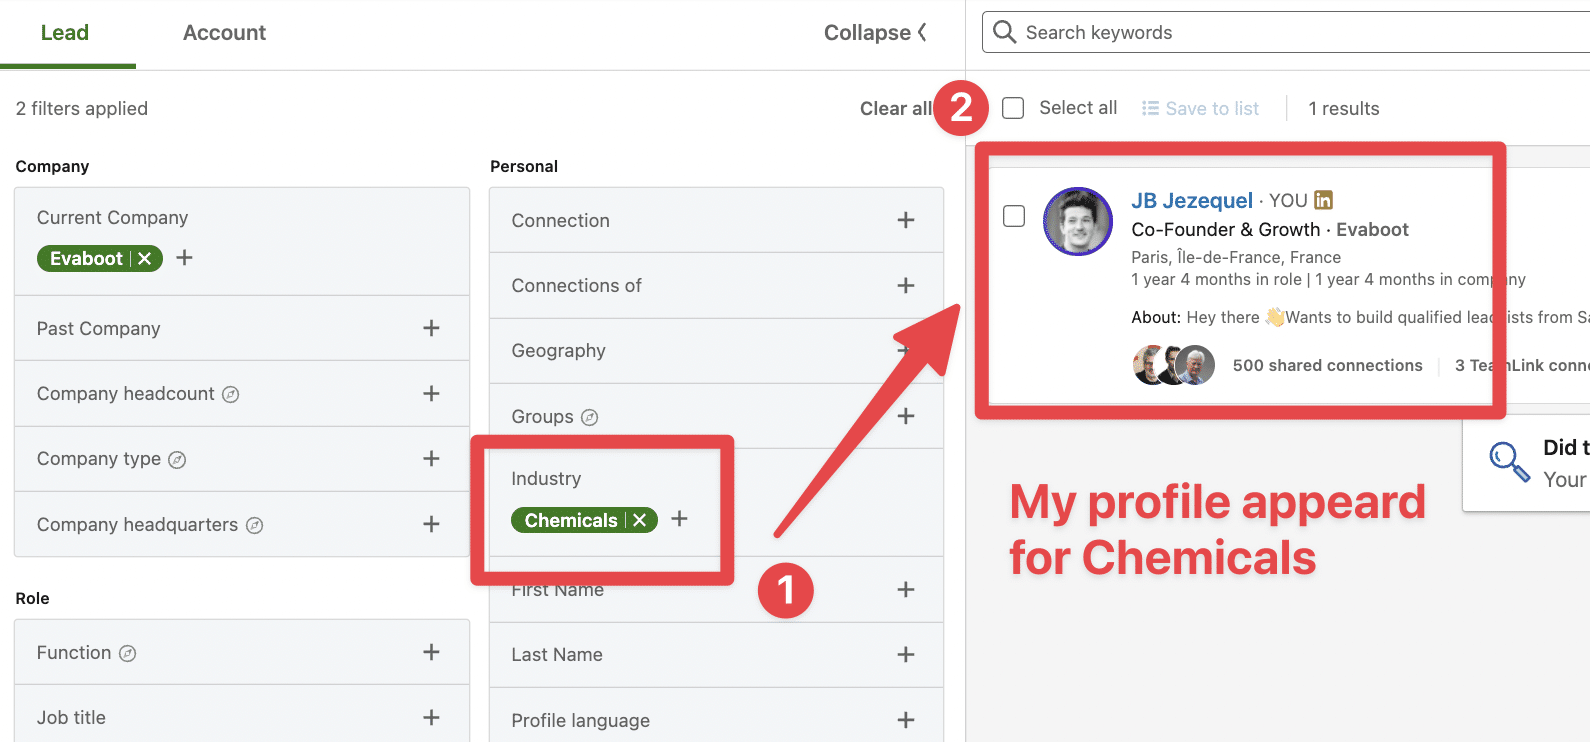
If you use this filter, your search will definitely contain garbage, but you can still use it with Evaboot if you want, as some people will correctly fill out their profile industry.
What Evaboot does to fix this
We extract the company industry on the prospect company page, and we check if it matches with the industry you selected on your lead search.
Basically, we correct this filter to make it search the right information.

When you use the Seniority level filter, LinkedIn tries to guess the seniority level with this information:
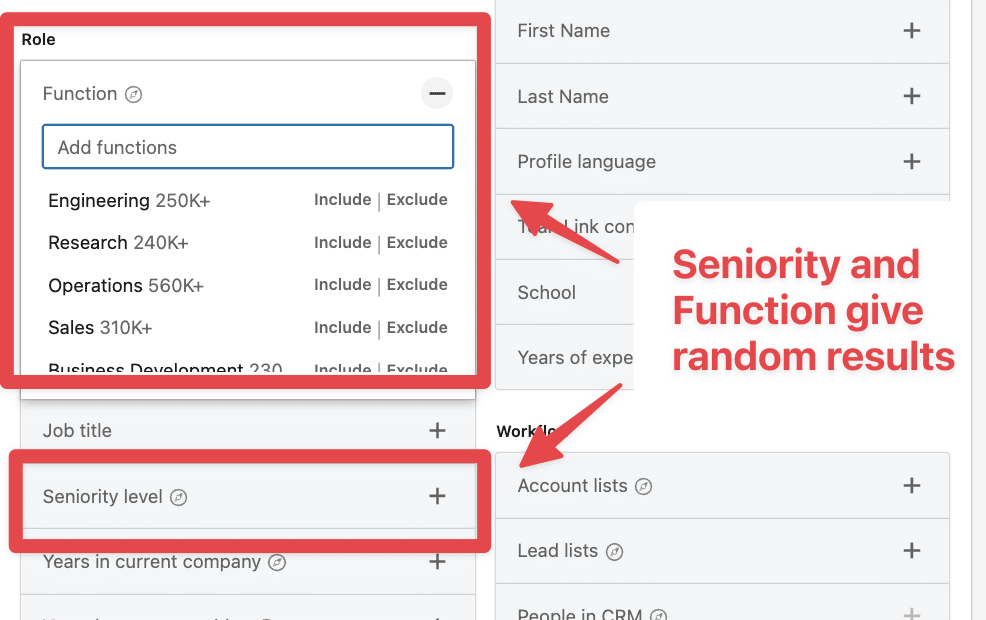
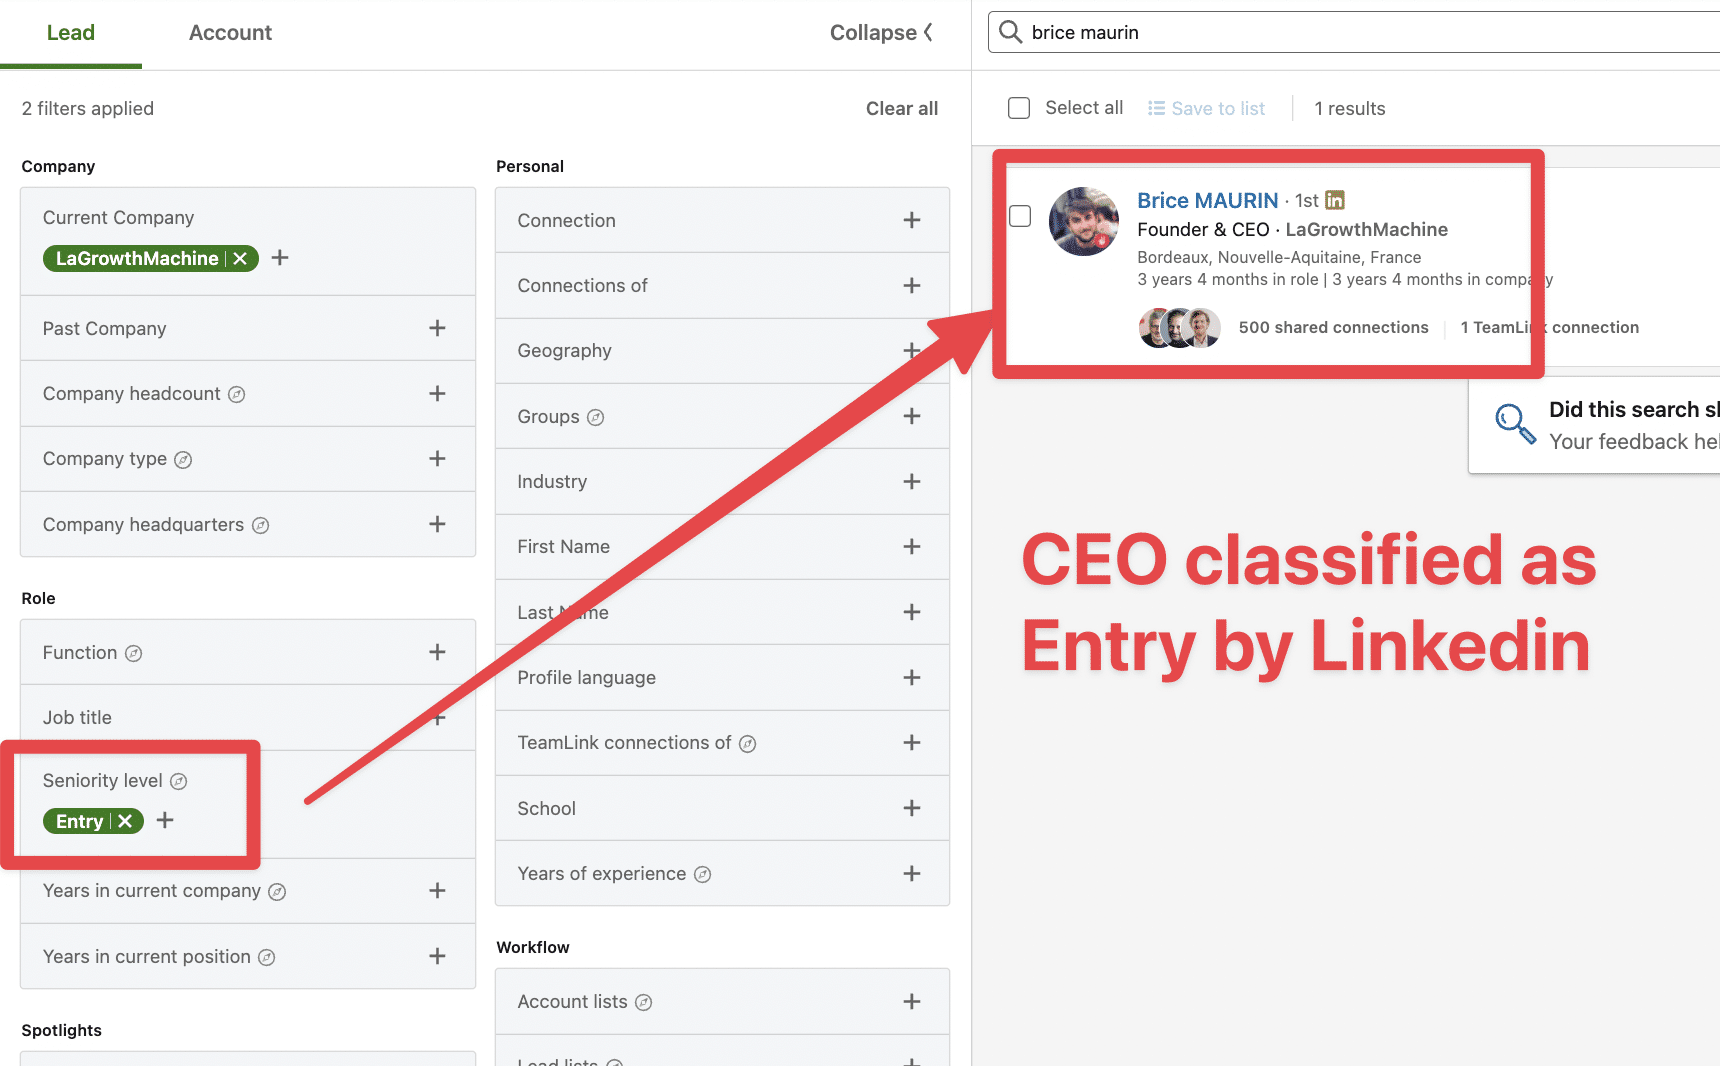
So if you’re a CEO, there is a high chance that LinkedIn classifies you as an Owner, for example.
They will also use the information given by users when they add their managers or add managers for other people.

This info is poorly informed, and the algorithm will give unpredictable results.
LinkedIn will create a Seniority Level for every current experience on your profile.
So, if you have 4 open experiences, you will have 4 different Seniority Levels attached to your profile.
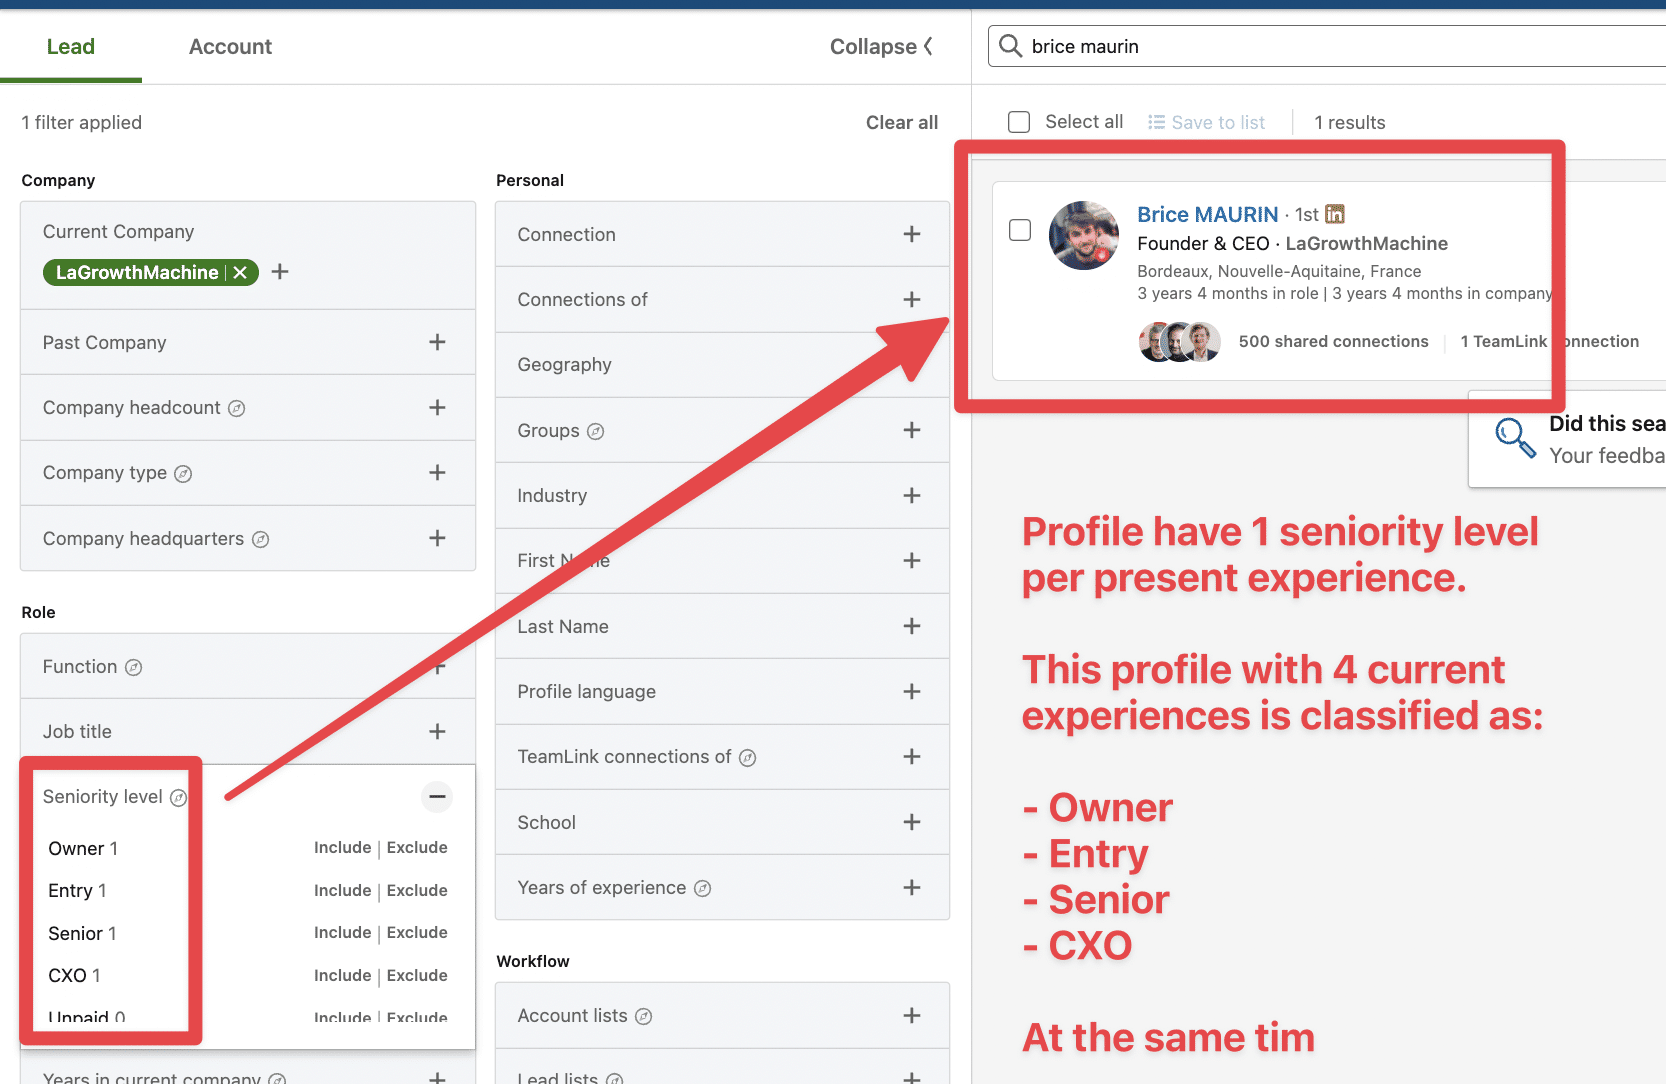
You can see in this example that a CEO can be considered an intern.
If you know exactly which job title you want to target, we advise not to use this filter.
After all, if you know the job titles you want to target, you don’t need this filter.
You should use it in only one case: discover new job titles.
For in this example where I tell LinkedIn: “Just give me decision-makers in Sales”
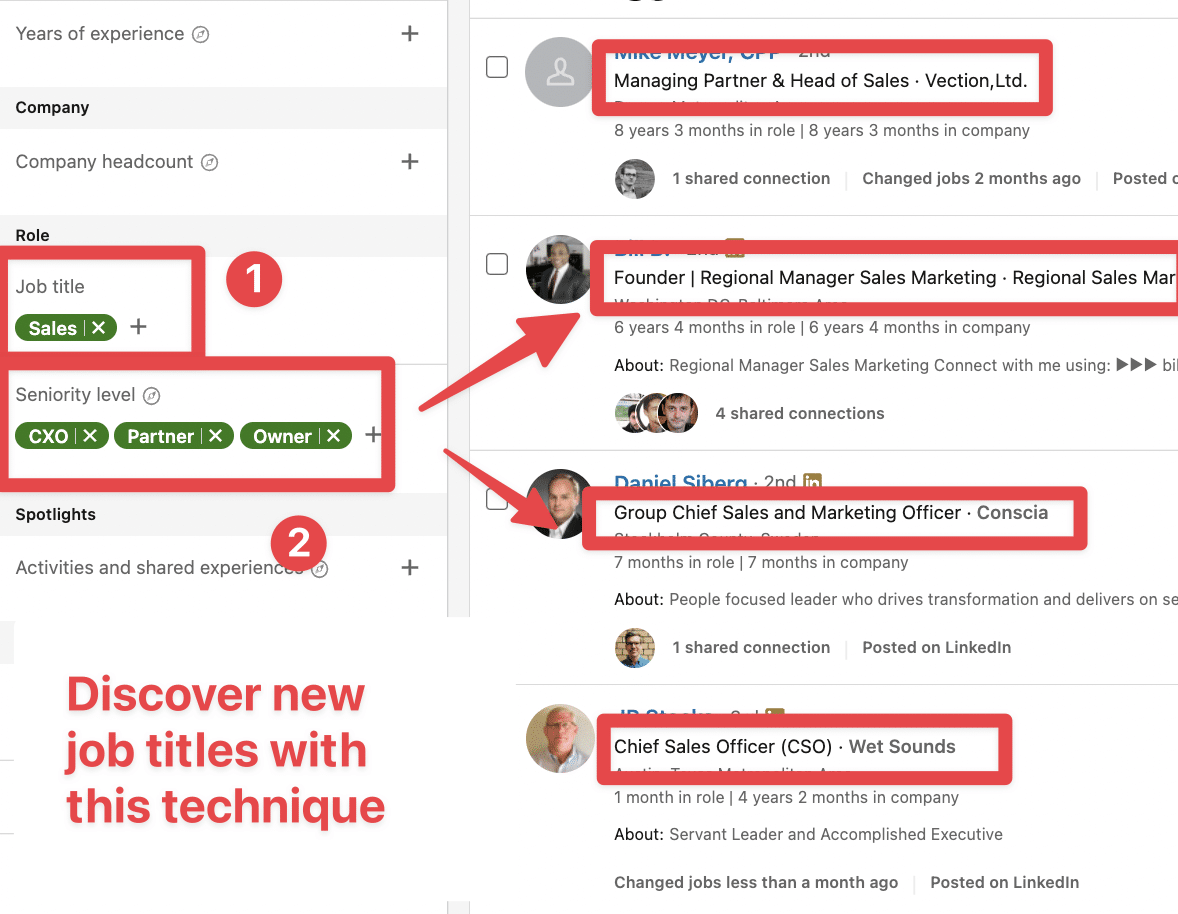
For this, I’ll enter “Sales” into the job title filter and add the highest seniority levels.
The function filter has the same problem as the seniority-level filter.
With it LinkedIn tries to guess your Function with your job title.
This, once again, is an unpredictable algorithmic decision.
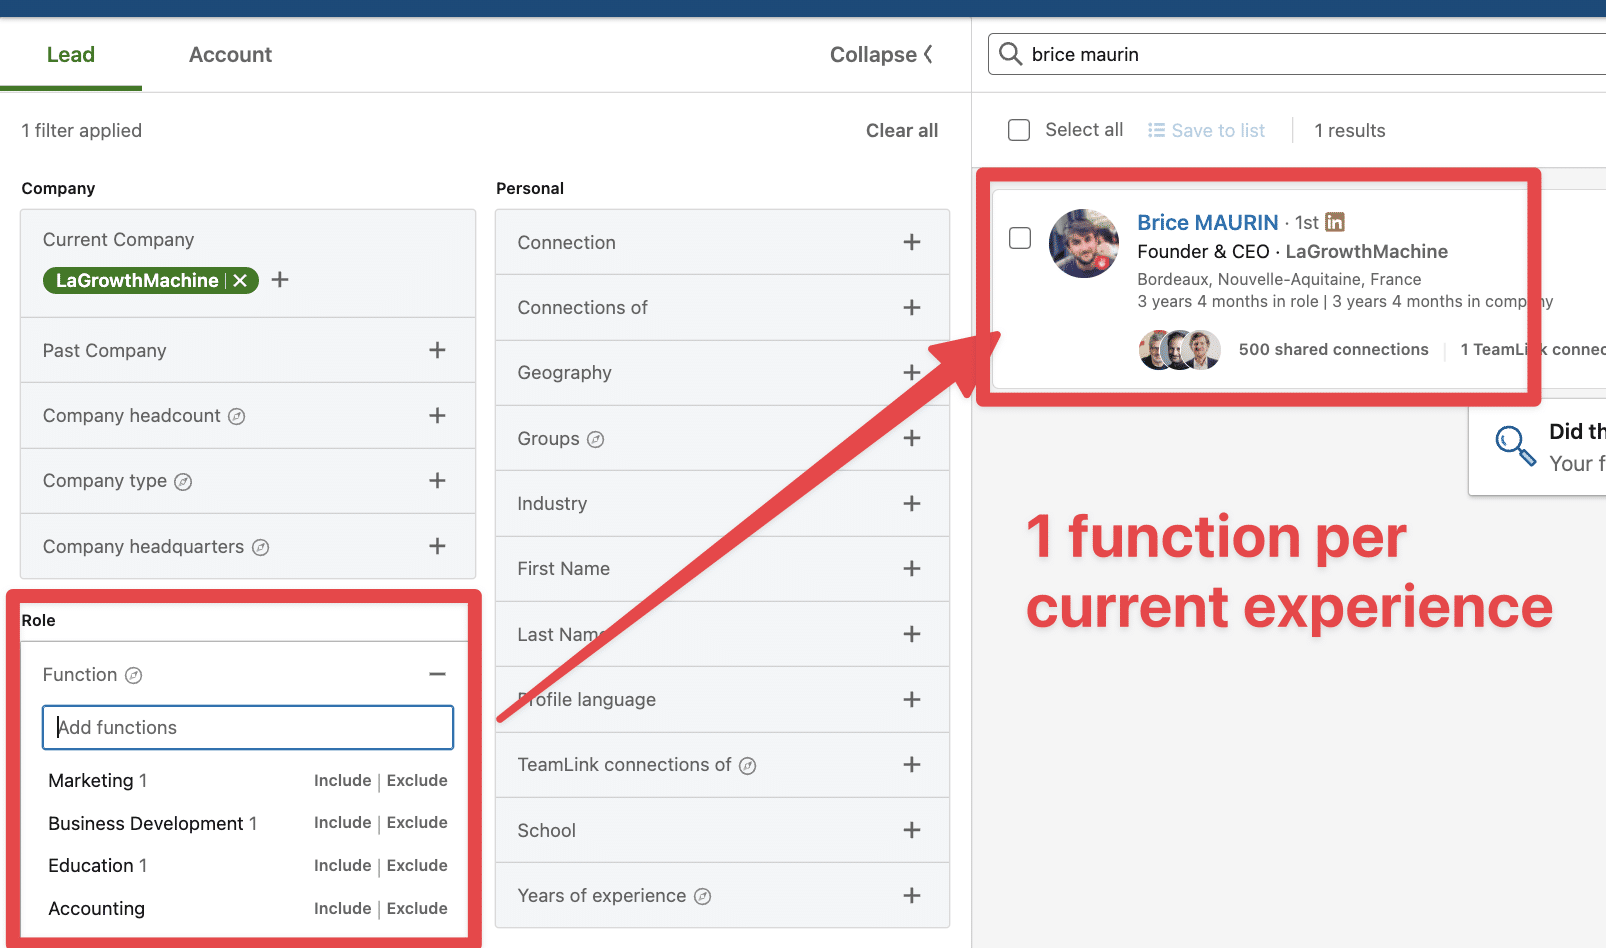
Like the Seniority Filter, LinkedIn will create one function for every current experience you have opened on your profile.
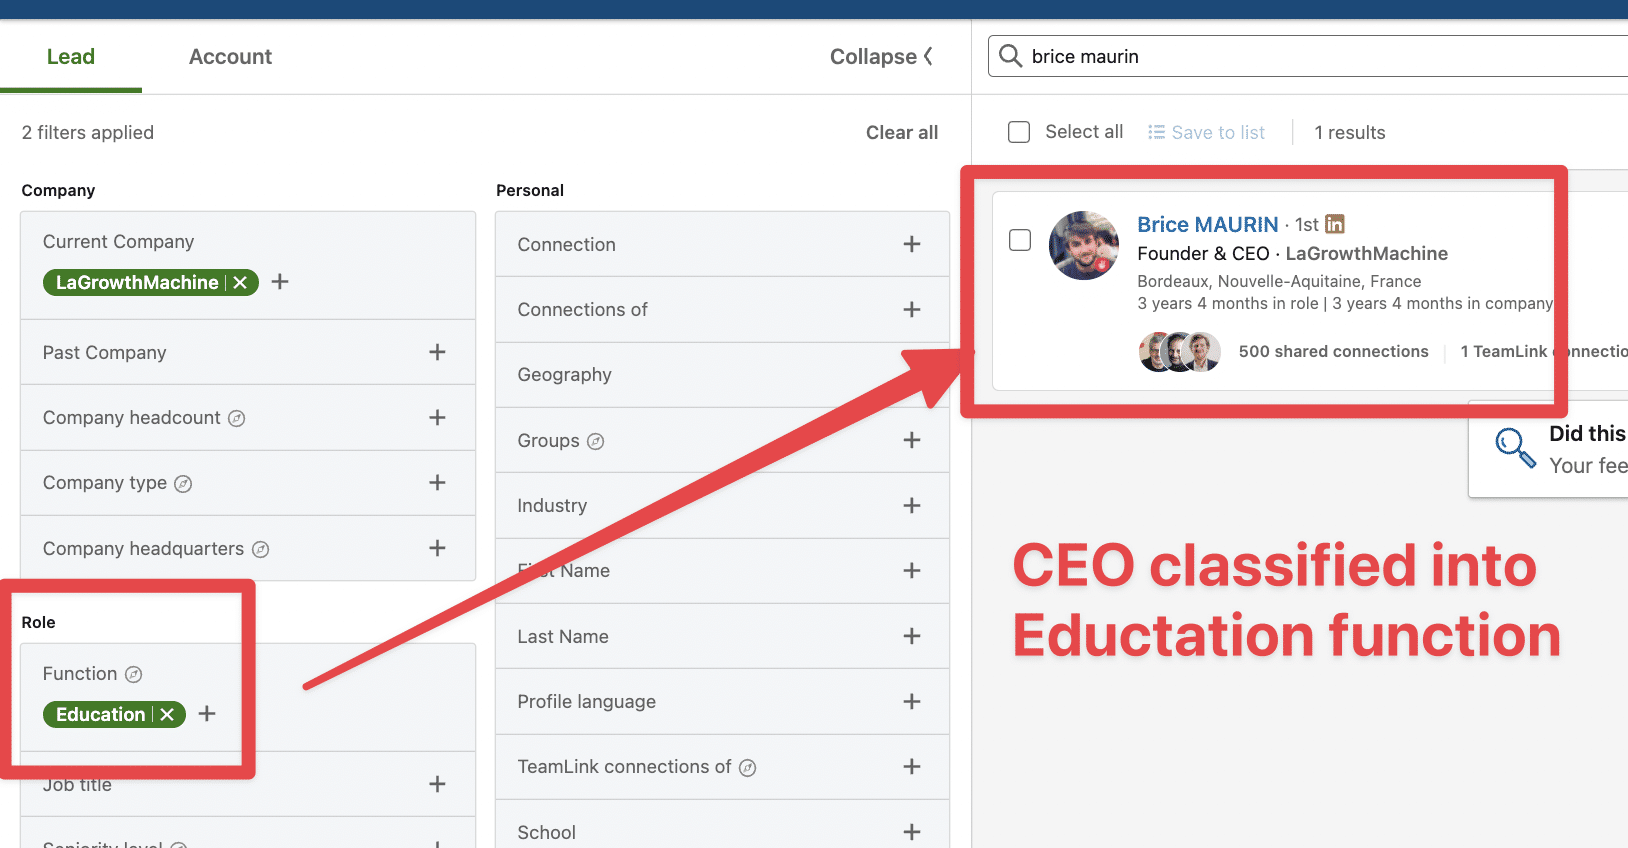
Don’t use this filter at all, if possible.
If you know your personas, you know what job titles they have, and you don’t need this filter.
Now let’s discuss the worst filter on Sales Navigator:
The technology filters.
The final best practice for using LinkedIn Sales Navigator is to avoid using the technology filter.
There is no information on LinkedIn’s documentation about how they find technologies used by companies.
It makes it hard to trust them on this.

If I use What’s Run, which is a reliable plugin to find technologies used on a website, it doesn’t mention Webflow on the website to detect
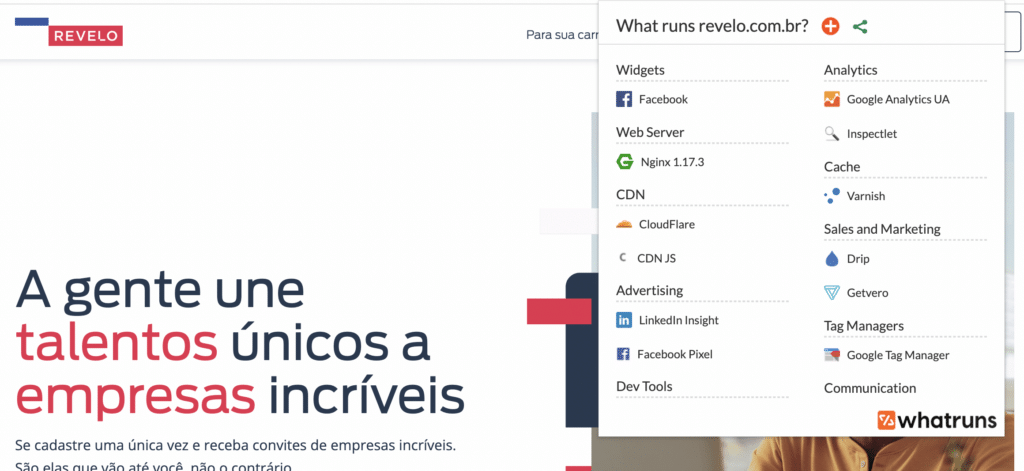
Do you want to target companies based on which technology they use?
It’s much better to use services built especially for that, like Wappalyzer or BuiltWith.
You can see the process and details in the 3rd part of this video.
This example concerns finding e-commerce using Shopify, but you can apply this technique to any technology.
By following these best practices for using LinkedIn Sales Navigator, you’ll not only save time but also increase your reply rates and lead quality.
But that’s not all. One of the best ways to reduce the number of unqualified leads in your Sales Navigator search results is to do account-based searches.
Let me show you how it works.
How to use LinkedIn Sales Navigator to target accounts:
When you do Account-Based Marketing on LinkedIn, you start by searching for account pages and then find the decision-makers.
LinkedIn Sales Navigator is the perfect tool to do that. The best sales managers use this technique and guarantee you to get relevant leads.
It offers 14 search filters for accounts that would be perfect clients for your business.
![How To Use LinkedIn Sales Navigator To Generate Leads? [2026 Tutorial] 10 company size filter sales navigator](https://evaboot.com/wp-content/uploads/2024/05/CleanShot-at-@-x-110-1024x785.png)
You can filter by:
The headcount growth and hiring filters allow you to target growing companies.
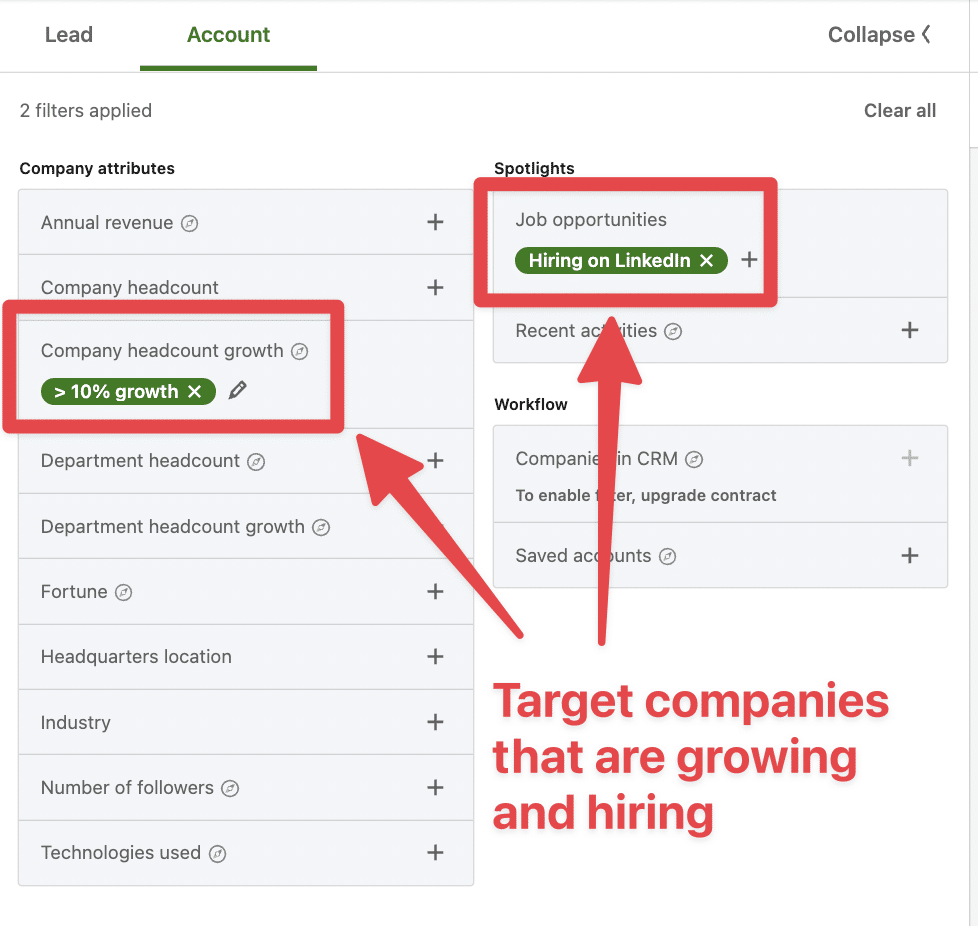
In terms of event detection, LinkedIn allows you to detect companies with recent funding events on Crunchbase.
LinkedIn also detects when they are a Senior Leadership change in the last 3 months in a company.
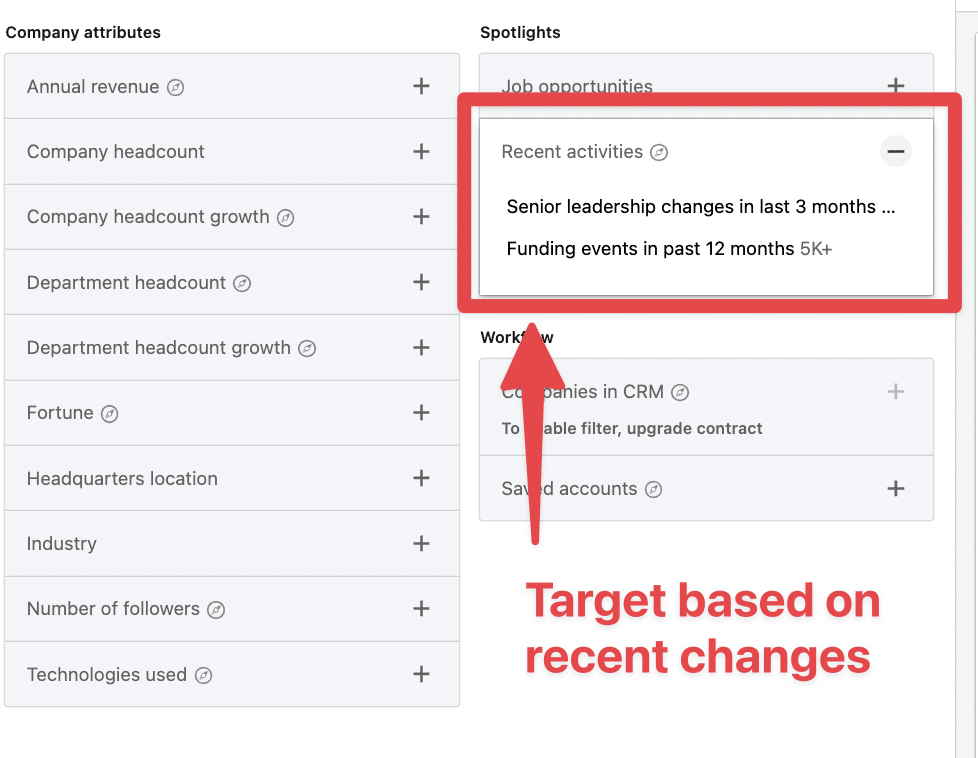
The arrival of a new top decision-makers is a great opportunity to launch a conversation with the account.
Newcomers tend to come up with new ideas, requiring products and services.
The next step?
You guessed it.
It’s to create account lists.
To create an account list on Sales Navigator:
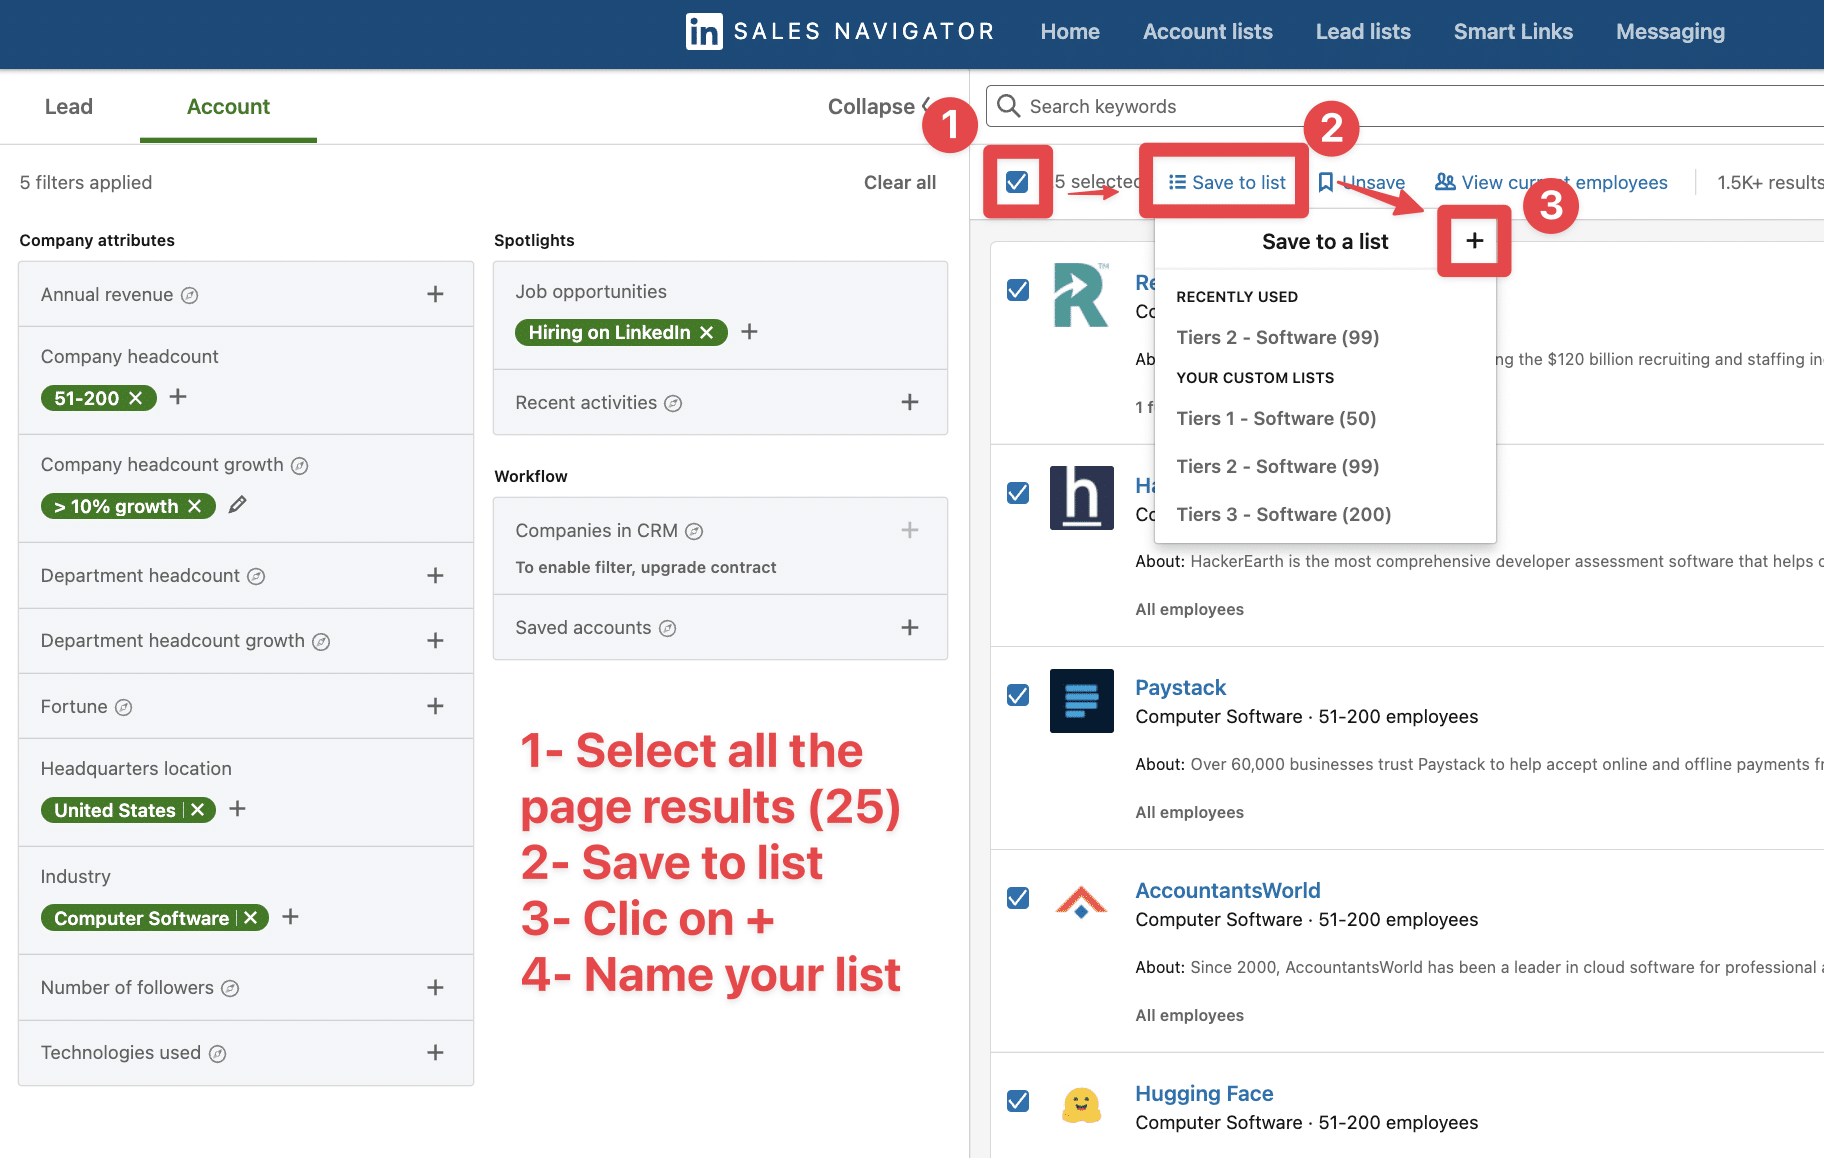
Once the account is added to your list, you will be notified when the company:
![How To Use LinkedIn Sales Navigator To Generate Leads? [2026 Tutorial] 11 cleanshot 2022 04 04 at 18.44.45@2x](https://evaboot.com/wp-content/uploads/2022/04/CleanShot-2022-04-04-at-18.44.45@2x.png)
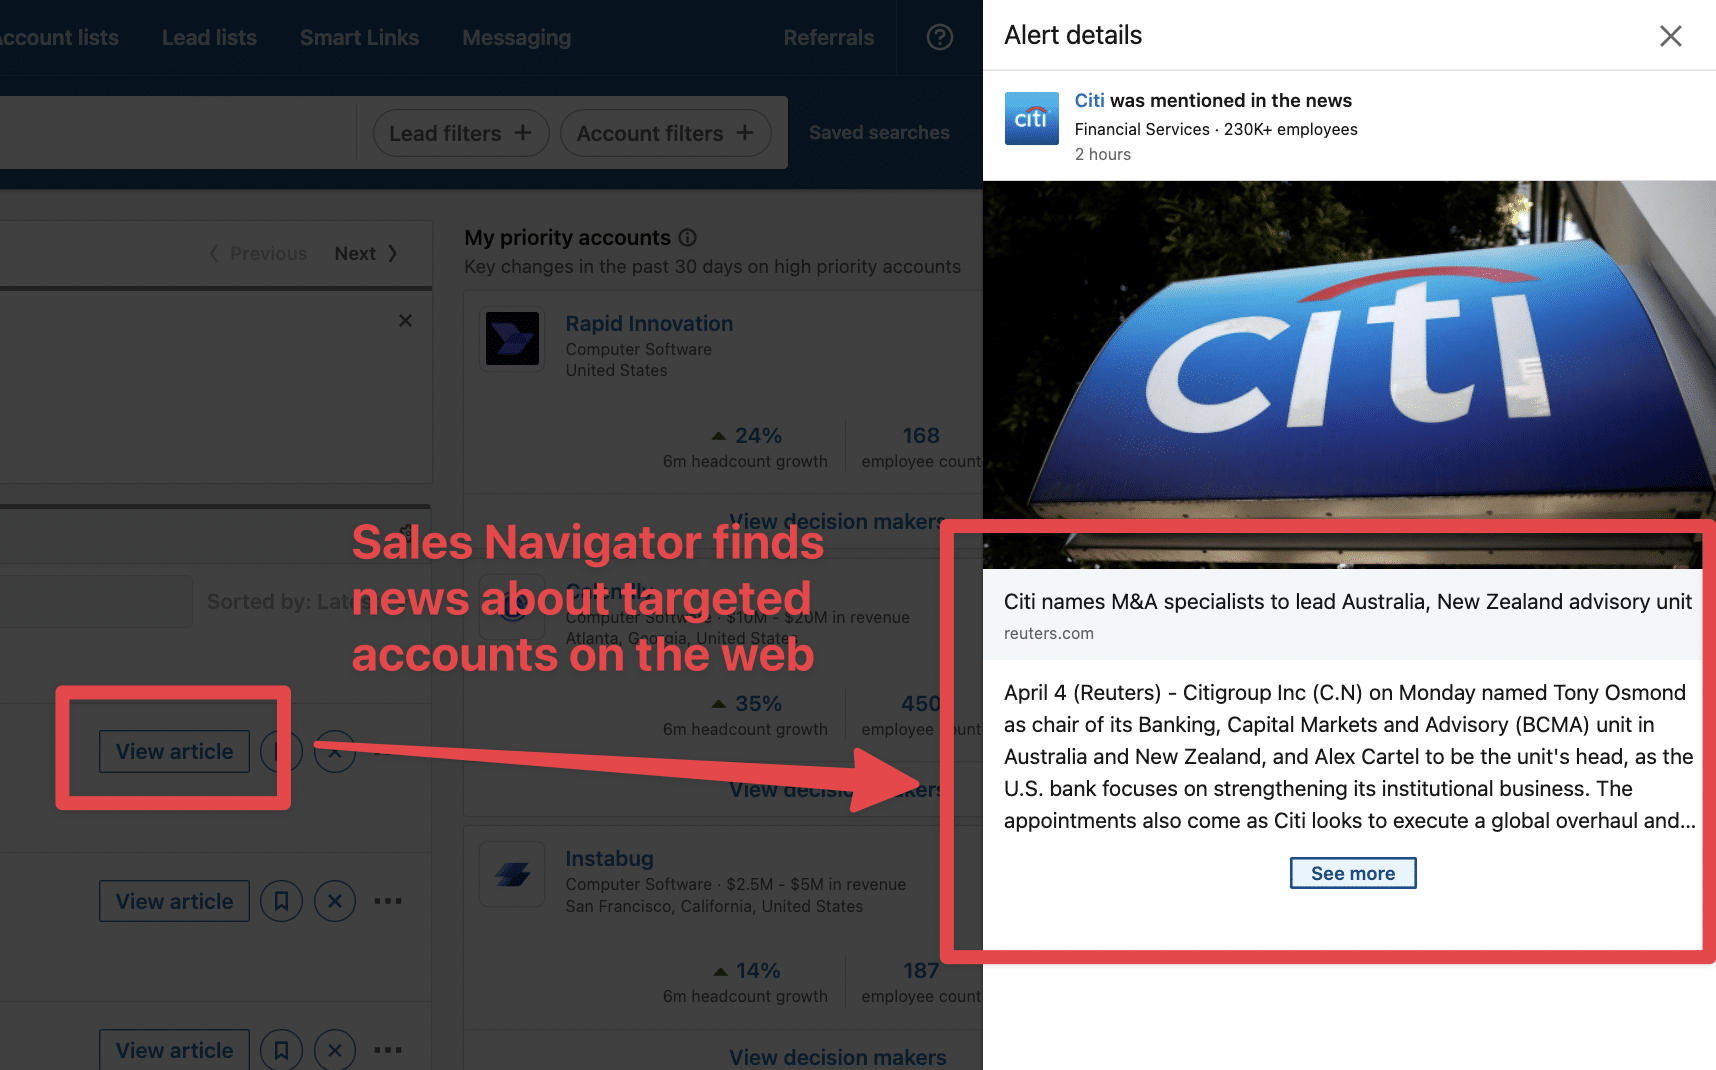
LinkedIn will also track your targeted companies online and send you a blog post mentioning them.
If you click View article, you can see an abstract and read the post.
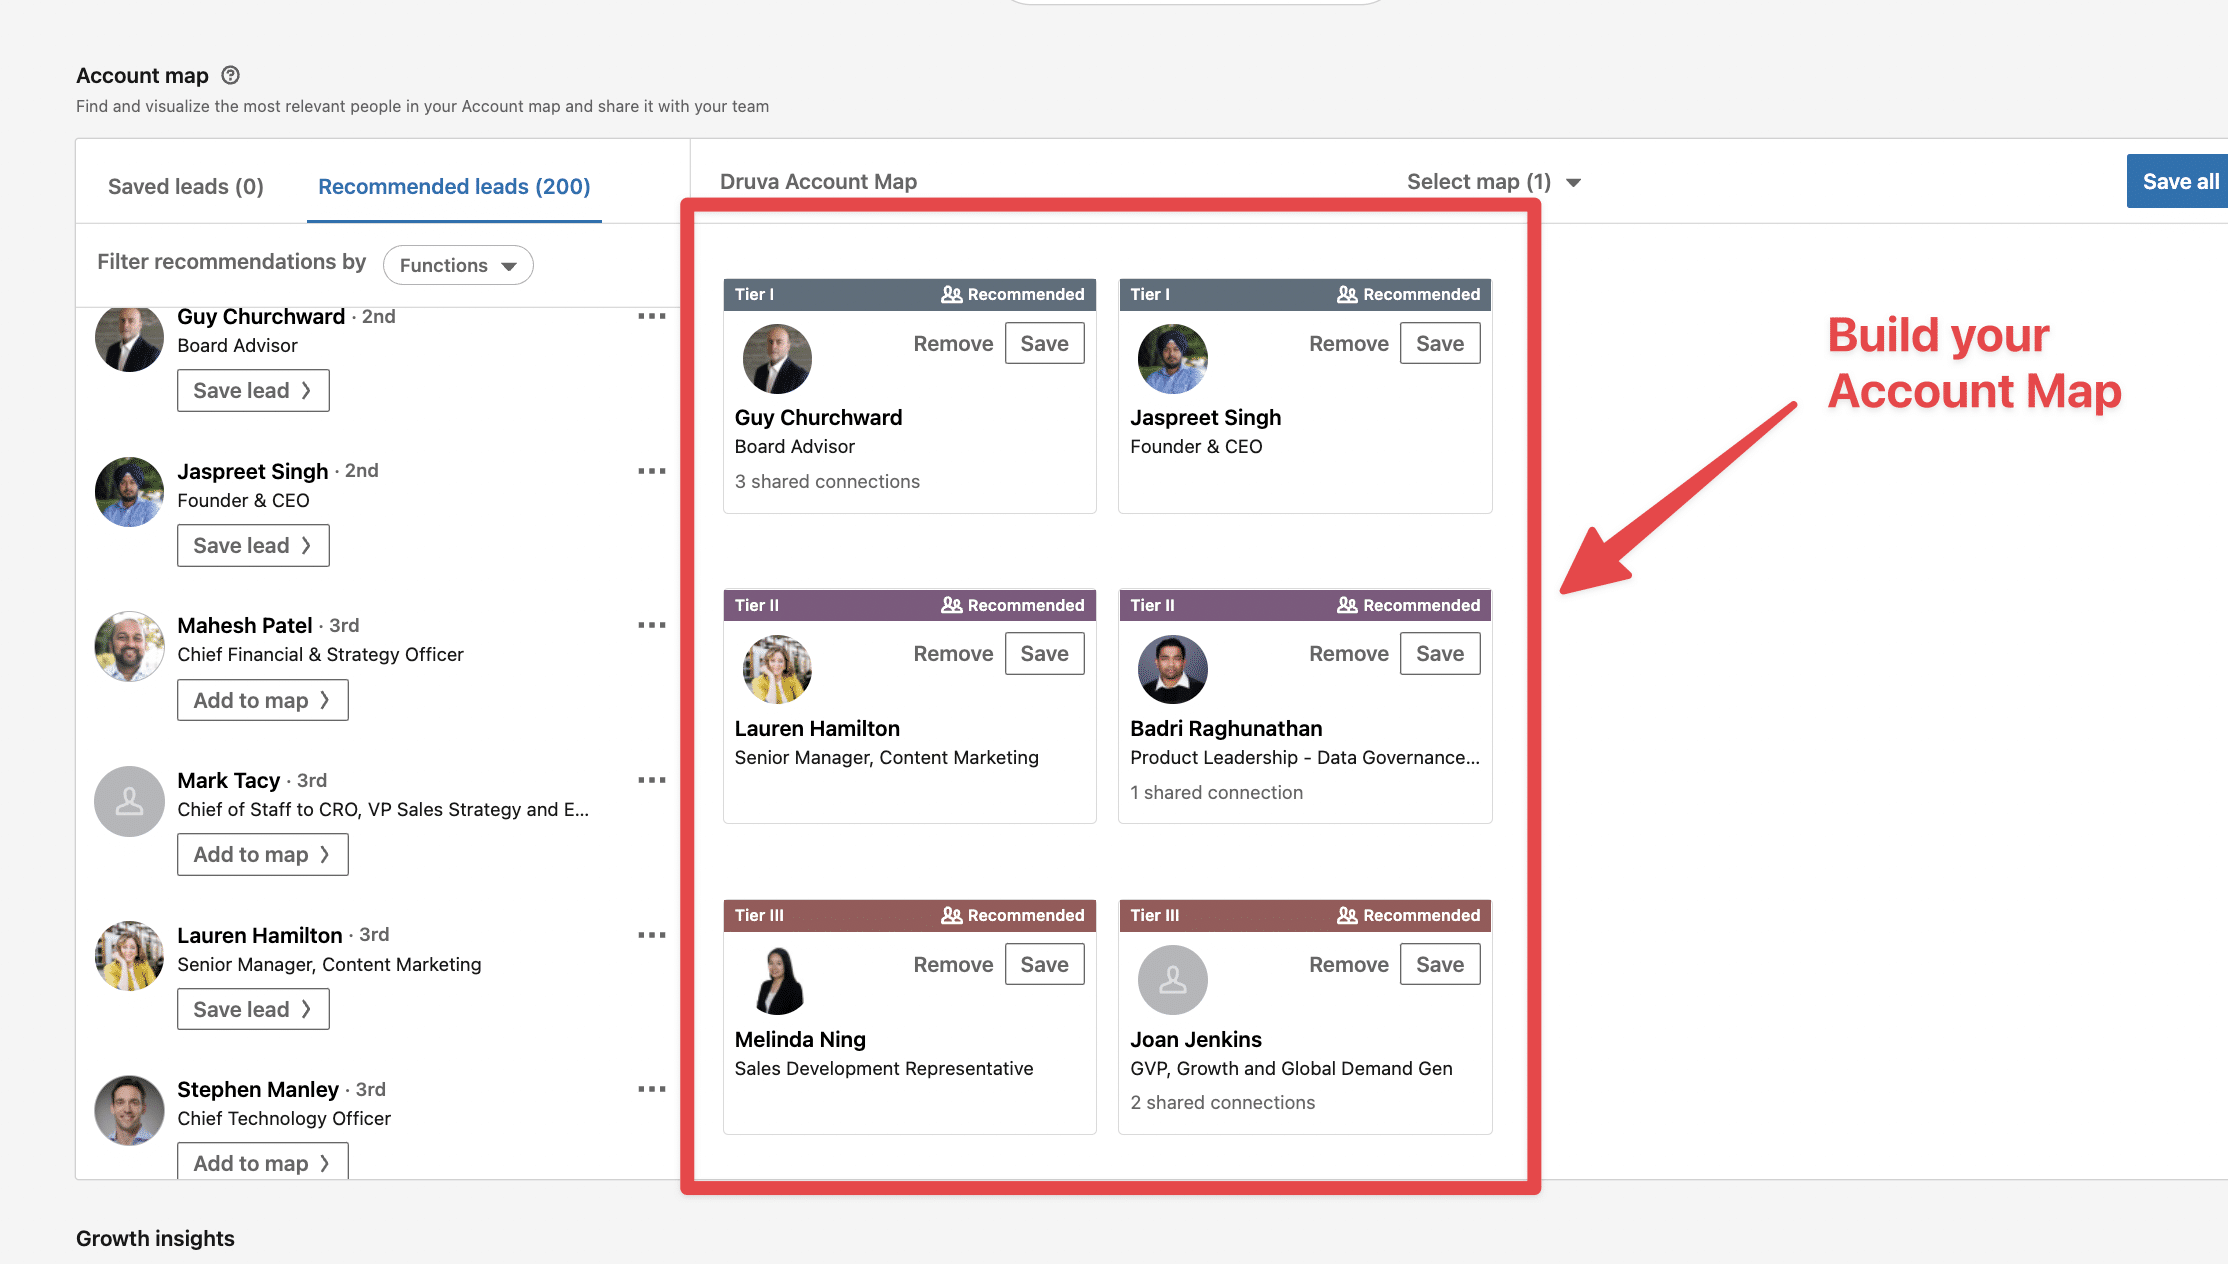
Another super useful tool for LinkedIn Account-based Marketing is the LinkedIn company page.
You can build your relationship map there by dragging and dropping leads into several categories (Tiers 1, Tiers 2, Tiers 3).
On LinkedIn, you can get some insights about growth, the size of the department, the hires, and job openings.
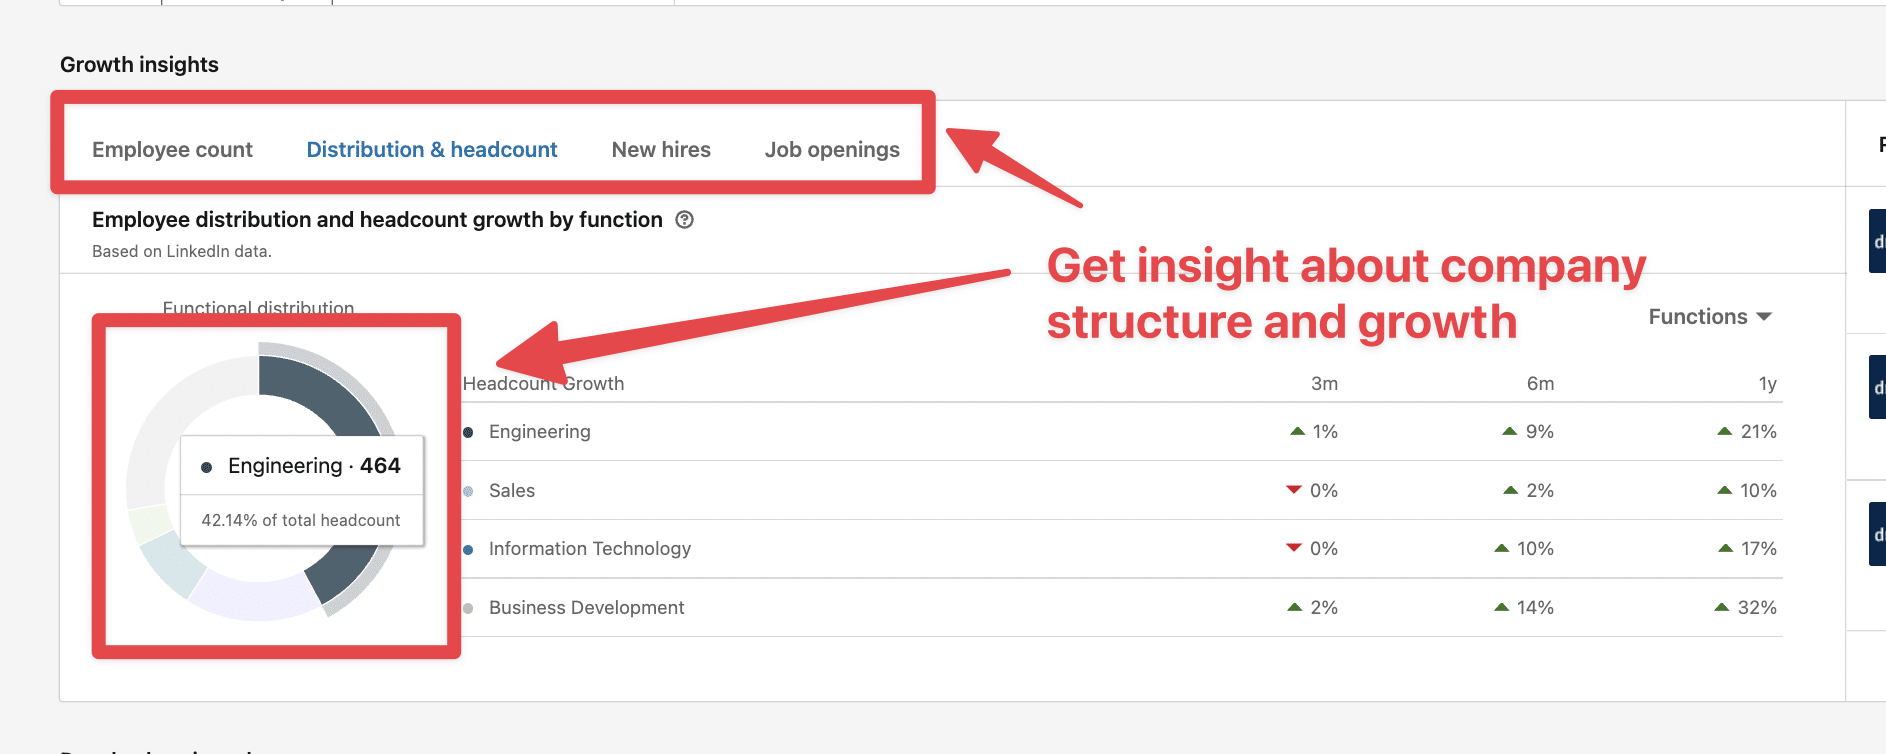
This is useful, to get to know your account to write super personalized sales prospecting messages.
But to whom should you send the messages?
How do we find the decision-makers?
Here is how to find decision-makers within an account list using Sales Navigator:
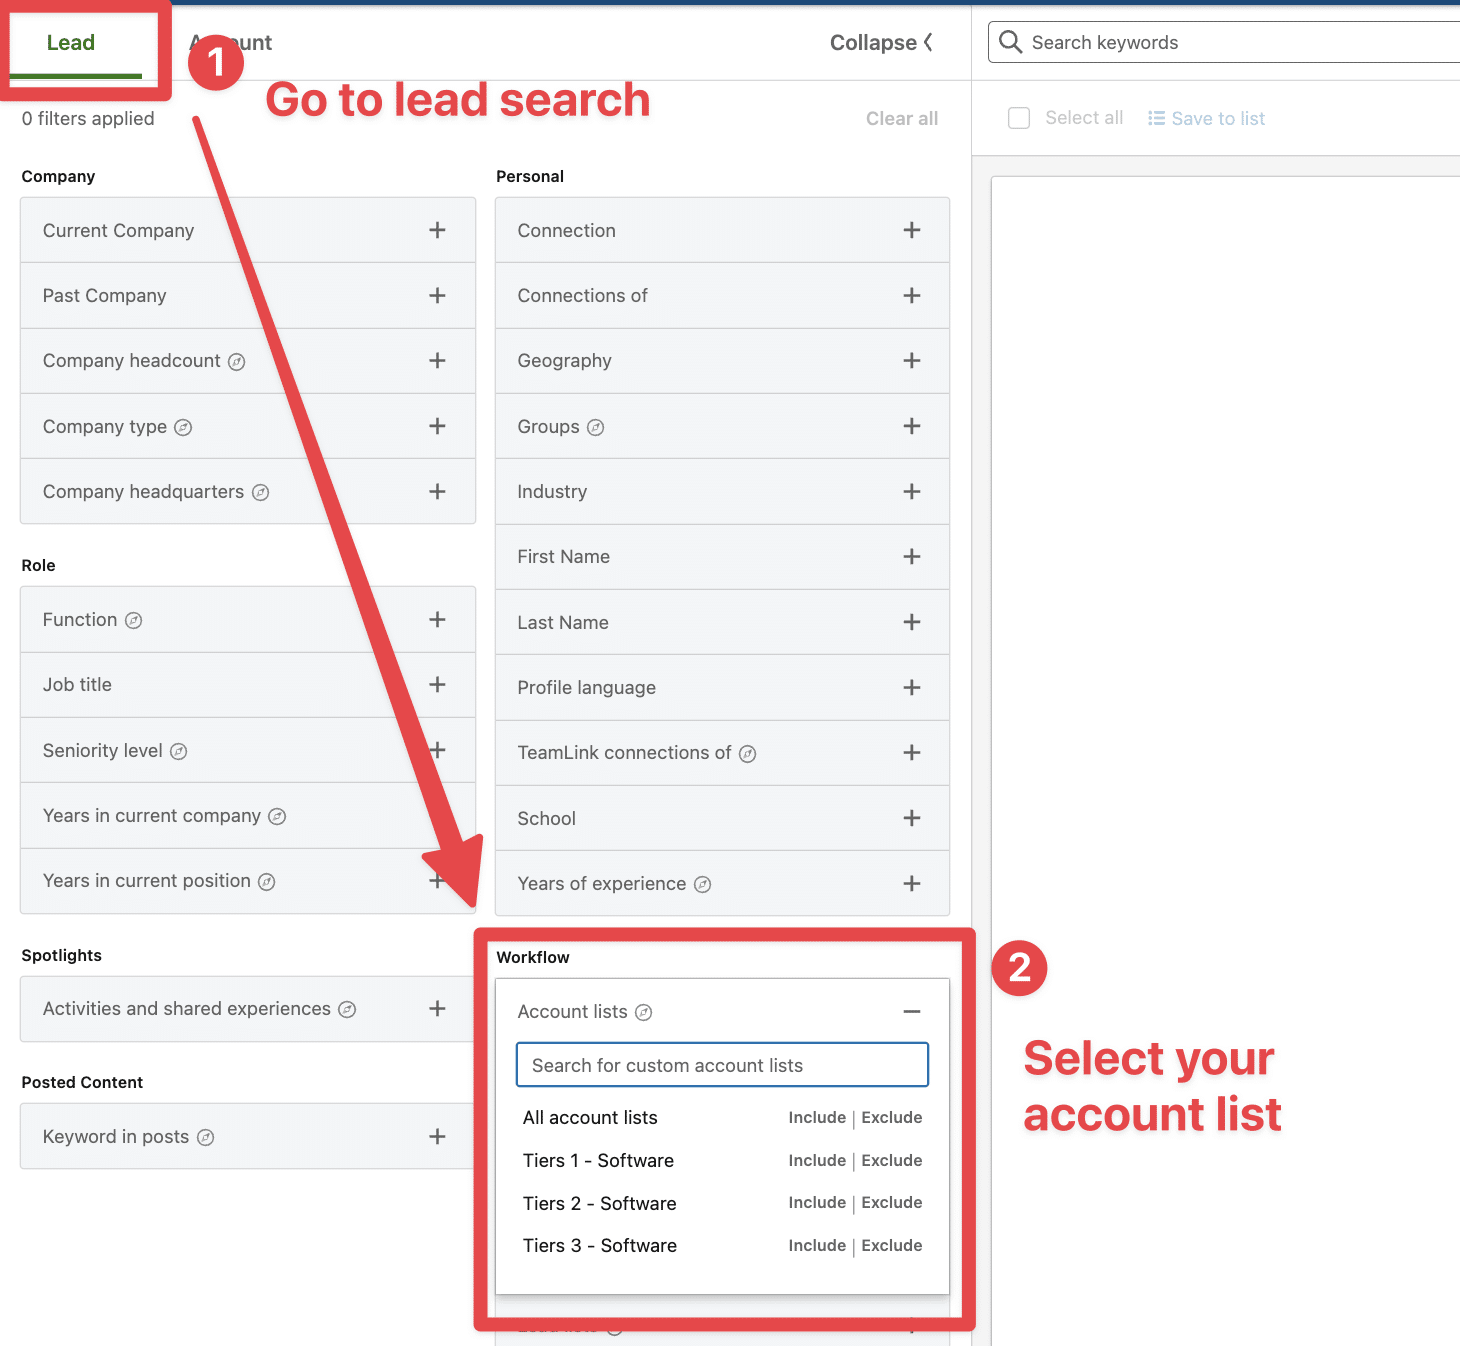
Once you have selected your account list, all the people working at these companies will appear in the search results.
Your job now is to add filters to get the right decision-makers. The job title filter is a great way to do that.
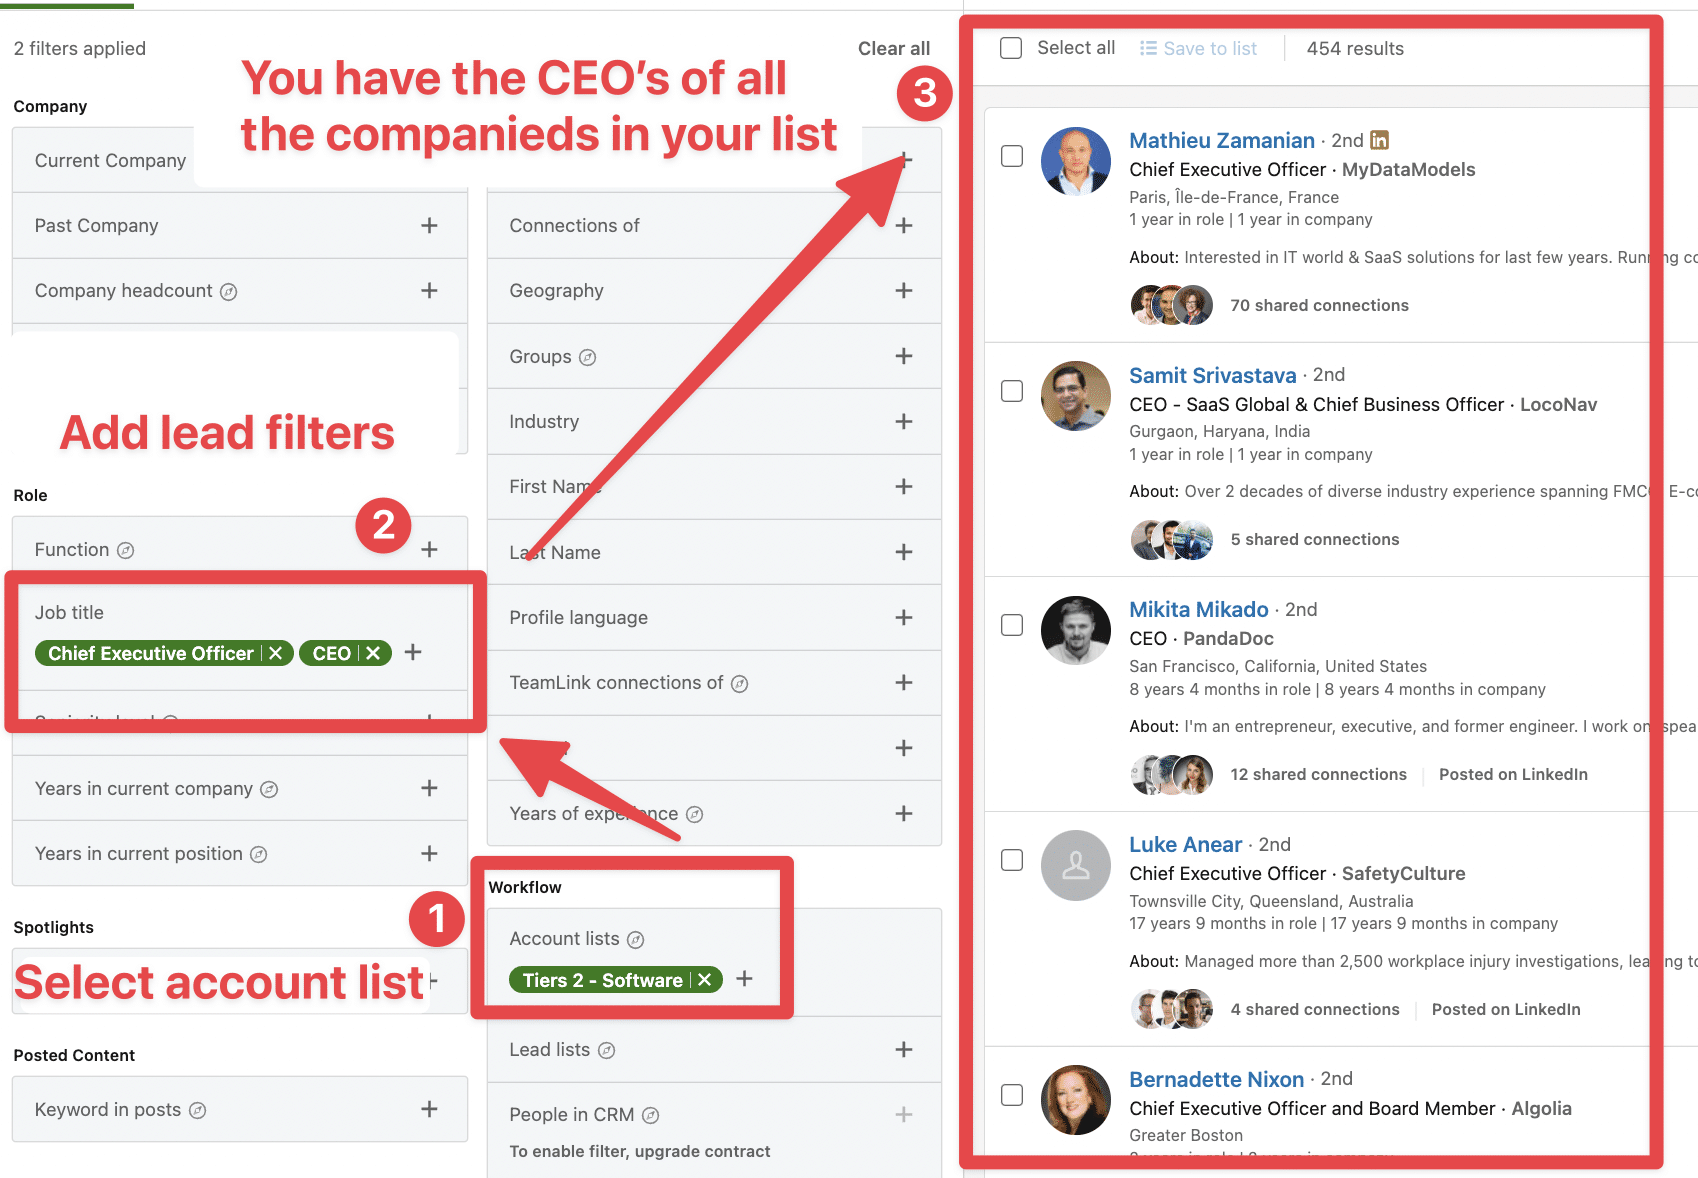
The efficiency of your LinkedIn prospecting strategy can be boosted by LinkedIn marketing using LinkedIn Ads.
There’s a hack to create super-targeted LinkedIn ads with your Sales Navigator extractions.

Instead of trusting the LinkedIn Algorithm, you provide LinkedIn with the exact list of people to target.
When choosing your audience, click List Upload> Contact List or Company List.
I’ve explained all the processes in this video!
By running ads to the people you are prospecting, you multiply the touchpoints your prospects have with your brand and increase the chances of getting a reply.
LinkedIn Sales Navigator offers 3 different plans:
For now, we’ve only covered the features of Sales Navigator Core.
Let’s explore the functionalities of Advanced and Advanced Plus so you can see if they can benefit your business.
Sales Navigator Advanced costs $149.99/ month. It offers everything included in Core Plus and:
If you’re using other data sources than LinkedIn to identify accounts, this feature can change your life.
Account uploads allow importing CSV on Sales Navigator with account information so LinkedIn can try to find these accounts in its database.
Here’s a video tutorial:
This process can automate Account list building and allow you to identify decision-makers inside companies you have scraped on:
If you can get the LinkedIn URL of the company page for every account, the match rate will be 100%!
LinkedIn Sales Navigator Smart Link is an underestimated feature for LinkedIn lead generation.
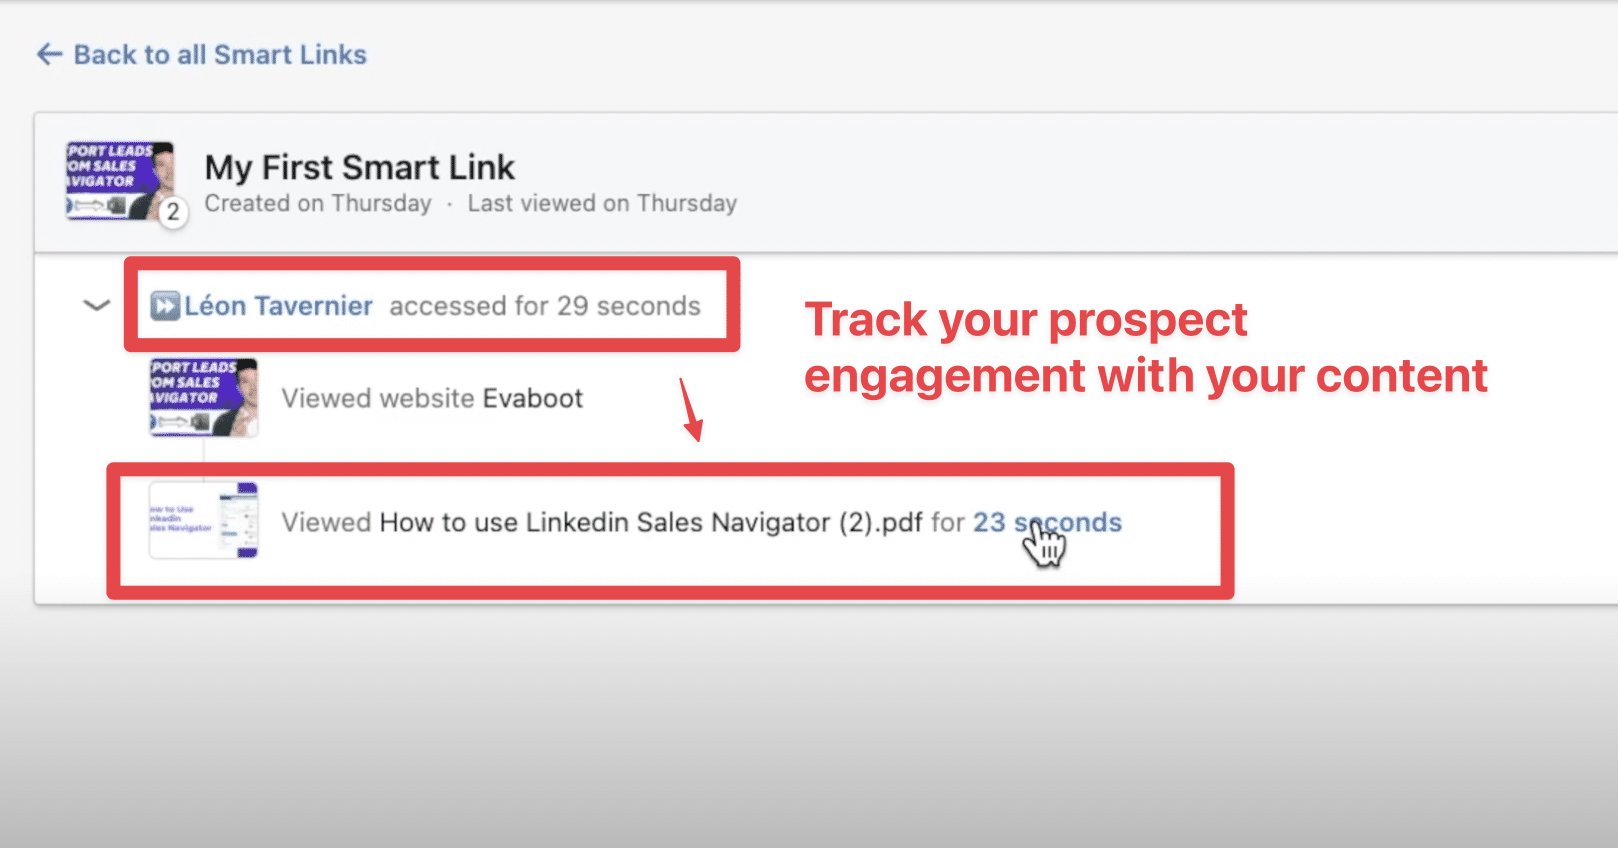
Smart Links allow you to create PowerPoint-like presentations directly from Sales Nav, send them to your prospects, and track their interactions with them.
In this video, you will find many tips about how to use Smart Links to generate leads.
LinkedIn TeamLink helps sales teams detect warm introduction opportunities with their prospects.
It does this by showing you if people in your search results are among your teammates’ first-degree connections.
Sales Navigator Advanced is built for companies with sales teams of between 5 and 10 people.
You might be interested in Sales Navigator Advanced Plus if you work in an Enterprise with many sales reps.
Sales Navigator Advanced Plus doesn’t have public pricing. You must go through LinkedIn Sales Team to get.
It offers everything included in Advanced Plus and:
TeamLink Extend lets you see if your prospects are connected to anyone in your company (not just your sales teammates).
![How To Use LinkedIn Sales Navigator To Generate Leads? [2026 Tutorial] 12 teamlink extend advanced plus](https://evaboot.com/wp-content/uploads/2023/07/teamlink-extend-advanced-plus-1024x347.png)
TeamLink connections dramatically increase the warm introductions your Sales team can get from people working in their company.
If you use a CRM like Salesforce, HubSpot, or Pipedrive, you can sync your CRM with Sales Navigator.
![How To Use LinkedIn Sales Navigator To Generate Leads? [2026 Tutorial] 13 crm sync advanced plus](https://evaboot.com/wp-content/uploads/2023/07/crm-sync-advanced-plus-1024x365.png)
For example, you can exclude from your Sales Navigator searches leads already present in your CRM.
Sales Navigator Advanced Plus is super helpful for keeping your contacts updated.
People don’t stay in the same company for 10 years anymore.
That’s why your CRM must stay up to date with job changes.
![How To Use LinkedIn Sales Navigator To Generate Leads? [2026 Tutorial] 14 sales navigator advanced plus update crm](https://evaboot.com/wp-content/uploads/2023/07/sales-navigator-advanced-plus-update-CRM.png)
LinkedIn Sales Navigator Advanced Plus lets you be notified whenever people in your CRM change jobs or companies.
Sales Navigator has been built to optimize the sales process, but you can also use it for recruiting.
Indeed, the search filters you use to look for leads can also be used to find candidates.
LinkedIn Recruiter and LinkedIn Sales Navigator give you access to the same data.
The only thing that changes is the interface.
Although LinkedIn Recruiter does not offer all the filters, you can use it to find people open to work.
The cool thing is that you can use the same tool to reach new prospects and ideal candidates for your company.
All that for $99 /month.
Not bad, right?
Mastering LinkedIn Sales Navigator can significantly enhance your sales and prospecting efforts.
Investing in this tool is worth it. However, make sure to choose the account type that best meets your business objectives.
Doing so can streamline your sales processes, save time, and allow you to focus more on building meaningful relationships with potential clients.
Sales Navigator provides account and lead insights to help you better understand your prospects. It shows their recent LinkedIn activity, company news, and job changes.
It also supports lead generation by identifying potential leads and recommending new prospects.
For sales professionals seeking to build relationships, LinkedIn Sales Navigator is invaluable.
Use it when you want to target specific companies or roles. Then, leverage its advanced features to stay updated on important milestones and opportunities with your leads.
Pairing this with other LinkedIn tools, such as Ads, can further enhance your outreach strategy.
While LinkedIn aids career growth, Sales Navigator is a sales-centric tool with specialized features. LinkedIn Premium offers user insights, but Sales Navigator is designed to optimize lead discovery.
Sales Navigator offers different pricing plans. Sales Navigator Core (Professional): $99/month. Sales Navigator Advanced (Team): $149/month. Sales Navigator Advanced Plus (Enterprise): starts at $1600/year.
Sales Navigator helps sales professionals build relationships at scale. As you save leads or contacts, it alerts you to key moments and milestones, opportunities for timely outreach, and noteworthy account developments.