Export Leads From Sales Navigator
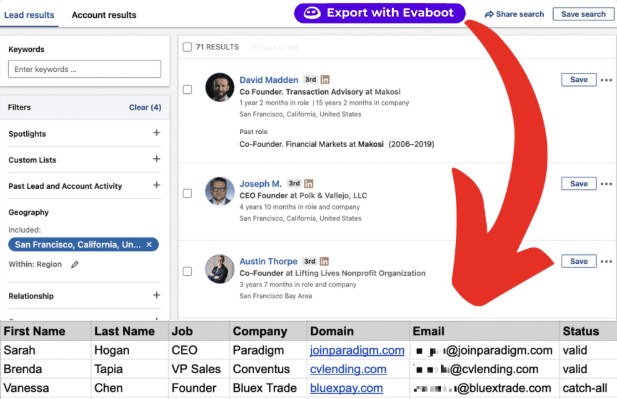
Create a clean B2B email list from LinkedIn Sales Navigator in just one click with the Evaboot Chrome Extension.
Export Leads From Sales Navigator

Create a clean B2B email list from LinkedIn Sales Navigator in just one click with the Evaboot Chrome Extension.
Contents
To export leads from LinkedIn Sales Navigator, you need to create an account on Evaboot and install the Chrome Extension.
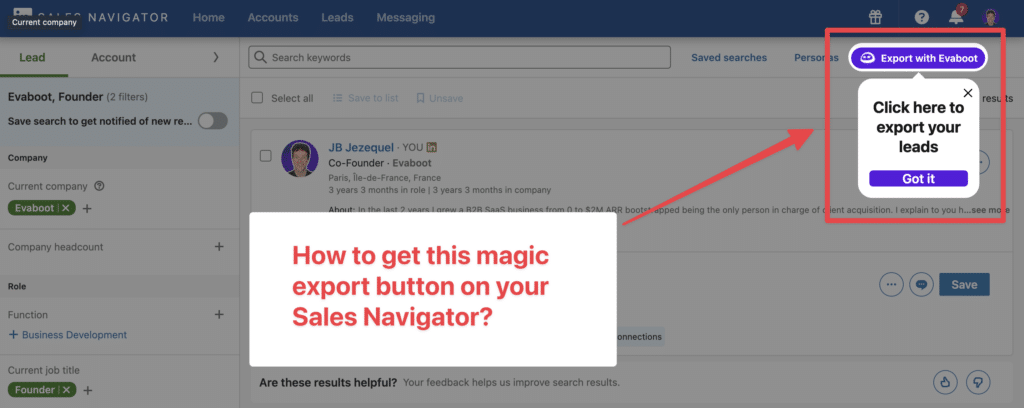
Afterward, a new “Export Leads” button will appear. Click on it to export your list, including LinkedIn data and emails to a CSV file.
Indeed, exporting lead lists is not a native feature of Sales Navigator.
You must use safe LinkedIn scraping tools to export LinkedIn Sales Navigator lists to Excel.
In this article, I’m going to cover:
Let’s get into it.
To export Sales Navigator lead lists, follow this step-by-step guide:
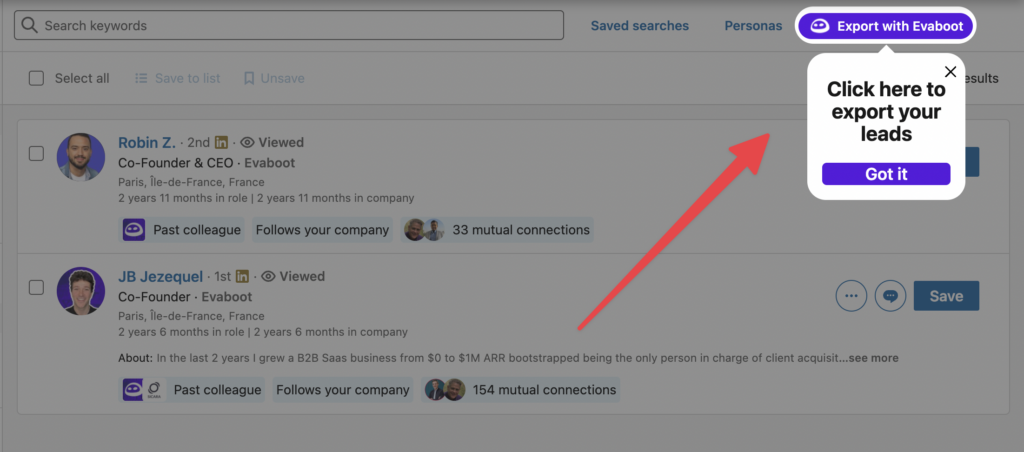
Once installed, the “Export Leads” button will appear at the top of your lead lists.
Click on it to export your leads and their contact information into a spreadsheet.
With this data, you can use multichannel outreach.
This will help you reach new prospects in many ways.
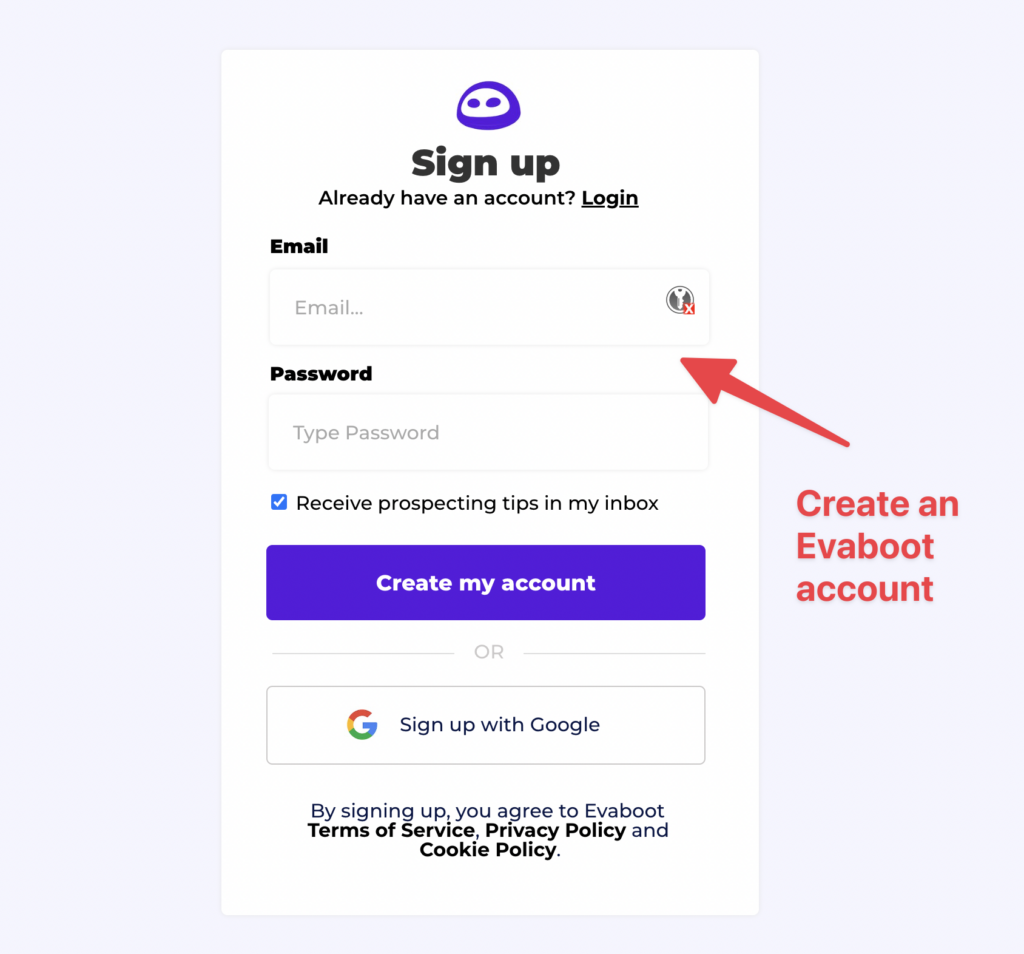
Step 1 is to create an account on Evaboot.
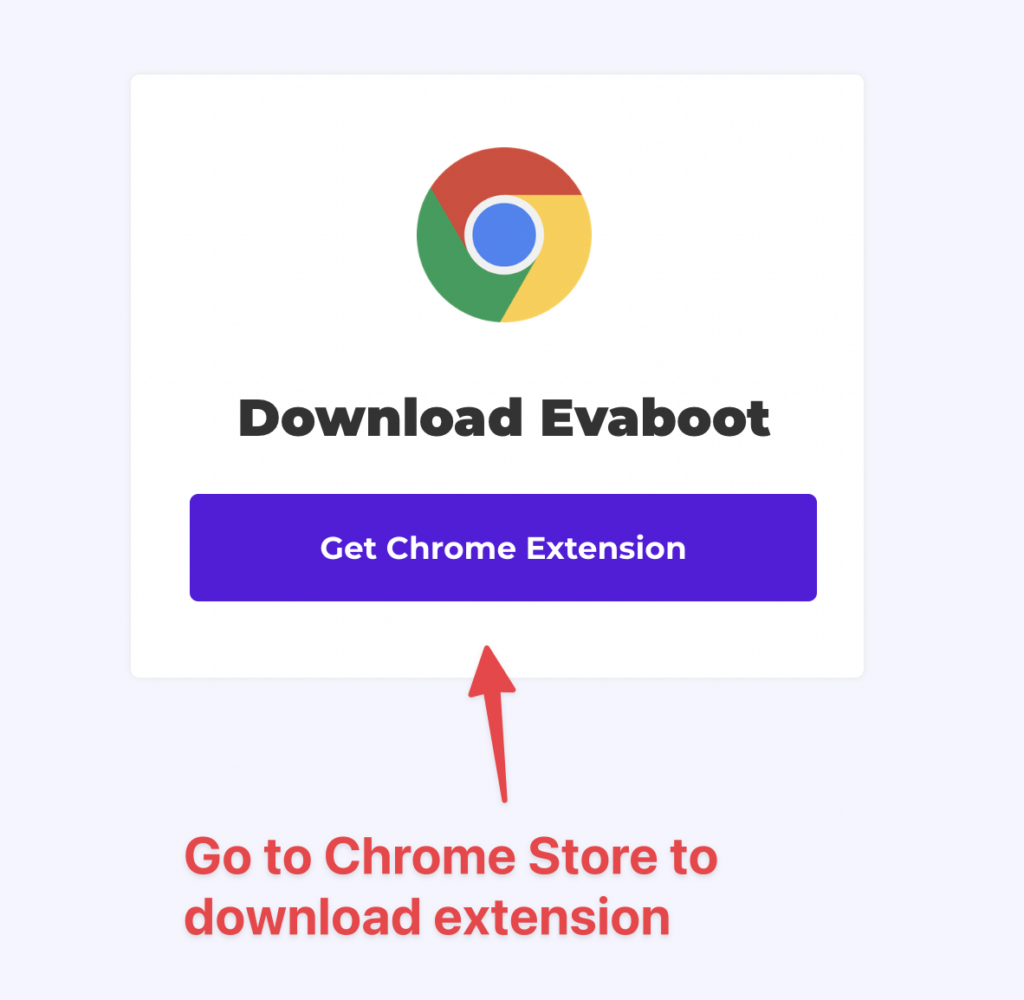
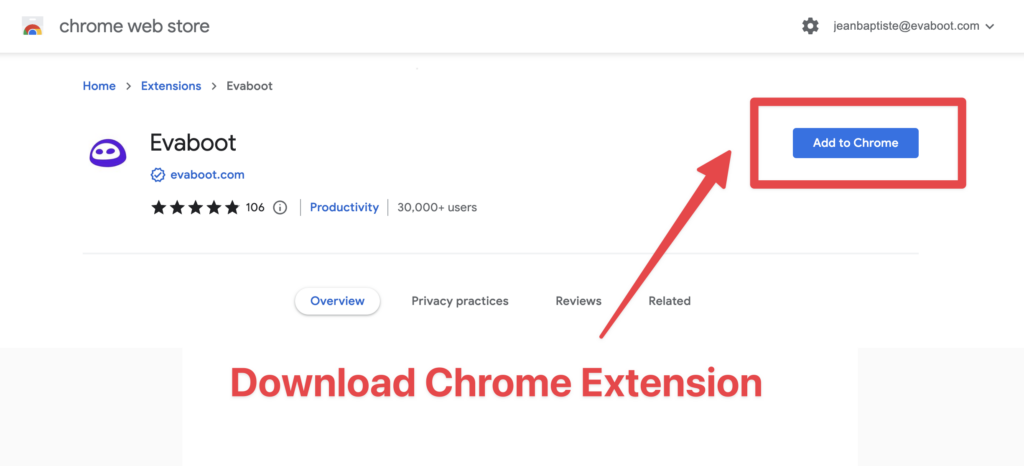
Once you’ve created your account, click on “Get Chrome Extension” to download it from the Chrome Web Store.
When on the Chrome Store page, click “Add to Chrome” to install the extension.
You’ll be automatically redirected to Sales Navigator. A popup will show you where the button is located.
Once the Chrome extension is installed, go to the list of leads you want to export. It can be:
Evaboot handles all the use cases.
The “Export Leads” button is at the top of these LinkedIn Sales Navigator pages.
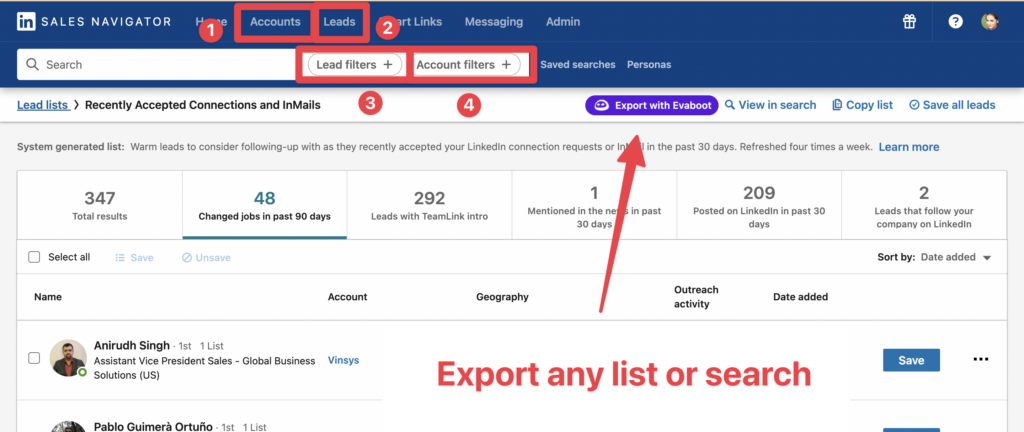
You can export specific tabs in your lead lists, such as “Changed jobs in the past 90 days.”
When you click “Export with Evaboot” you will be redirected to the Evaboot app.
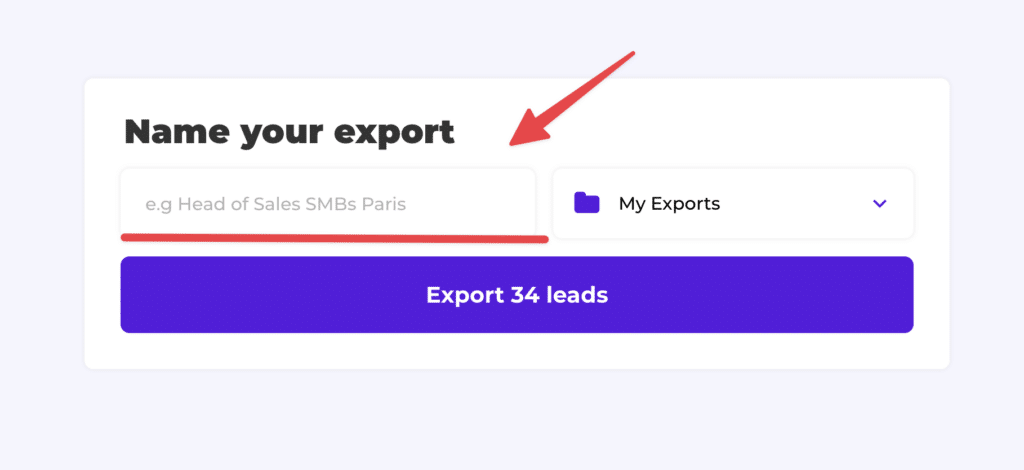
Choose whether you want to find emails for these leads.

Give a name to your export and click on “Export leads”.
The estimated end date will appear on the left right after launching the export.

Evaboot will export all these leads in real-time.
That makes your lead generation process GDPR-compliant, in opposition to using databases.
After the extraction is done, you will get an email. This email will have a link to download your lead list in a CSV file.

Choose the list type that you want to download. And you’re done.
Evaboot does much more than export your list. It also cleans all the names and company names of your LinkedIn contacts.
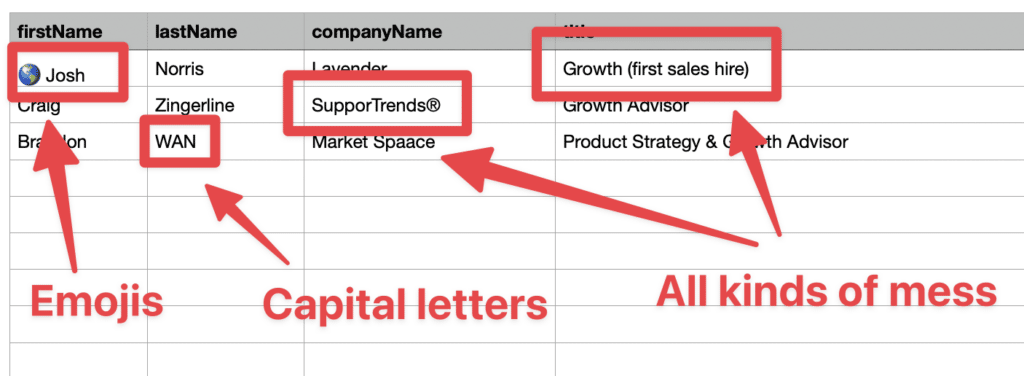
The data on LinkedIn is not clean.
Cleaning data from your sales navigator export can take hours if you do it manually.
Hopefully, the Evaboot cleaning algorithm takes care of all this work for you by automatically cleaning:
Nobody wants to spend hours cleaning Excel files. Better let robots do this boring job.
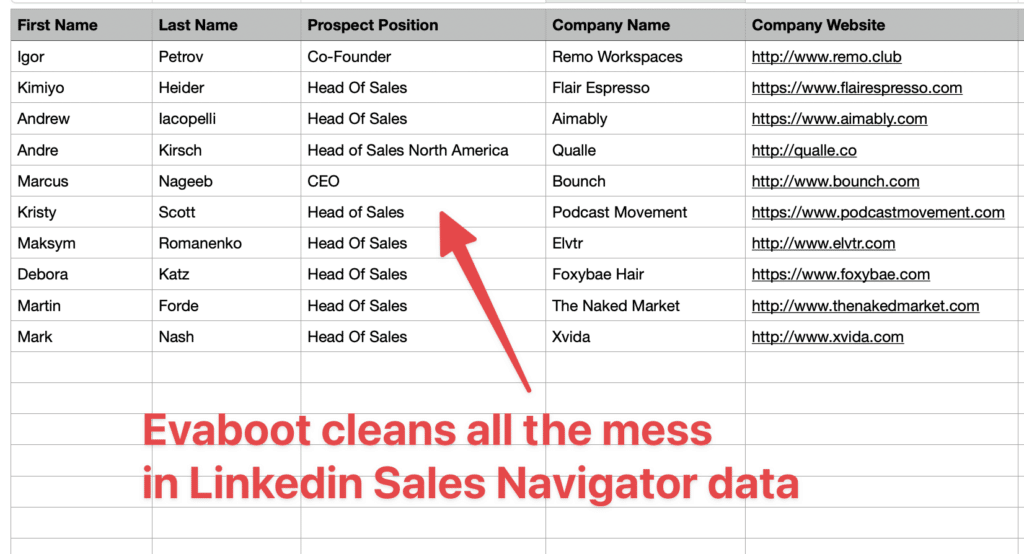
You will often find false positives in your LinkedIn Sales Navigator search results.
Even if you’re using super precise LinkedIn boolean search operators.

You will frequently find leads that don’t match the search filters you chose in the Sales Navigator search engine.
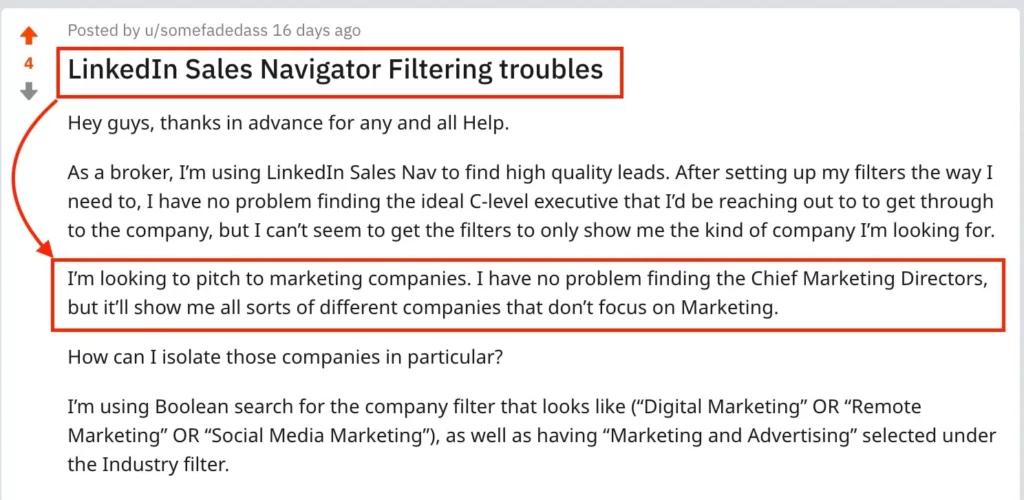
That’s why many people spend hours double-checking their search results manually.
This is a painful task, but it’s no problem.
Evaboot is the best Sales Navigator scraper.
Our algorithm checks your leads twice to make sure they fit your search filters.

In this export, there’s a column named “No Match Reasons.”
This column tells you if your leads really match your search filters.
If they don’t, we will explain why. In this example, the leads have the wrong title.
The initial search was for growth marketers.
To reduce false positives in your Sales Navigator searches, check out our full Sales Navigator tutorial.
You cannot export account lists directly from LinkedIn Sales Navigator. However, you can use a LinkedIn scraper like Evaboot.
Download the Evaboot Chrome extension, go to your account list or search, and click the “Export with Evaboot” button.
This is what it will look like for account lists.

And this is what it will look like for account searches.
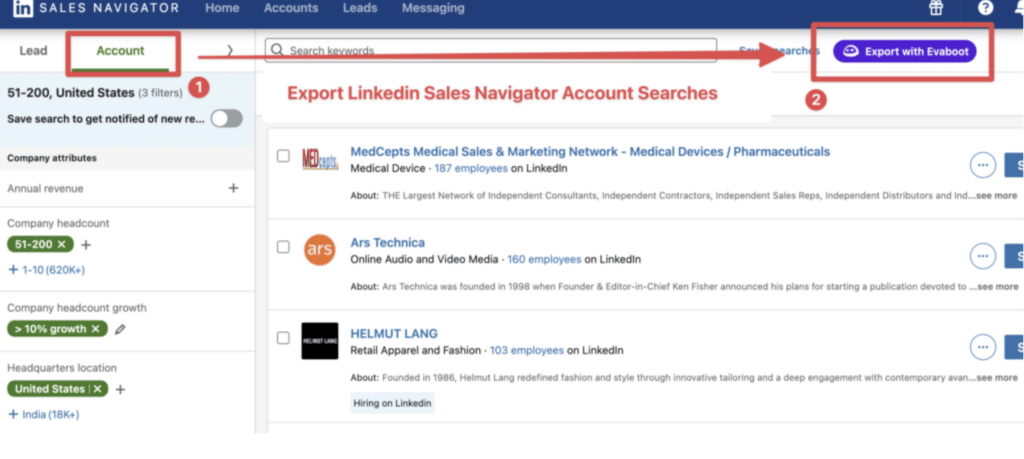
When you export account lists from the Sales Navigator with Evaboot, you get the following:
Evaboot’s cleaning and filtering algorithms also clean and filter all this data.
That being said, lead data is not static.
B2B data decays by 2.1% per month, meaning 22.5% of your exported leads could be outdated within a year. Job titles change, companies evolve, and outdated information leads to wasted outreach efforts.
To solve this, Evaboot offers LinkedIn profile URL Enrichment: a tool allowing you to upload Linkedin URLs stored in your CRM to enrich your LinkedIn contacts with Sales Navigator data.
How it works:
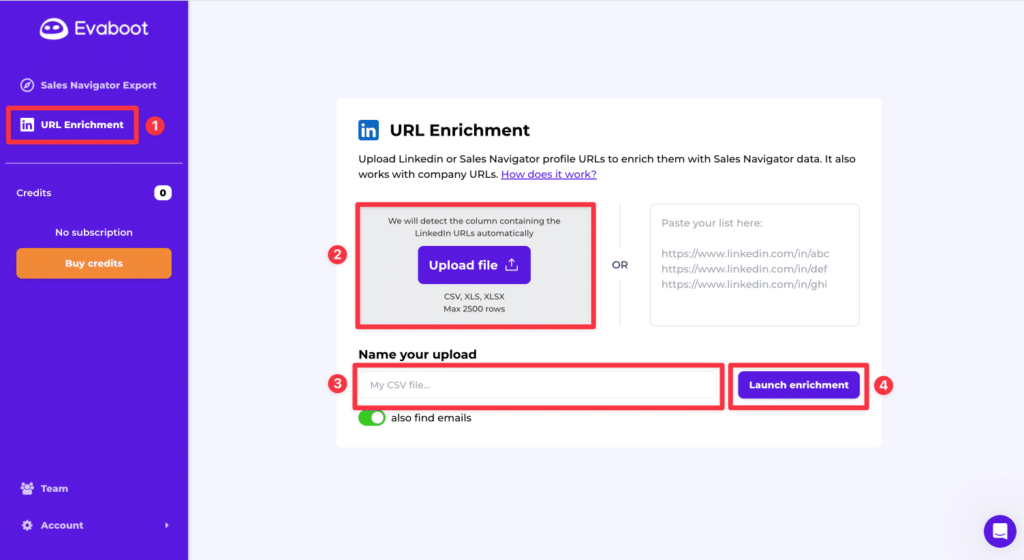

And here you go!
We recommend updating your lead lists every 3-6 months to maintain accuracy. This ensures your database stays fresh, relevant, and effective—so your sales efforts never go to waste.
For a visual step-by-step guide, check out the video tutorial:
4 data points you can export from LinkedIn Sales Navigator:
When Evaboot extracts lead lists from Sales Navigator, it exports a ton of lead information. The more info you get, the more efficient LinkedIn outreach strategy will be.
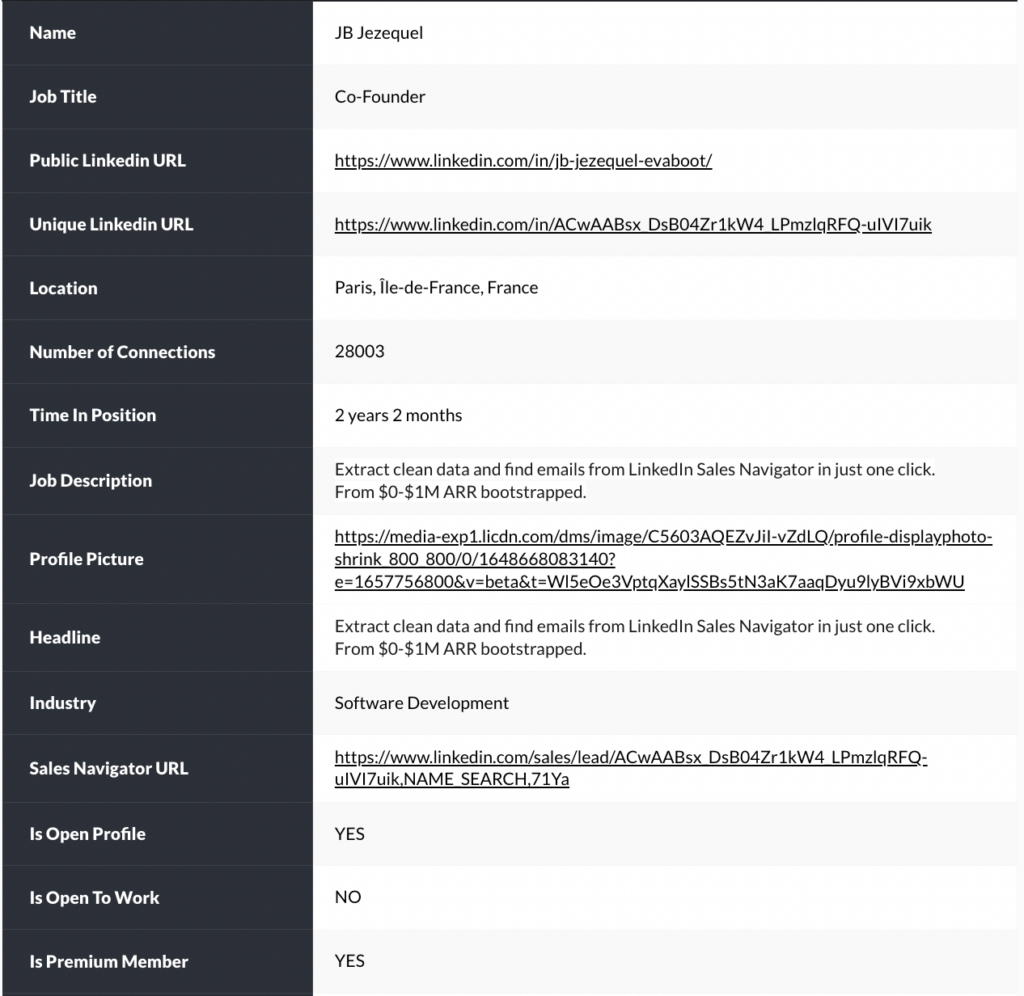
Every time you export lists with Evaboot, you get the following:
You can use this data to create a full profile of your leads. This can help with your CRM, cold emails, or LinkedIn prospecting campaigns.
Knowing if your prospects are Open Profiles is useful because, in that case, you can send them free InMails.
More on that in this video:
Unlike many scraping tools, Evaboot does not only extract LinkedIn profile information. We also export all the data available on their company page for all the leads.
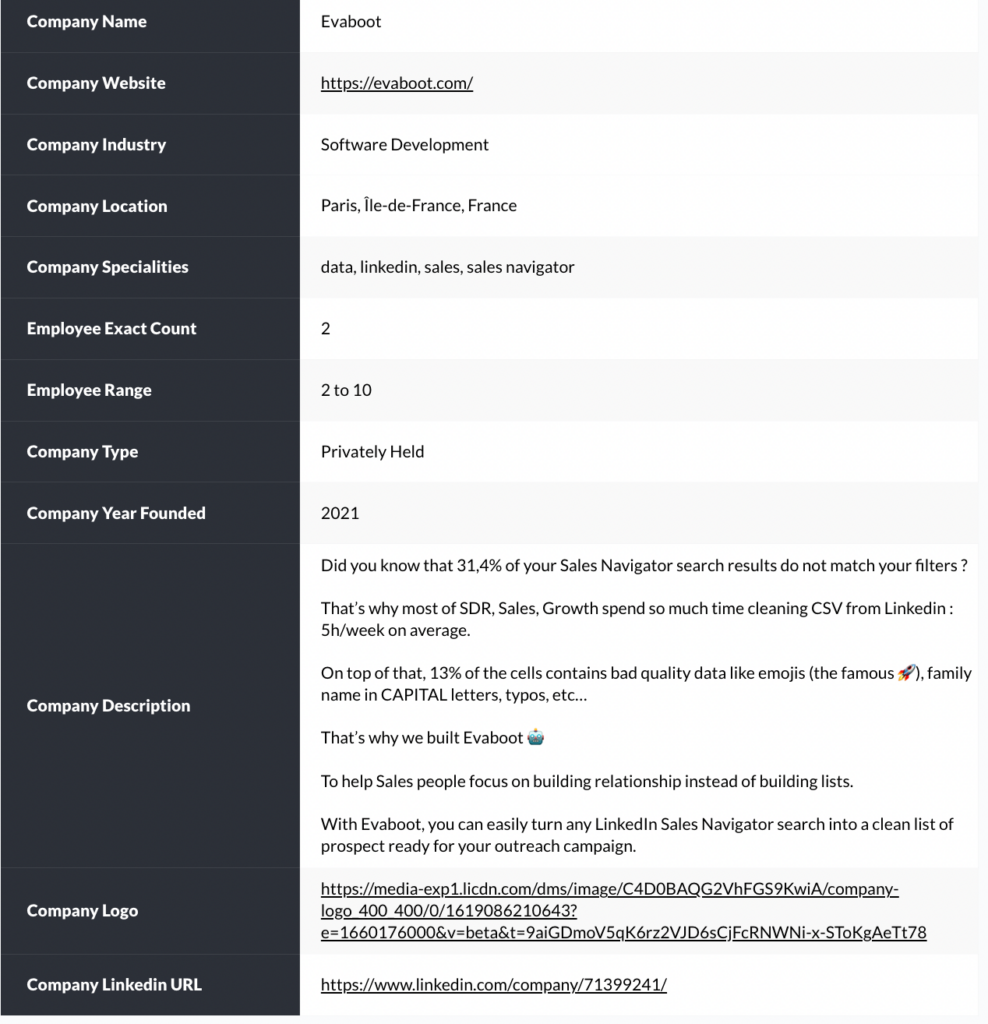
This includes:
Once you have all this LinkedIn data, you can open the Excel files or import them into Google Sheets to work on them.
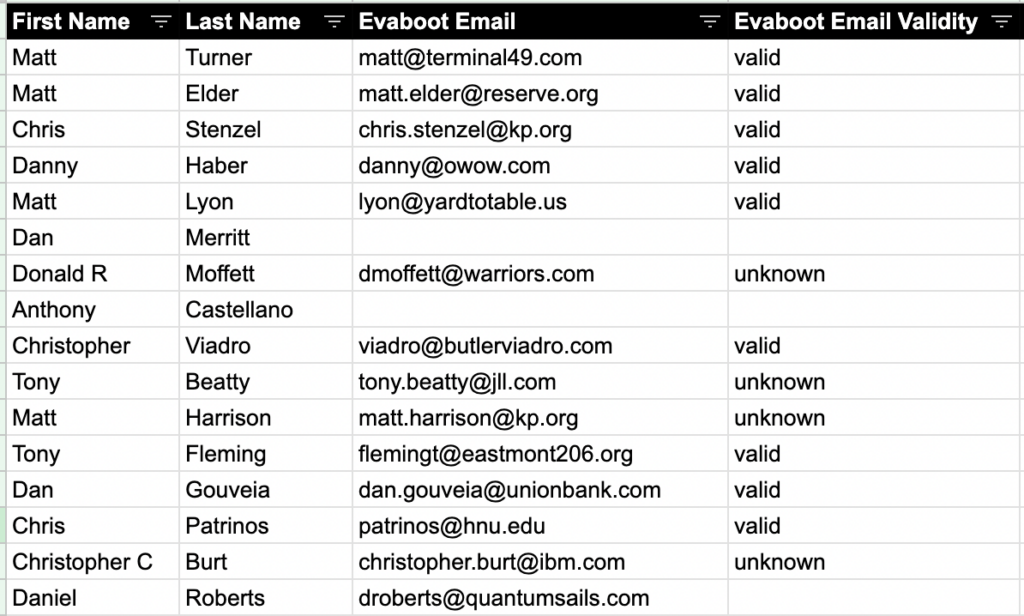
If you want to add professional emails to your Sales Navigator export, click “With Emails” when launching the export.
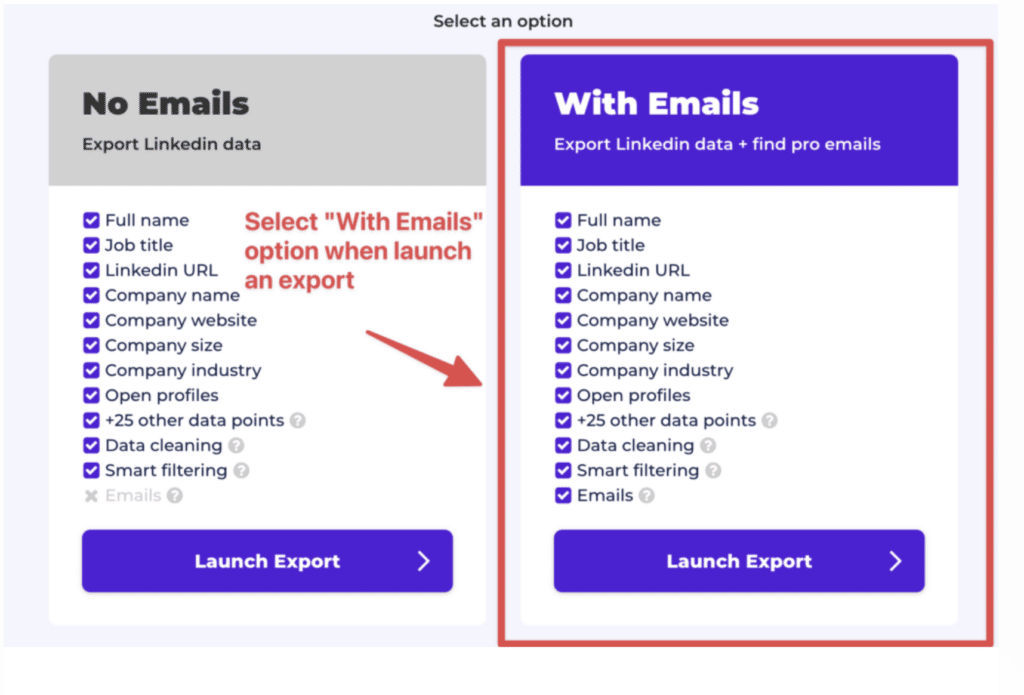
You can also launch the email enrichment later by clicking “Find Emails” on the Evaboot dashboard.

Few minutes later, the pro emails will be added in your file:
Some LinkedIn profiles contain emails, but that is far from the majority. For 1st degree connections, you’ll find the email on the profile in 30% of the cases.

For 2nd and 3rd-degree connections, this number drops to 5%.

That’s why you can’t rely on scraping only to find emails from LinkedIn.
To get emails from LinkedIn Sales Navigator, Evaboot uses 3 different techniques:

To optimize the efficiency of any email finder, you need to provide the right data points.
All email finders will ask you for three key pieces of information to do their job correctly:
Most people don’t always provide company domain, but this is a huge mistake. Providing the domain will increase verified email discovery by 10-20%!
If you don’t provide a website to an email finder, it will search Google to find the website for you.
If the company name you give is specific, like Welcome To The Jungle, the email finder will work well.
There are not many companies with that name, so it can easily find the right website.
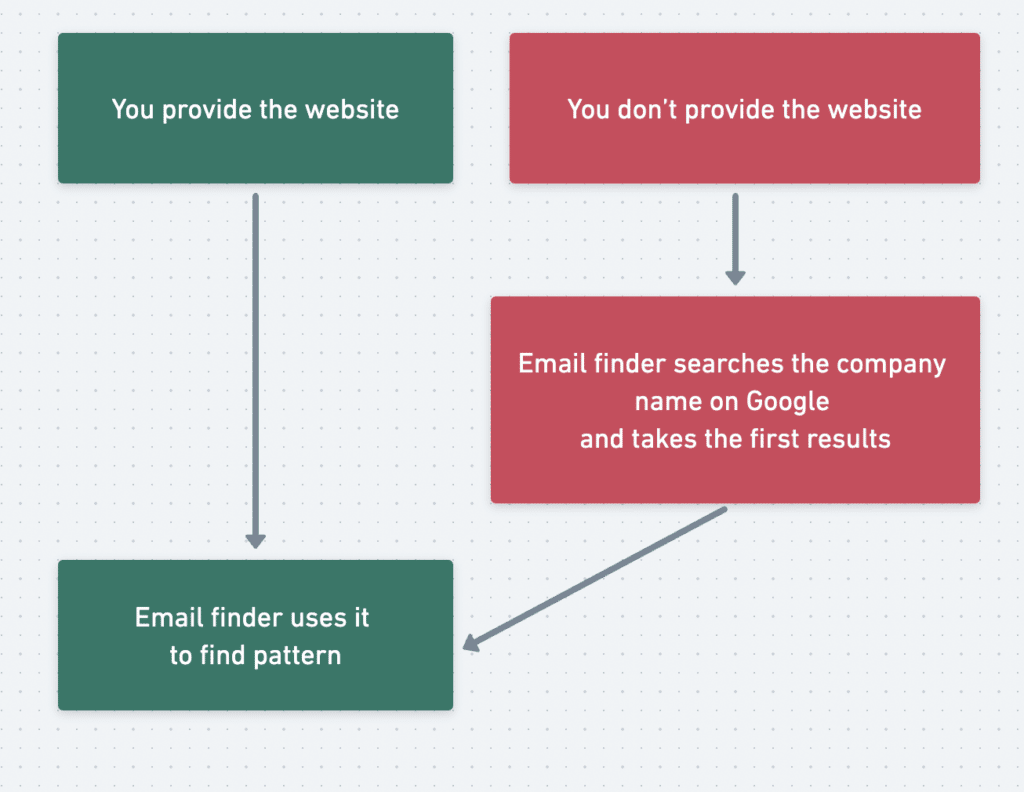
If the company name is generic, like ABC Digital Consulting, many companies might have the same name. This means there could be many websites with that name, such as .co and .com .ai, .io, etc.)
The email finder won’t always find the correct domain name you’re looking for, and you’ll contact the wrong prospects. So, remember to always provide the websites to email finders.
Note that you can do the reserve and also find LinkedIn URLs from emails using other tools.
Only 0.5% of LinkedIn members chose to share their phone numbers with 2nd and 3rd degree connections.
That’s understandable, you don’t want to be harassed on the phone by any stranger?
That’s why you must use external databases to find phone numbers from LinkedIn Sales Navigator.
Once you export a list with Evaboot, you can upload it into Datagma Bulk Phone Finder.
Connect to Datagma and click on Search > File Upload > Mobile Phone Numbers Only.
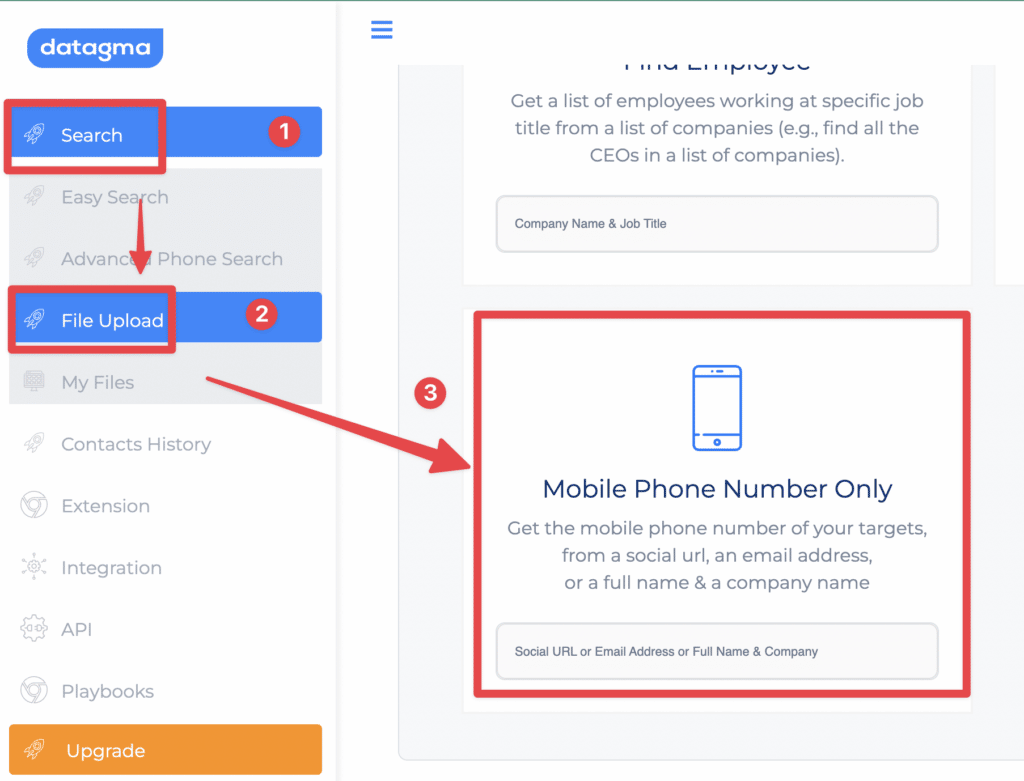
There will be a column-matching step:
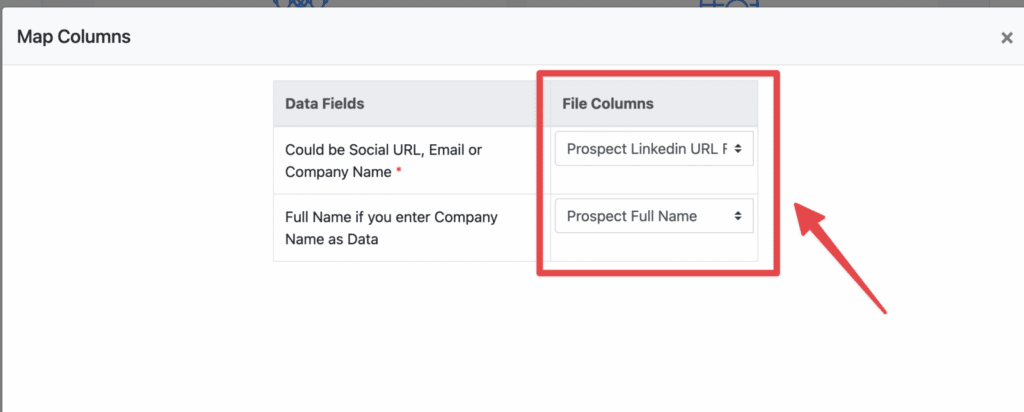
Wait for the file processing to finish, and hundreds of phone numbers are added to your file.
You will only pay for phone credits when Datagma finds a phone number.
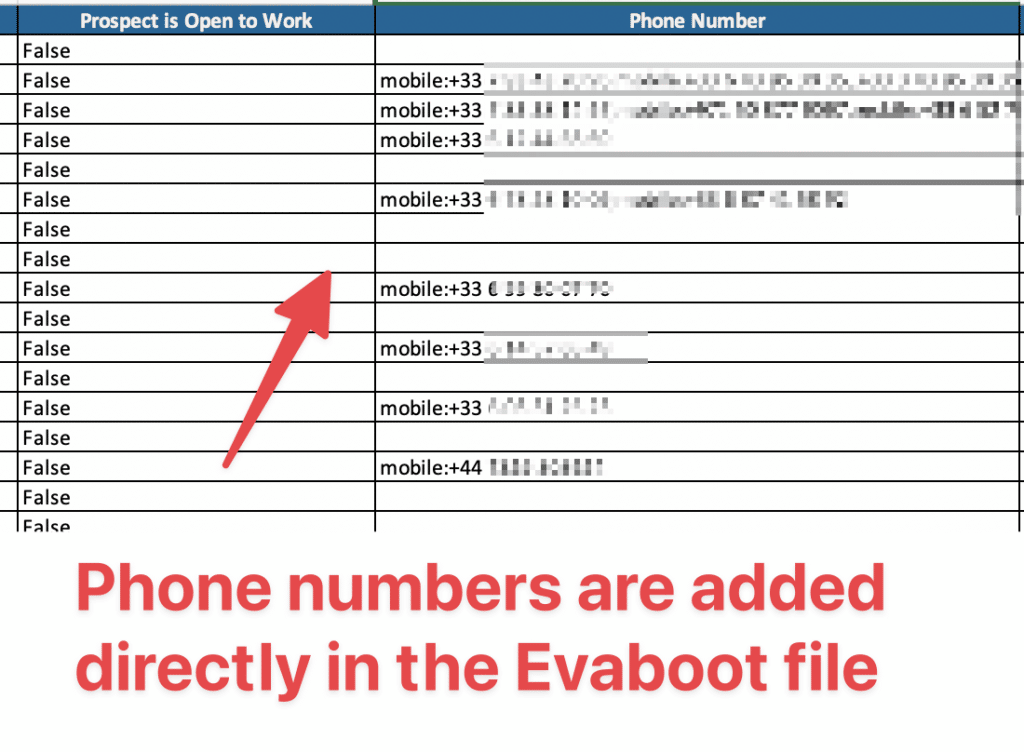
That’s it. You built a spotless lead list with phone numbers.
There are two limitations to be aware of when you export from LinkedIn Sales Navigator lead lists:
This limit is in place because LinkedIn shows only 100 pages. Each page has 25 results on Sales Navigator. This means there are 2,500 prospects in total (25*100=2500).
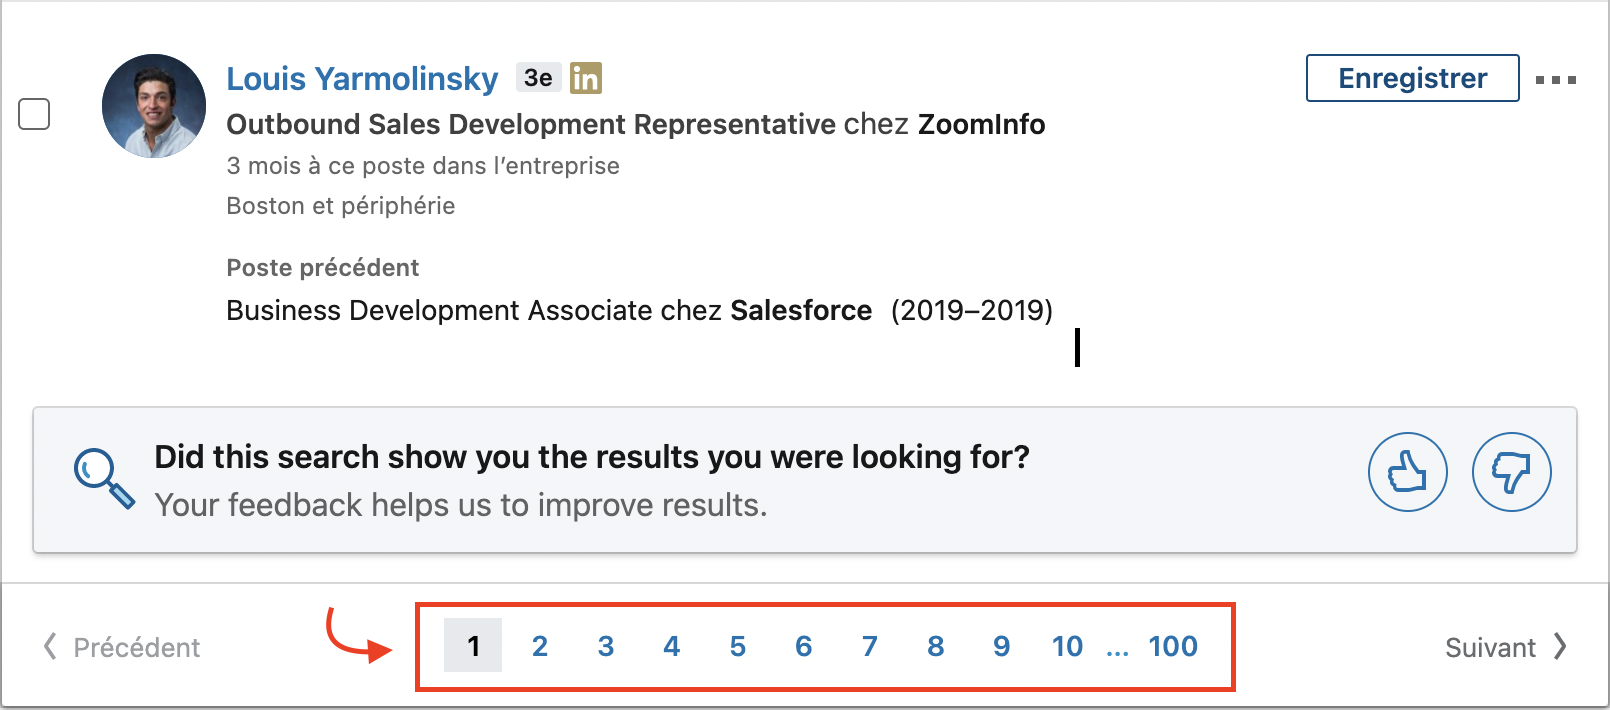
LinkedIn has this limit to protect its database. It helps stop people who want to take all the data from LinkedIn.
If your Sales Navigator search has more than 2,500 results, you must split it into smaller parts. Use different search filters to see all the results.
The Function, Seniority, and Industry Filters can be used for that.
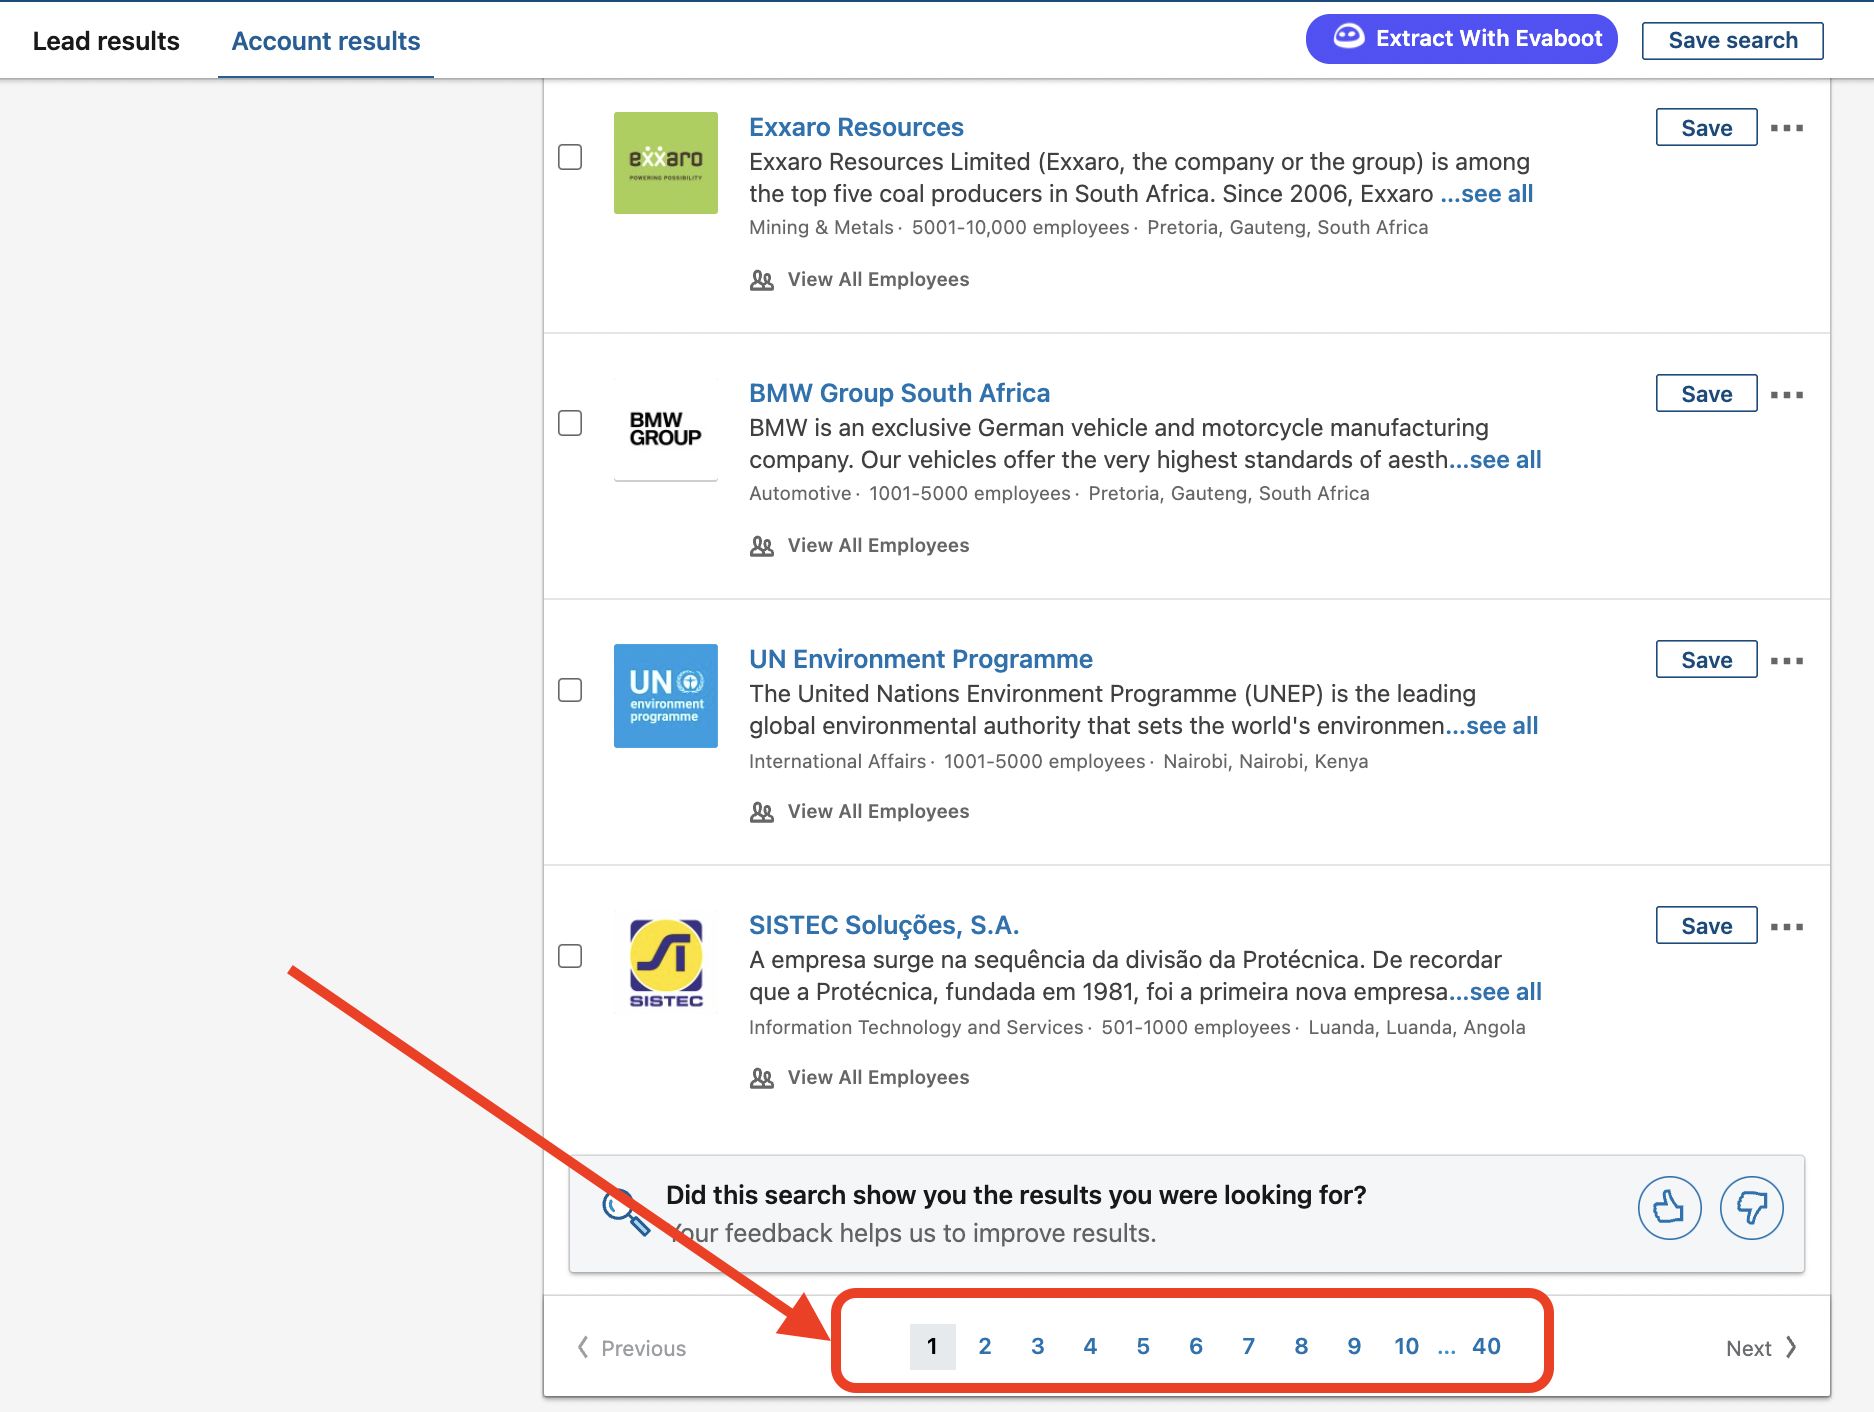
For the account search, the results are limited to 1000 accounts (40 pages of 25 accounts each).
As you know, LinkedIn is not a big fan of automation and bots. Still, LinkedIn doesn’t have many salespeople who need them.
To protect your Sales Navigator account, you must respect the rules. LinkedIn has built technical systems to protect its database from abusive extractors.
Notes
Be careful if you use Evaboot + another tool. You will be able to export more than 2.5K leads, but this will really endanger your LinkedIn account.
Many powerful tools can help you export data from Sales Navigator.
But did you know you can also import data into Sales Navigator?
It’s possible if you have a LinkedIn Sales Navigator Advanced Plan. I’ve explained everything in this video:
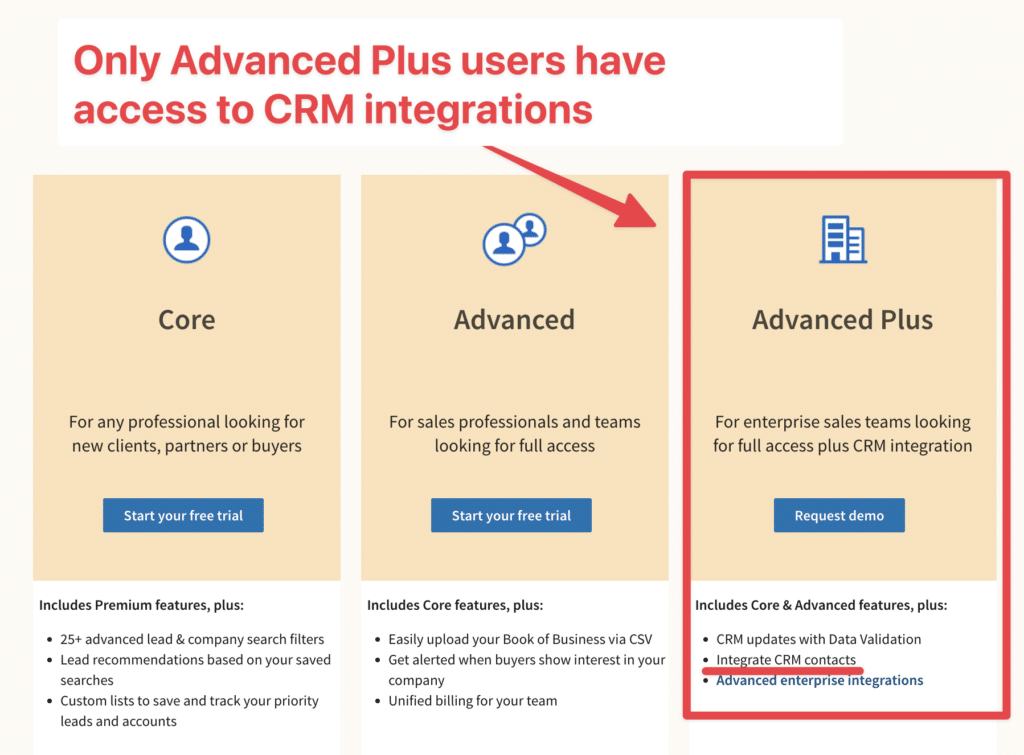
LinkedIn Sales Navigator does have direct integrations with CRMs like Hubspot and Salesforce.
The thing is that they are only available to Sales Navigator Advanced Plus account owners.
This license has no public prices. You must go through Linkedin Sales Team to subscribe to that one.
So, if importing potential customers to your CRM is part of your lead gen process, you have 2 options.
If you have a lot of budget, buy the Sales Navigator Advanced Plus subscription.
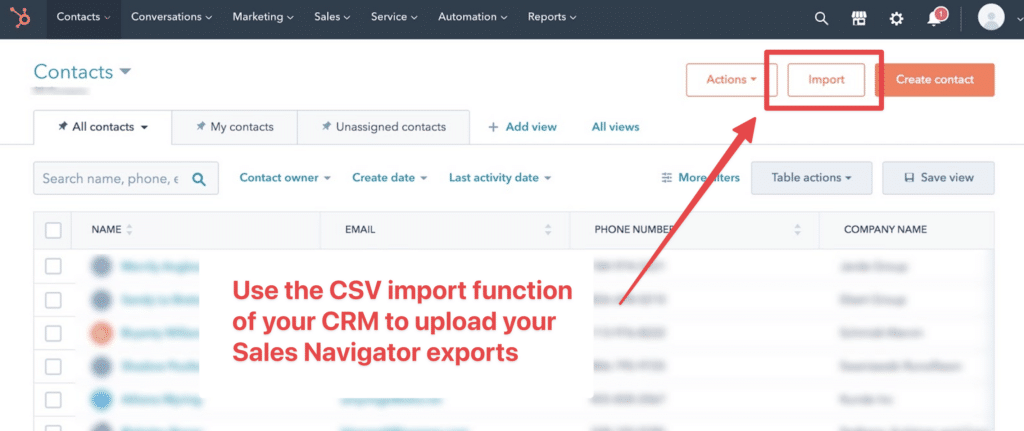
If you don’t want to subscribe, you can still export the leads with Evaboot. Then, use the CSV import function to add the file you extracted.
Most CRMs, including Hubspot, Salesforce, and Pipedrive, offer this option.
If you don’t have Lead or Account lists to export, let me show you how to create a targeted prospecting list in 5 steps:
To create a prospecting list, start by identifying your ideal customer profile (ICP). Next, define your buyer persona.
An ICP describes the type of company that fits the best to your product or service.
A buyer persona is a semi-fictional representation of the individual decision-makers within your target companies.
![5 Steps To Build A Sales Prospecting List In 2024 [+Tools] 4 icp vs buyer personae](https://evaboot.com/wp-content/uploads/2023/11/icp-vs-buyer-personae-1024x256.png)
By creating an ICP and buyer personas, you can focus on your target market. This helps you find the most relevant and qualified prospects for your business.
To create an ICP, you need to consider factors and demographics such as:
![5 Steps To Build A Sales Prospecting List In 2024 [+Tools] 5 build your icp prospecting list](https://evaboot.com/wp-content/uploads/2023/11/build-your-icp-prospecting-list-1024x256.png)
To create a buyer persona, you need to consider factors such as:
![5 Steps To Build A Sales Prospecting List In 2024 [+Tools] 6 build your buyer personae prospecting list](https://evaboot.com/wp-content/uploads/2023/11/build-your-buyer-personae-prospecting-list-1024x256.png)
You can easily make buyer personas using online tools. Try HubSpot’s Make My Persona or Xtensio’s User Persona Creator.
You can use surveys, interviews, or social media to collect data. This helps you gain insights from your current customers or contact lists.
![5 Steps To Build A Sales Prospecting List In 2024 [+Tools] 7 hubspot make my personae](https://evaboot.com/wp-content/uploads/2023/11/hubspot-make-my-personae-1024x573.png)
To complete these steps, you must clearly understand what you are trying to sell.
As a salesperson, you must grasp:
Understanding your unique value proposition lets you identify which customers will benefit from your product or service.
Once your ICP and buyer personas are well-defined, you can look for them using LinkedIn Sales Navigator.
LinkedIn Sales Navigator is a powerful tool for salespeople to quickly and easily identify and connect with potential customers.
With Sales Navigator, sales reps can access a large database of prospects and leads. This includes detailed information about job titles, company size, industry, and more.

The first step will be to build a list of companies matching your Ideal Customer profile.
For that, you can use the account search filters:
You can find other filters to find the companies that would be perfect clients for your business.

It’s time to save all these companies into a list:
![5 Steps To Build A Sales Prospecting List In 2024 [+Tools] 10 build company prospect list](https://evaboot.com/wp-content/uploads/2023/11/build-company-prospect-list-1024x596.png)
Now, let’s find your buyer personas in these ICP companies.
All the people working in these companies will appear on the right.
![5 Steps To Build A Sales Prospecting List In 2024 [+Tools] 11 find buyer personae linkedin sales navigator](https://evaboot.com/wp-content/uploads/2023/11/find-buyer-personae-linkedin-sales-navigator-1024x555.png)
Obviously, we don’t want to reach out to everybody. We must find our buyer persona inside that list.
For that, we are going to use lead filters like:
![5 Steps To Build A Sales Prospecting List In 2024 [+Tools] 12 build list of qualified prospect linkedin sales navigator](https://evaboot.com/wp-content/uploads/2023/11/build-list-of-qualified-prospect-linkedin-sales-navigator-1024x555.png)
Here, I added “CEO” to the job title filter, and LinkedIn gave me all the CEOs of the companies on my list.
This is an easy and efficient way to quickly identify the right buyer persona inside ICP companies.
![5 Steps To Build A Sales Prospecting List In 2024 [+Tools] 13 prospect list building autopilot](https://evaboot.com/wp-content/uploads/2023/11/prospect-list-building-autopilot-1024x677.png)
Once you are happy with a search, you can even save it. LinkedIn will alert new leads matching your search criteria every week.
And here’s a useful tip: You can create a Persona in Sales Navigator by function, seniority, job title, and geography to quickly find the right leads and stop wasting time rebuilding searches.
Once you have your lead lists and have exported them with Evaboot, as I showed you earlier, it’s time to store them somewhere.
For that, you can use a CRM like:
Pipedrive is a good fit if you are just getting started.
If you are a small marketing team, you can go with Hubspot.
If you are an enterprise with a really big sales team, you can go with Salesforce.
![5 Steps To Build A Sales Prospecting List In 2024 [+Tools] 18 crm for prospect lists](https://evaboot.com/wp-content/uploads/2023/11/crm-for-prospect-lists-1024x256.png)
After you upload your leads into your CRM, you can begin reaching out to them. You should also keep track of your interactions by taking notes.
If you want to save time, you can also use email and LinkedIn automation tools like:
They let you automate emails and LinkedIn messages. This helps you follow up easily. You can then focus on building relationships with those who replied to you.
![5 Steps To Build A Sales Prospecting List In 2024 [+Tools] 19 upload sales prospecting list to outreach tools](https://evaboot.com/wp-content/uploads/2023/11/upload-sales-prospecting-list-to-outreach-tools-1024x256.png)
Since your prospecting list has LinkedIn profiles and emails, use both channels to contact your leads.
Here is a video showing how to use LaGrowthMachine to reach your prospects.
Once you’ve built your lead list in Sales Navigator and exported it, the next step is reaching out.
But generic messages won’t get you replies, and sending personalized icebreakers at scale takes ages.
That’s where AI come into play.
Here’s how to write custom, conversation-starting openers in seconds:
To get the most out of AI for your LinkedIn prospecting messages, you need to provide the right context and instructions.
Your prompt will have to include contextual data such as:

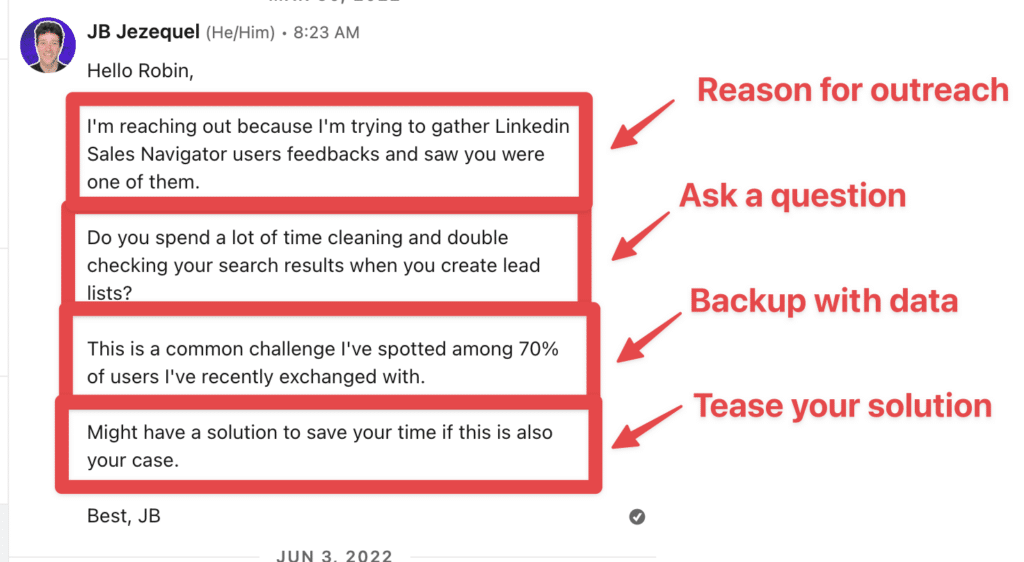
Once you’ve got your context, here’s a sample prompt using the RABT framework you can try:
Write a LinkedIn icebreaker message to a [TARGET ROLE] at a [COMPANY TYPE] using the RABT formula:
1. Reason for outreach: Reference [SPECIFIC TRIGGER – recent post, job change, mutual connection]
2. Ask a question: Include a thoughtful question about [RELEVANT TOPIC]
3. Backup with data: Mention [CREDIBILITY POINT or RELEVANT STATISTIC]
4. Tease your solution: Hint at a solution without directly pitching
Keep it under 300 characters, conversational, and don’t pitch in the first message.
This structured approach ensures your AI generates relevant icebreakers that follow best practices rather than generic templates.
This will produce a message like this:
Here are three AI-ready templates you can customize for different prospecting scenarios.
Each follows the RABT framework and is designed to maximize response rates:
Subject: your thoughts on [topic of their post]
Hi [First Name],
Your recent post about [specific point from their content] caught my attention. The part about [specific detail] resonated with what we’re seeing in the market.
Have you found that [ask a specific question related to their post]?
We recently helped [similar company] improve their [relevant metric] by [percentage].
Might have some insights that could help with your approach if you’re interested.
[Your Name]
Subject: congrats on the new role
Hi [First Name],
Congratulations on your new position as [Role] at [Company]! I noticed you previously worked at [Previous Company] in [Previous Industry].
What’s been the biggest adjustment in your transition to [New Industry/Company]?
Having worked with several [similar professionals] during role transitions, I’d be interested to hear your perspective.
I might have a resource that addresses some common challenges in this transition.
[Your Name]
Subject: Thoughts on [recent industry development]
Hi [First Name],
I saw that [Prospect’s Company] was mentioned in relation to [recent industry news/trend]. This seems like a significant development for companies in your space.
How is your team approaching [specific challenge related to the news]?
According to [credible source], [relevant statistic or insight] – I’d love to hear if that aligns with what you’re experiencing.
Might have a solution to streamline this process if it’s something you’re working through.
[Your Name]
These templates are starting points – instruct your AI to adapt them to your specific prospect and situation while maintaining the RABT structure.
The real power of using AI for LinkedIn icebreakers comes when you can personalize messages at scale. Here’s how to implement this in your workflow:

By combining the efficiency of AI with the personal touch of human review, you can create highly effective icebreakers that stand out in crowded LinkedIn inboxes.
Exporting leads from LinkedIn Sales Navigator to Excel doesn’t have to be a daunting task.
With the right scraping tools and techniques, you can manage your data easily. You can also integrate it with your CRM. This will help you improve your outreach strategies.
By following the steps outlined in this guide, you’ll be well on your way to maximizing your LinkedIn leads.
Yes, you can export leads from LinkedIn Sales Navigator, but it requires the use of third-party tools since LinkedIn does not offer a native export feature for lead lists.
Some tools usually offer free trials or limited free services. However, comprehensive exporting typically requires a subscription or purchase.
To export leads from Sales Navigator to Excel, use a third-party Chrome extension like Evaboot. This tool automates the data extraction process and saves you time.
1. Log in to LinkedIn Sales Navigator and go to the lead search page.
2. Use the search filters to find the leads you want to export.
3. Save those leads to Sales Navigator Lists.
4. Install the Evaboot Chrome extension provided by the third-party tool.
5. Go to the Lists tab in Sales Navigator, select your list, and click the Export button on the top right corner.
6. Select the export format (CSV or Excel) and save the file to your computer.
To efficiently scrape data from LinkedIn Sales Navigator, use the Evaboot export tool for a seamless experience.
Evaboot simplifies and automates the extraction process, saving time and ensuring accuracy.
Unlike other tools, Evaboot offers a one-click export feature, making data collection effortless, correct, and clean.
LinkedIn imposes certain limitations on exporting leads to ensure fair usage and prevent abuse:
• Per search limit: You can access up to 2,500 leads per Sales Navigator search.
• Daily export limit: The number of leads you can export daily varies depending on the tool and method used. For instance, Evaboot allows up to 2,500 leads per day to avoid you to cross the Linkedin limitations.
Managing daily limits and safe scaling practices:
• Segmented searches: Break down large lead lists into smaller segments to stay within the per-search limit.
• Multiple accounts: To increase your daily export capacity, you can consider using multiple Sales Navigator accounts.
• Avoid automation abuse: Exceeding these limits or using unauthorized automation tools may violate LinkedIn’s terms of service and could result in account restrictions.
While LinkedIn profiles may include phone numbers in the ‘Contact Info’ section, this information is often limited and not always available.
To enrich your lead data with phone numbers, consider using data enrichment tools like Datagma. After exporting your lead list, you can upload it to Datagma, which will append mobile phone numbers and other relevant contact details to your existing data.
If there are more than 2500 results in your Sales Navigator search, you will need to split it into several chunks using different search filters to access all the results. The filters Function, Seniority, and Industry can be used for that.