LinkedIn Sales Navigator Search Filters: 2026 Guide
Contents
If you’ve been wasting hours sifting through irrelevant profiles with LinkedIn’s limited search filters, it’s time to switch to LinkedIn Sales Navigator Search Filters.
LinkedIn has revolutionized online networking, but its objectives do not match those of sales reps who try to close deals and generate new leads online.
LinkedIn Sales Navigator offers 36 lead and 16 account search filters, while LinkedIn Basic Search only offers 18 filters.
Sales Navigator is the best tool for finding potential customers and ideal candidates with just a few clicks.
In this tutorial, I’ll discuss how to get the most out of LinkedIn Sales Navigator, including:
- LinkedIn Sales Navigator Lead Search Filters
- LinkedIn Sales Navigator Account Search Filters
- Advanced Techniques for Sales Navigator Search
- How To Optimize LinkedIn Search Filters with AI
- Account IQ: Turn Search Into Insight-Driven Outreach
Let’s dive right in.
LinkedIn Sales Navigator Lead Search Filters
Lead search filters help you find prospects matching specific buyer personas and ICP.
To access Sales Navigator lead filters, on your Sales Navigator homepage, click “Lead Filters”.

There are 8 categories of LinkedIn Sales Navigator Search filters for Leads.

- Keyword Filter
- Company Filters
- Role Filters
- Personal Filers
- Buy Intent Filters
- Best Path In Filters
- Recent Updates Filters
- Workflow Filters
1. Keyword Filter
Here, you only need to put the keyword you’re looking for in the search bar at the top of your Sales Navigator search results.

The keyword filter will look into the whole profile of LinkedIn members, including:
- Headline
- Job title
- About
- Skills
- Schools
- Recommendations
- and more…
These are the same search criteria you can use on your LinkedIn Account.
However, you should be careful when you use this filter.
Let’s take a dumb example: Imagine you write “sales” in the keyword filter.
If someone writes “I hate sales” in its About section, the filter will pick this person.
2. Company Filters
There are 5 company filters on Sales Navigator

- Current Company
- Company Headcount
- Past Company
- Company Type
- Company Headquarters Location
1. Current Company
This filter allows you to filter people by the current company where they work right now.

Just type the Company name and search for leads that match your quest.
2. Company Headcount
This filter helps you build a leads list of people who work at specific company sizes.
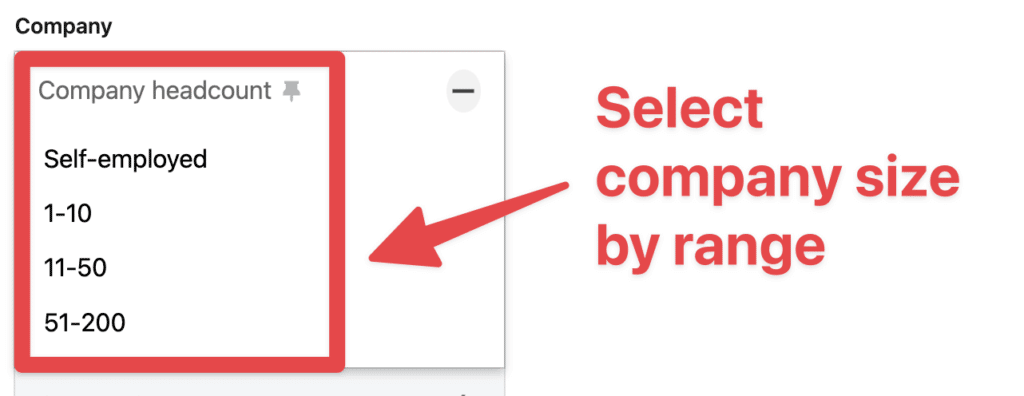
His filter considers companies’ manual input on their company page, not the number of employees declared on LinkedIn.
These two numbers can be different if the company forgets to update them as it grows.

Double-check your lead lists to see if the 2 numbers match.
The LinkedIn count will only matter if most employees are on LinkedIn.
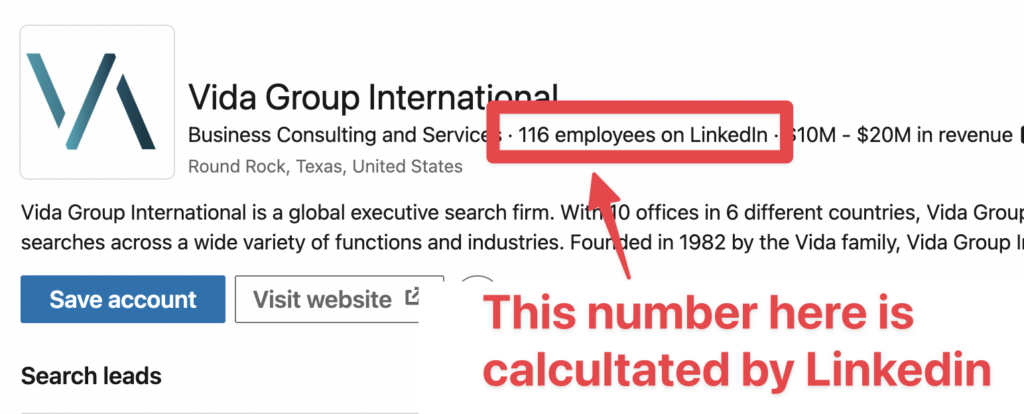
Let’s say you are looking for construction companies, but most employees won’t be on LinkedIn.
Don’t trust the LinkedIn count for non-digital companies.
3. Past Company
The Past Company filters allow you to target people who used to work in a Company.

You can also combine Current Company and Past Company filters to look for alumni of one company who currently work in another company.
For example, people who used to work at Apple and now work at Microsoft.
4. Company Type
This filter allows you to filter companies based on their type, like:
- Public
- Private
- Non-profit
- Etc.
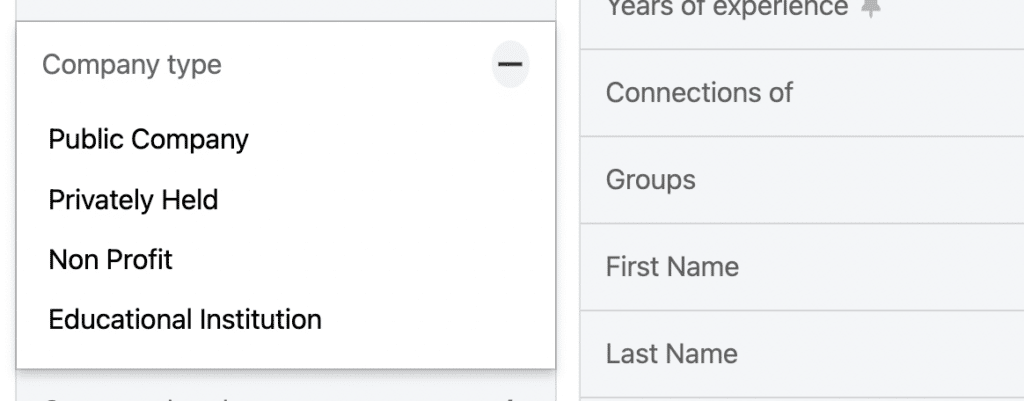
Most of you will target Privately Held companies, but some might be interested in other types.
5. Company Headquarters
This filter allows you to target people who work for a company based in a specific country, region, or city.
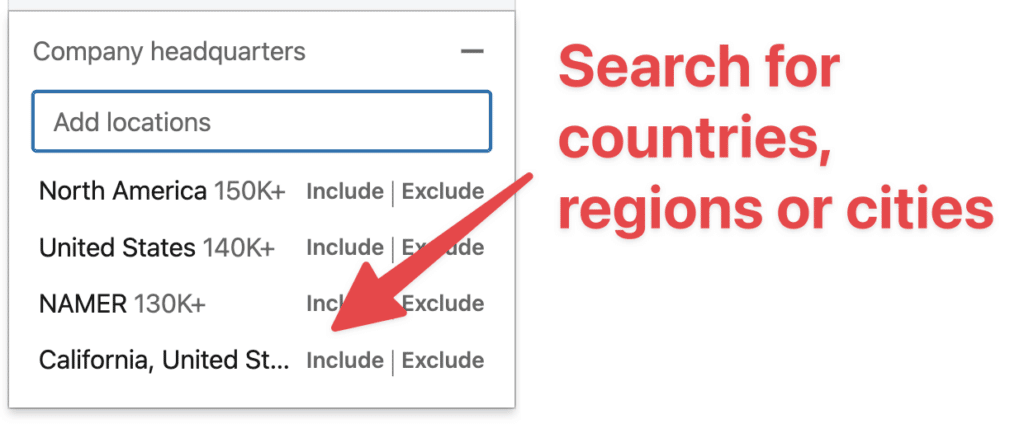
Here, you are not targeting the location of your leads or candidates but the location of their company’s headquarters.
3. Role Filters
You can target your potential leads by 6 role filters on Sales Navigator:
- Function
- Current job title
- Seniority level
- Past job title
- Years in current company
- Years in current position
1. Function
LinkedIn uses an algorithm to guess the function of people based on their job titles.
We recommend not to use this filter as it’s not reliable.
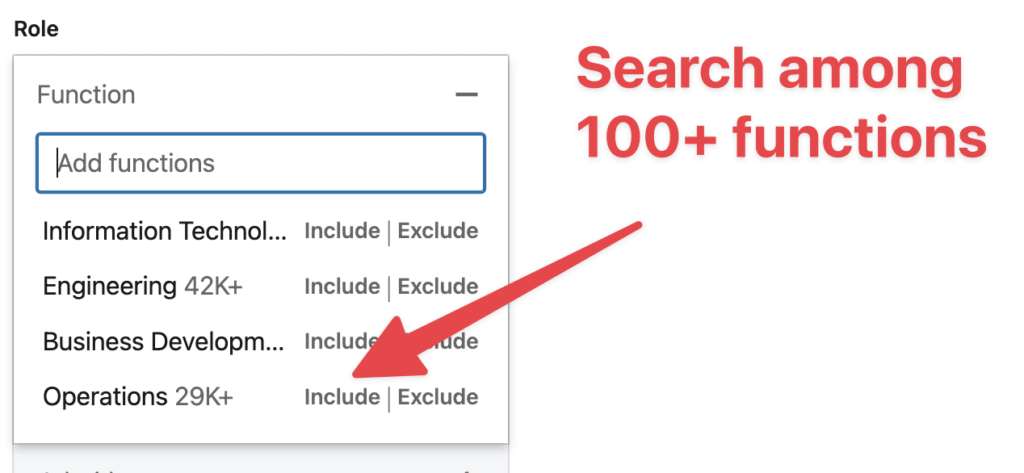
LinkedIn creates a function for every open job on your leads’ profile.
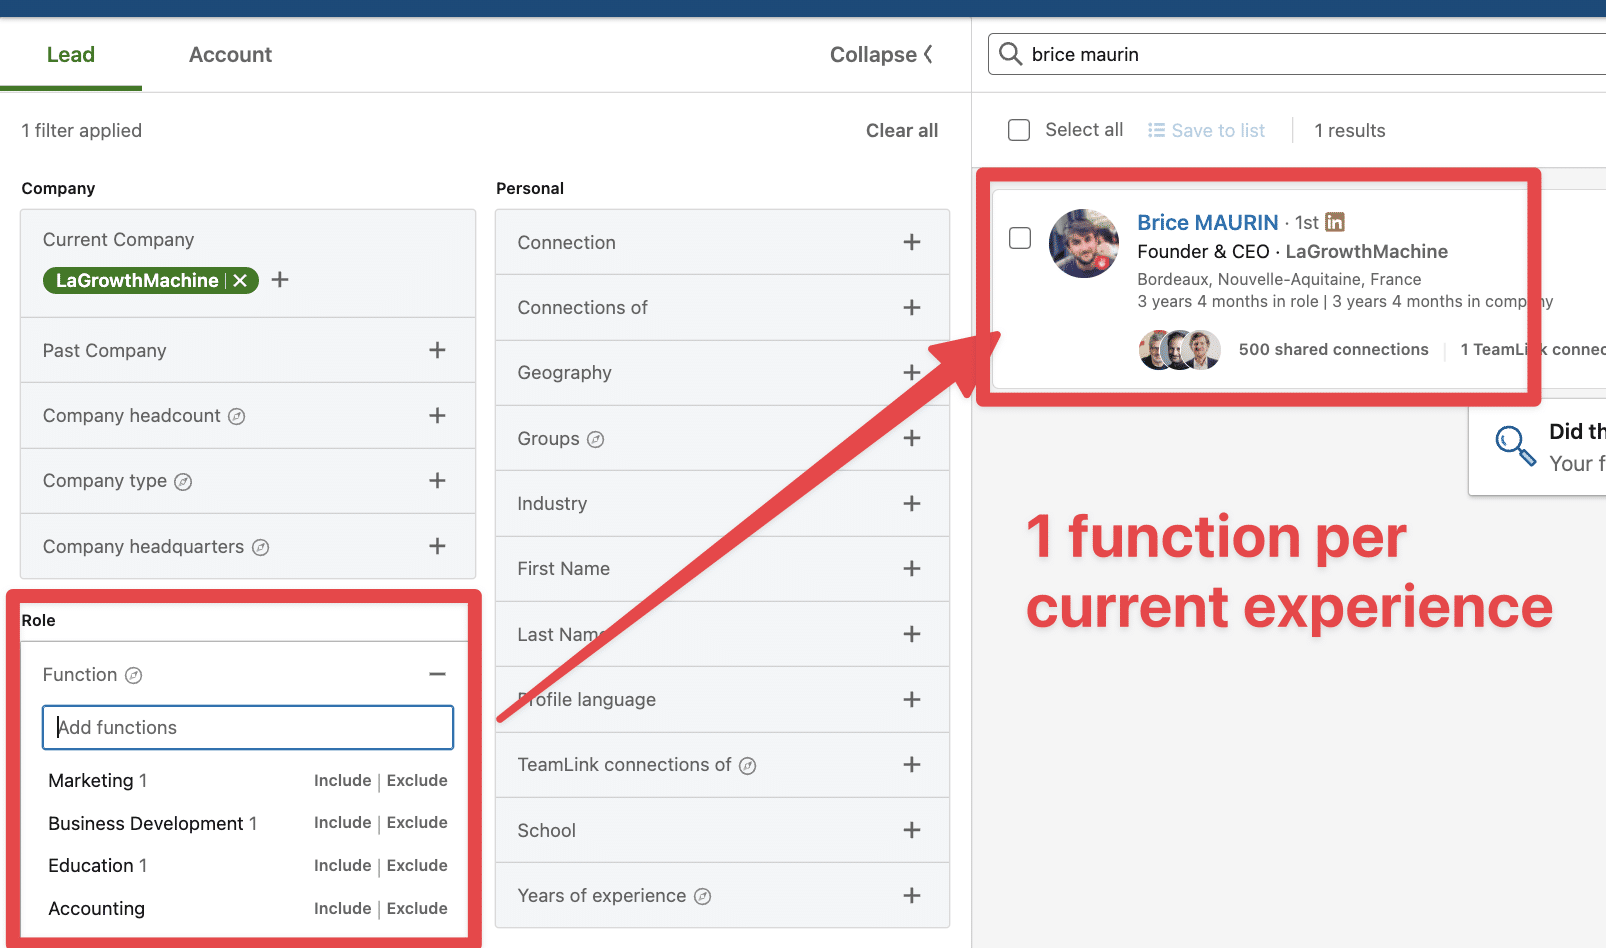
Here you can see that this person with 3 current experiences has 3 functions:
- Marketing
- Business Development
- Education
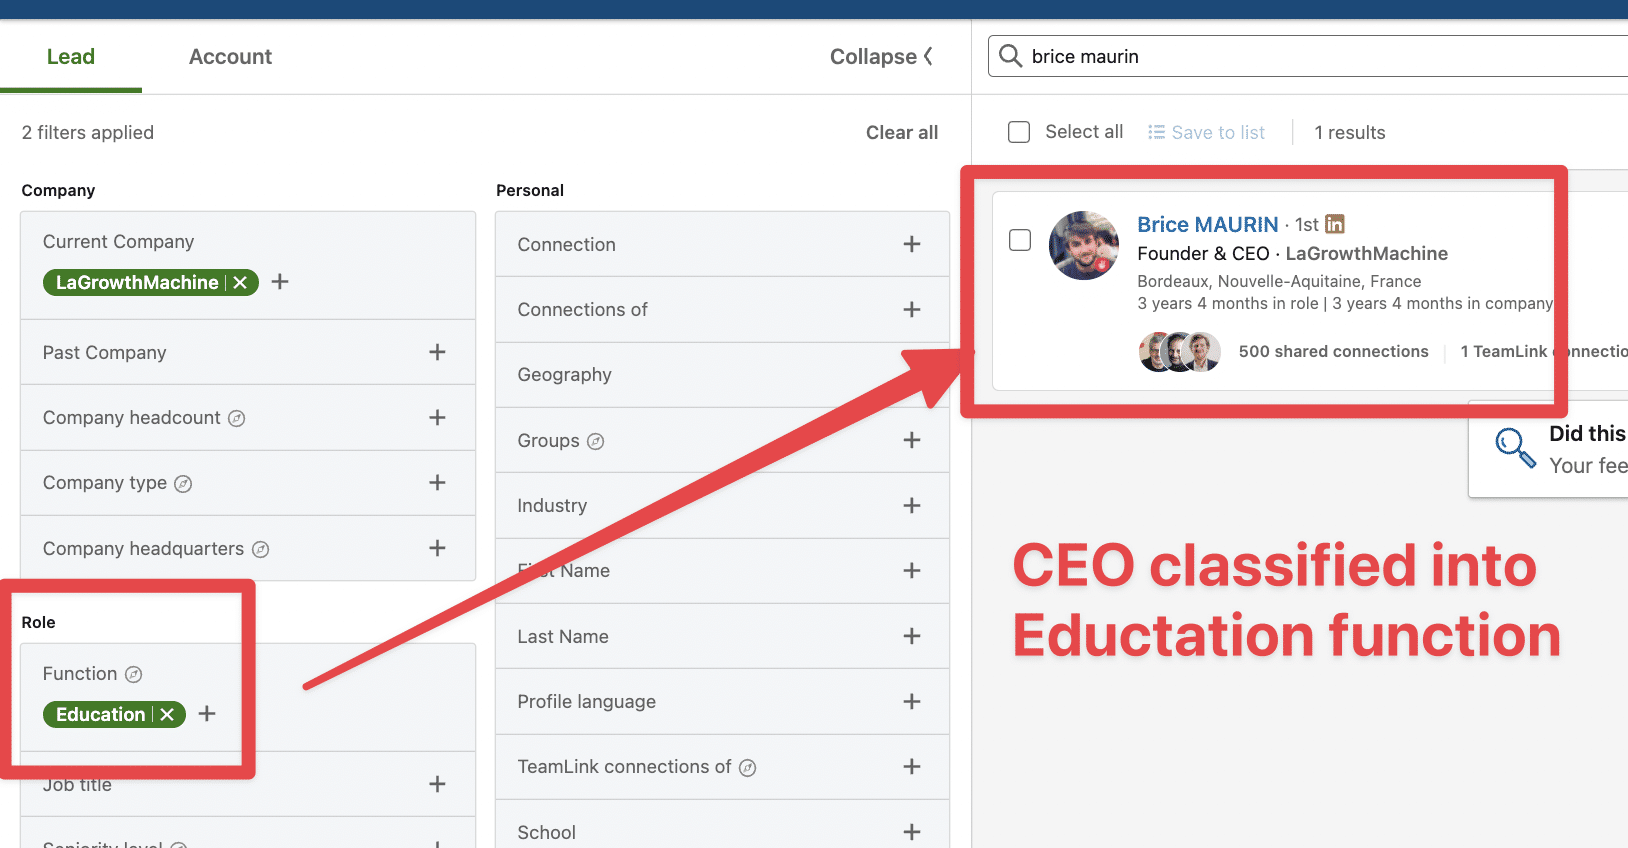
This creates confusion and can lead you to add unqualified leads to your search results.
2. Current job title
The Current job filter looks into your prospects’ current experiences.

When you use the job title filter, LinkedIn will search within all the job experiences marked as “Present“
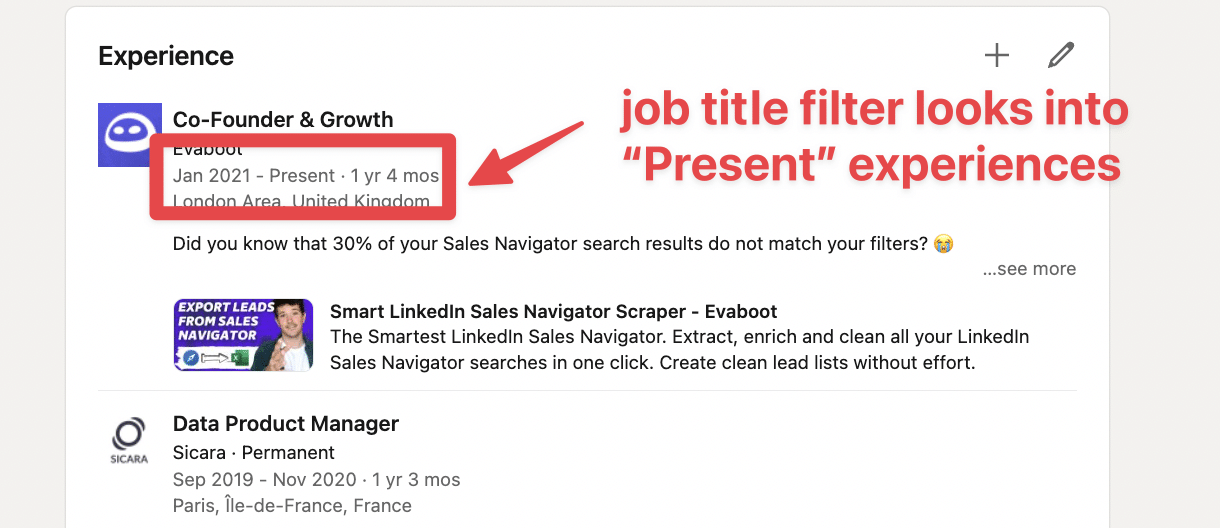
The thing is, many people forget to update their job position when they change jobs correctly.
They create a new experience but don’t close the previous one, which is still marked as present.
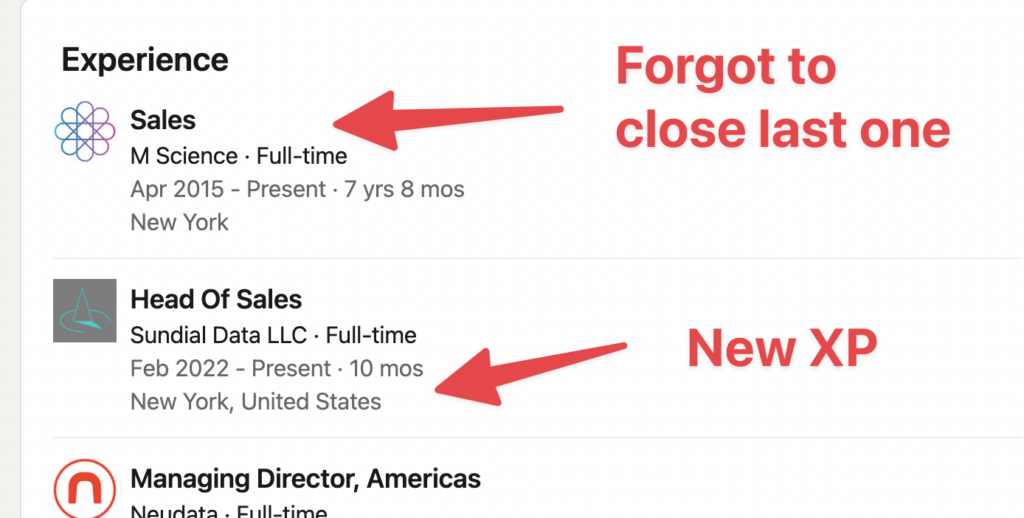
With this multiple current experience problem going on LinkedIn, you might see unqualified leads in your search even if you enter the right job titles.
In fact, some users report broader problems with Sales Navigator’s filtering system, where even carefully crafted searches still return irrelevant profiles.
Hopefully, Evaboot will solve this problem by automatically double-checking your search results when you extract your lead lists.
This export has a column named “No Match Reasons”. This column will tell you if your leads match your search filters.

If it doesn’t match, we will explain why. In this example, the leads have the wrong title. The initial search was looking for Growth Marketers.
3. Seniority Level
The same thing here.
LinkedIn uses an algorithm to guess the seniority levels of your leads based on their job titles and other information.
I don’t recommend using it!
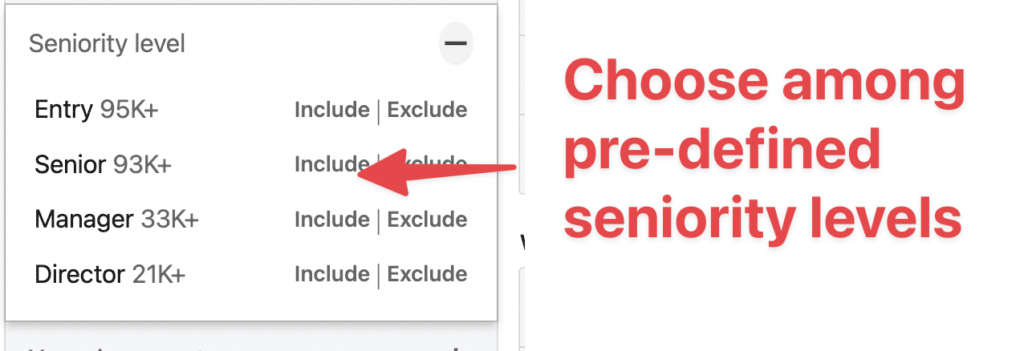
LinkedIn will create a Seniority Level for every current experience on your profile.
So, if you have 4 open experiences, your profile will have 4 different Seniority Levels attached to it.
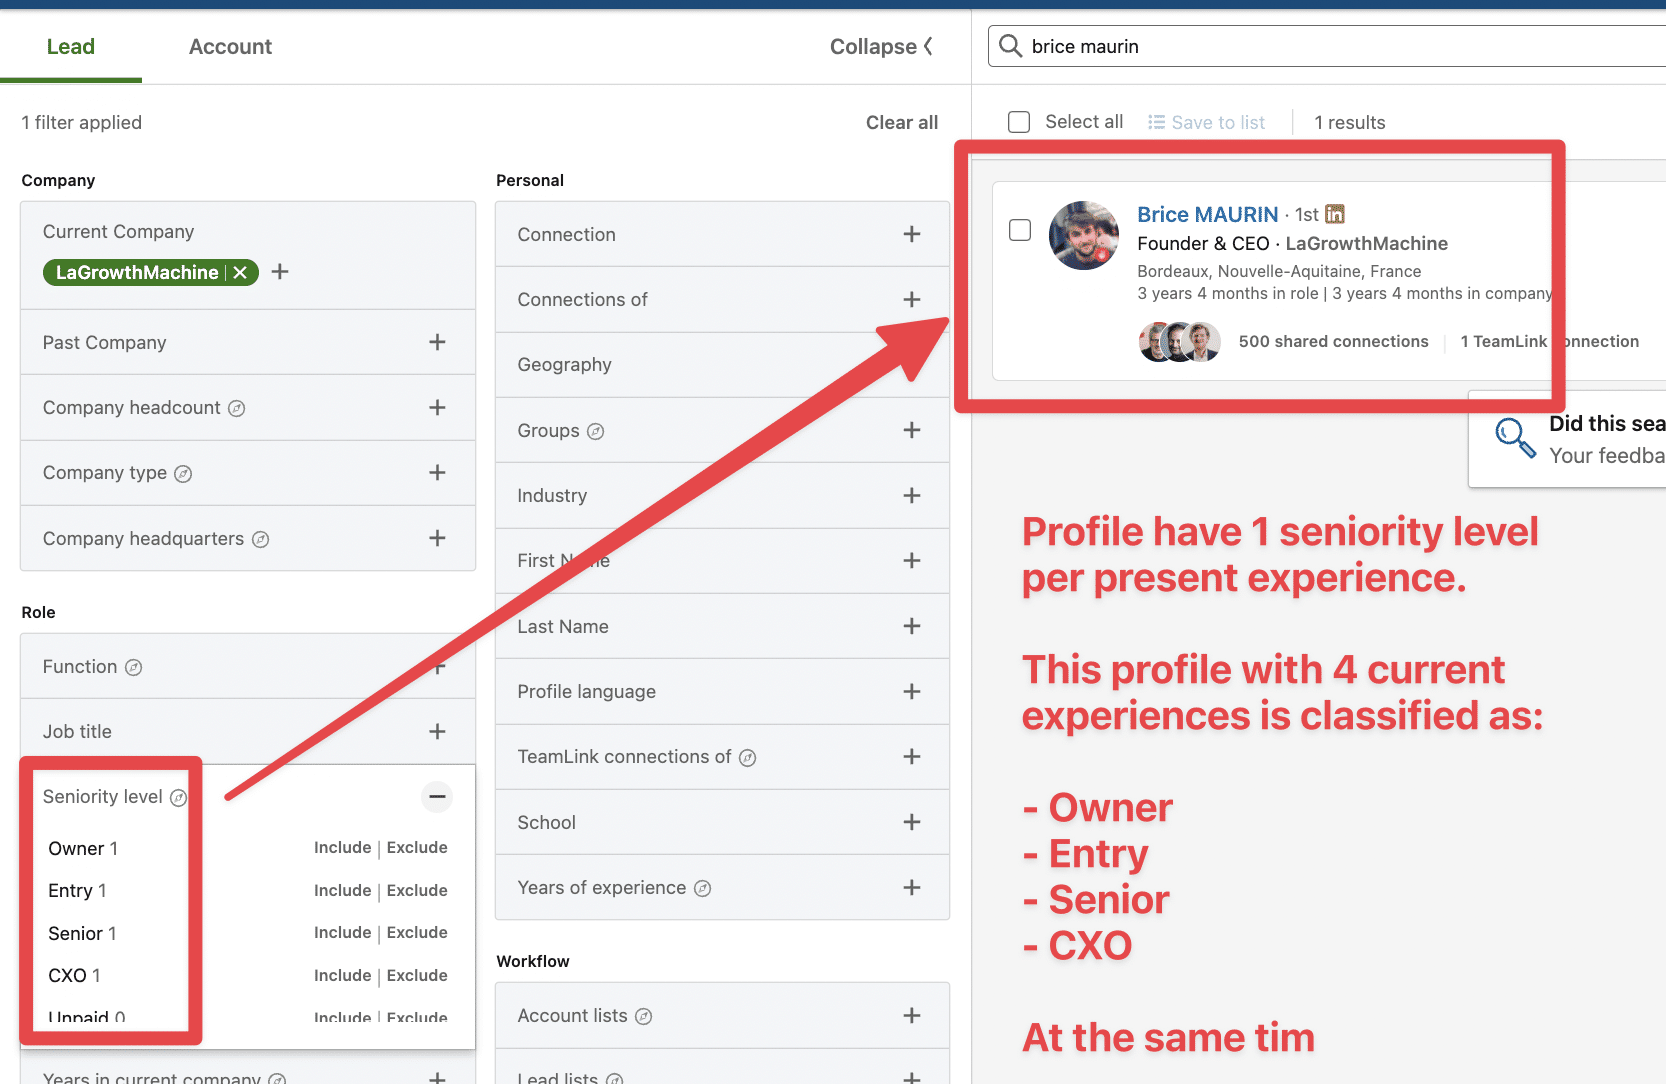
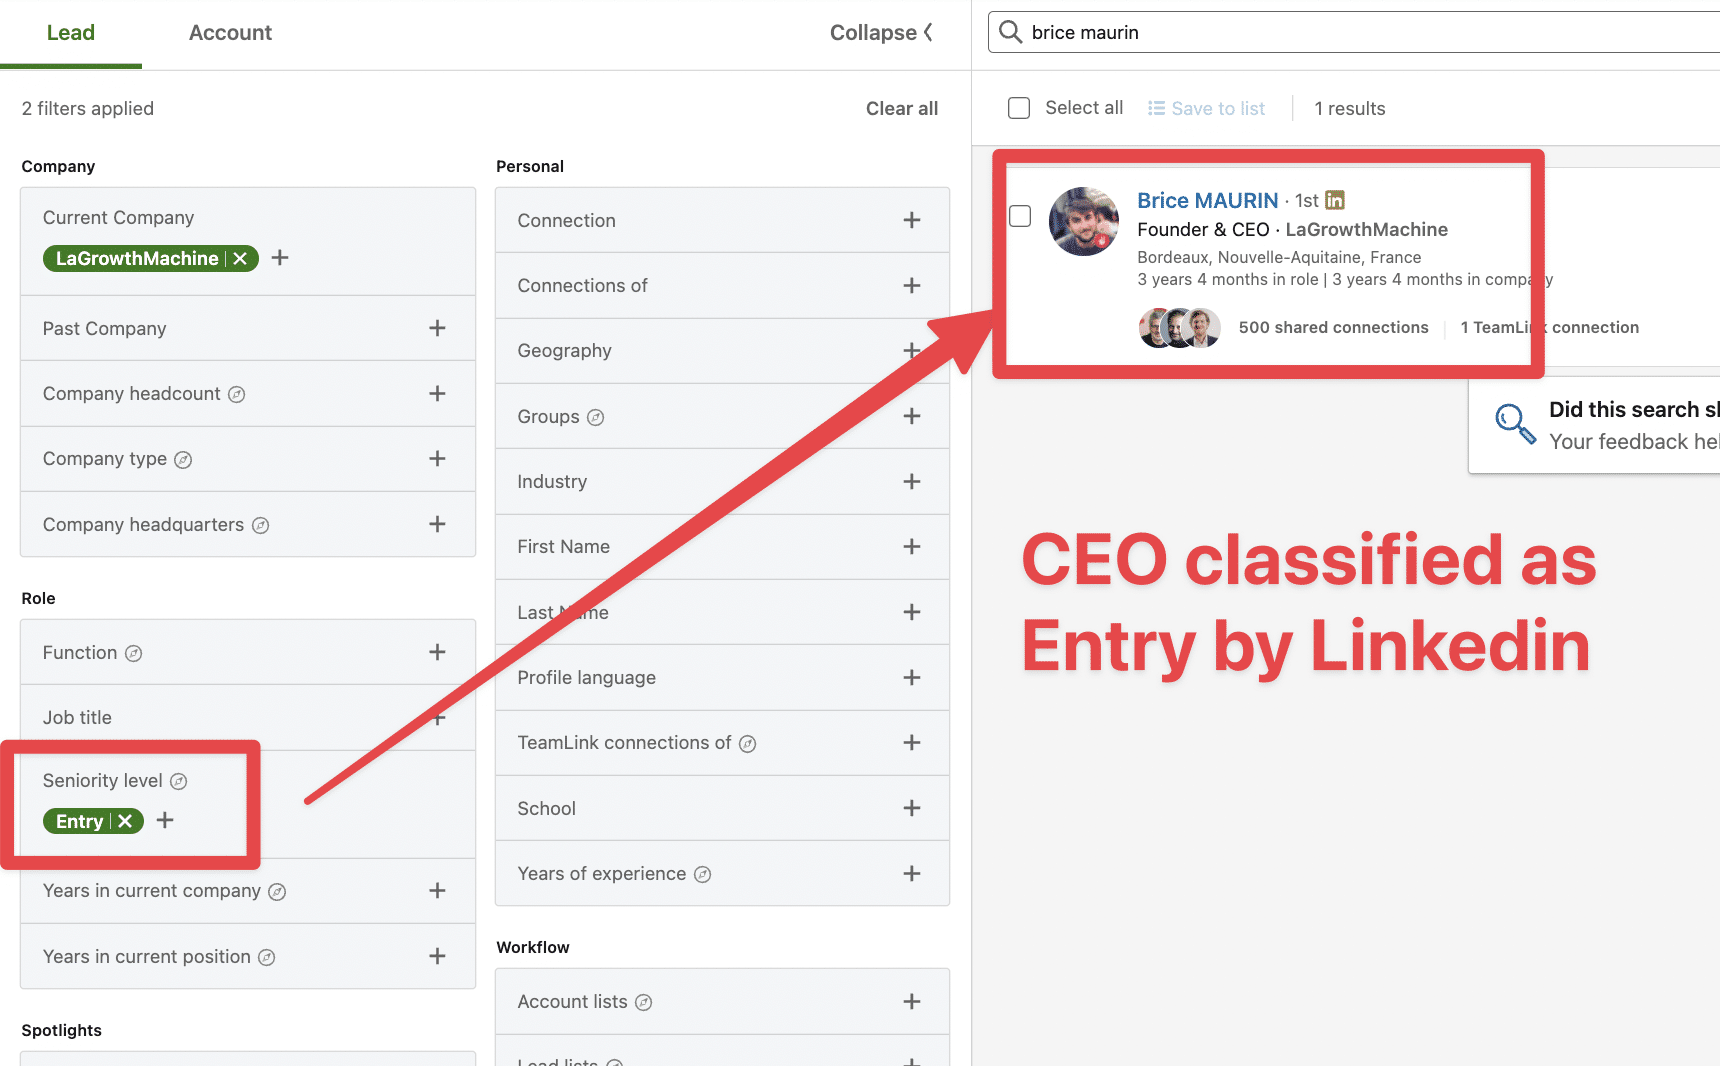
You can see in this example that a CEO can be considered an intern.
You don’t need this filter if you know exactly which job title you want to target.
4. Past job title
The Past job title filter works the same way but only looks for job experiences that are not marked “Present.”

This means you look at the past roles of the leads.
5. Year in current company
This filter can be useful if your target audience includes:
- Company heads starting their new companies, open to using new services or products (using the less than 1-year filter).
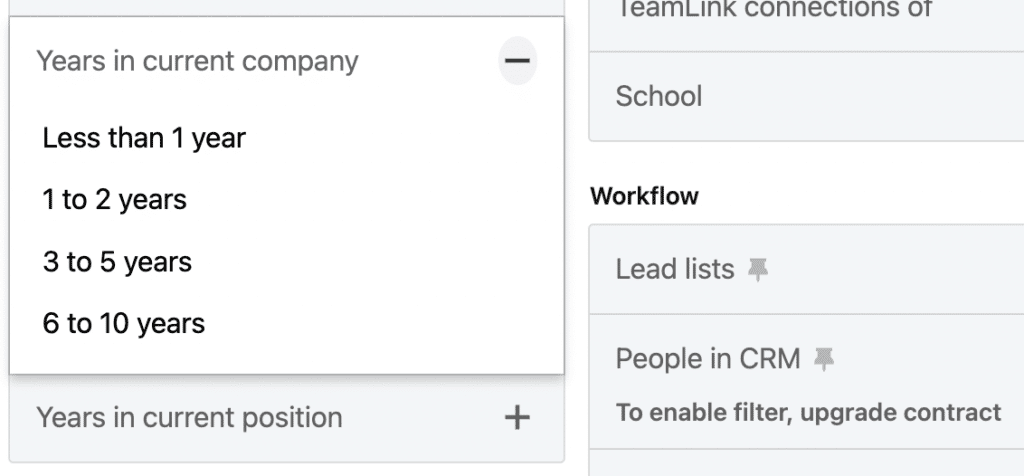
- Entrepreneurs who launch their company in enough time to have the budget to pay you.
6. Year in current position
The year in the current position filter is similar to the Year in the current company filter.

But as you can see, it takes the time spent in the current job position as input.
4. Personal Filters
There are 8 personal filters on Sales Navigator that you can use:
- Geography
- Industry
- First name
- Last name
- Profile language
- Years of experience
- Groups
- School

1. Geography
The geography filter allows you to target your leads based on their location (not the location of their company).
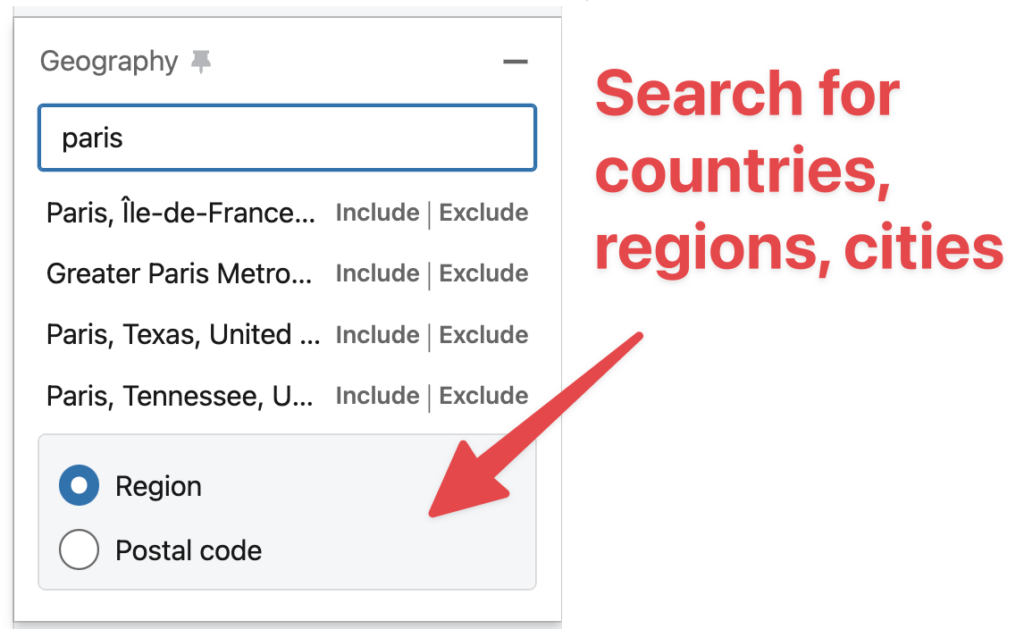
When you type a country or a city, you target people based on the location indicated on their LinkedIn Account.

2. Industry
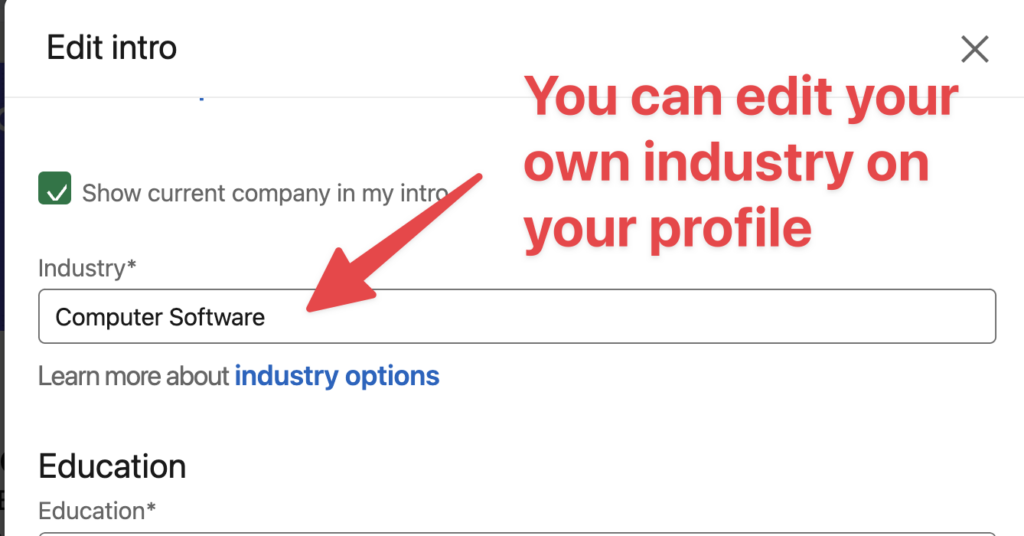
This filter allows you to filter leads based on the industry they have selected on their profile, not their company’s industry.
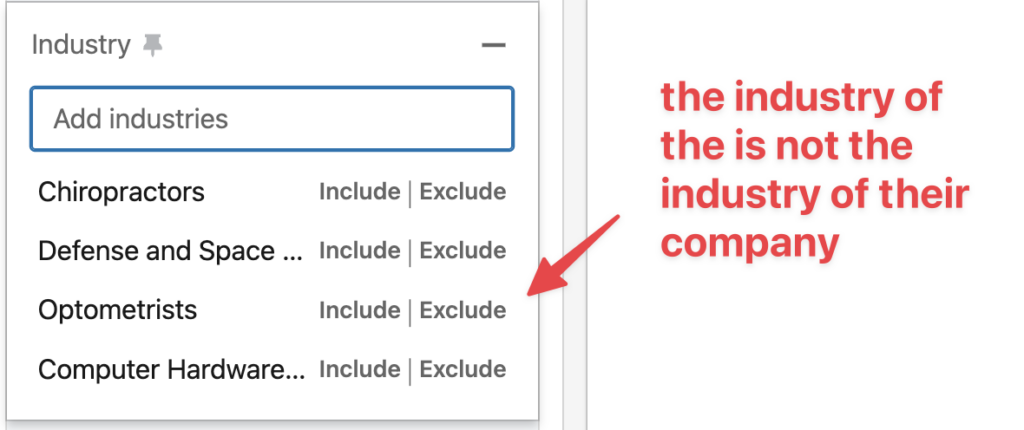
A lot of people think this filter looks at the industry of the lead’s company, but it finds the info here:
3. First Name
Target people based on their names.
It is not so useful, except if you want to contact all the Johns on Earth.
4. Last Name
Target people based on their last names.
Same thing. It’s not useful except if you want to find all Rothschilds on LinkedIn.
5. Profile Language
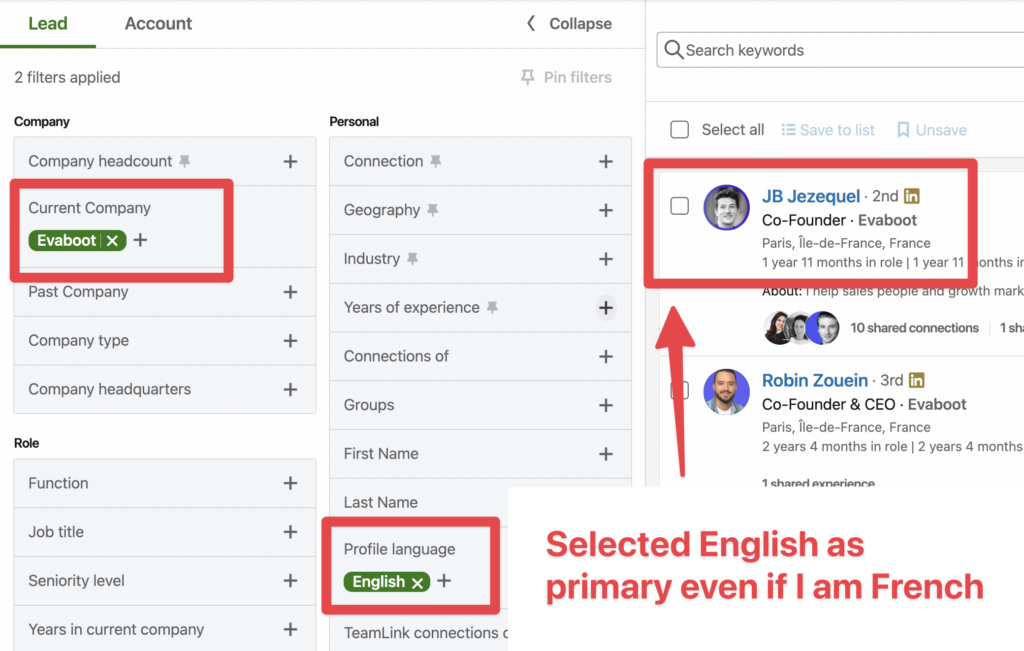
This filter allows you to target people based on the primary language of their LinkedIn profile.
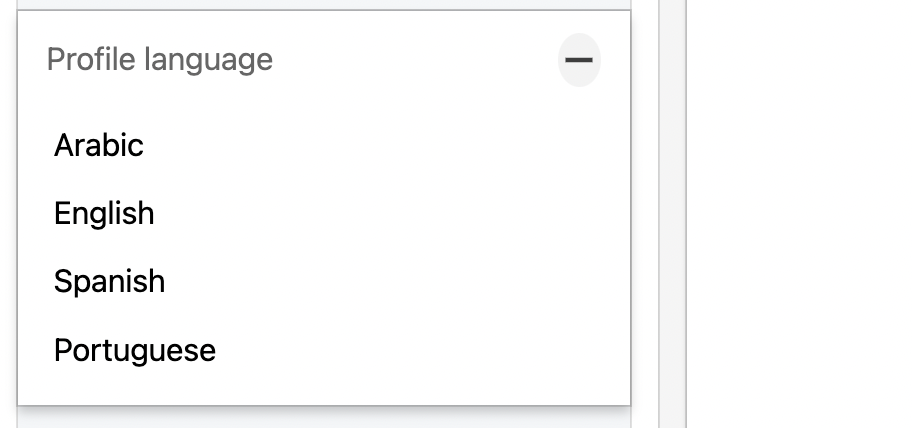
Use this filter with caution. Many people select English as their primary language, even if they speak another language.
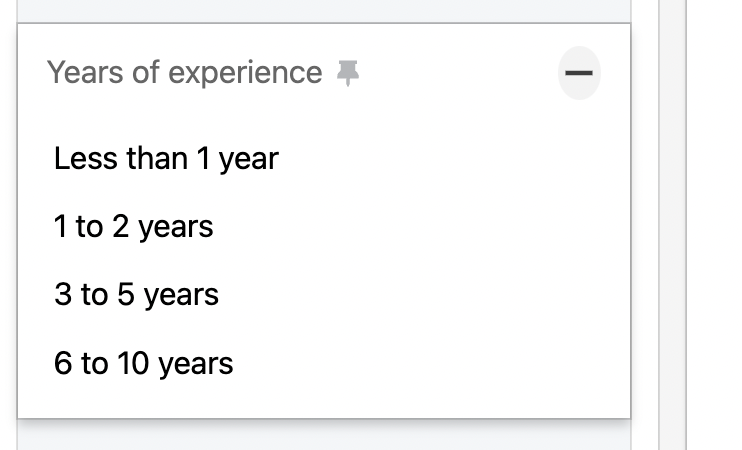
6. Years of experience
If you target people who change companies often (such as freelancers, cooks, or waiters), this filter can be useful for targeting individuals with extensive experience in one field, even if they change companies regularly.
7. Groups
This filter allows you to target people who are members of LinkedIn groups.
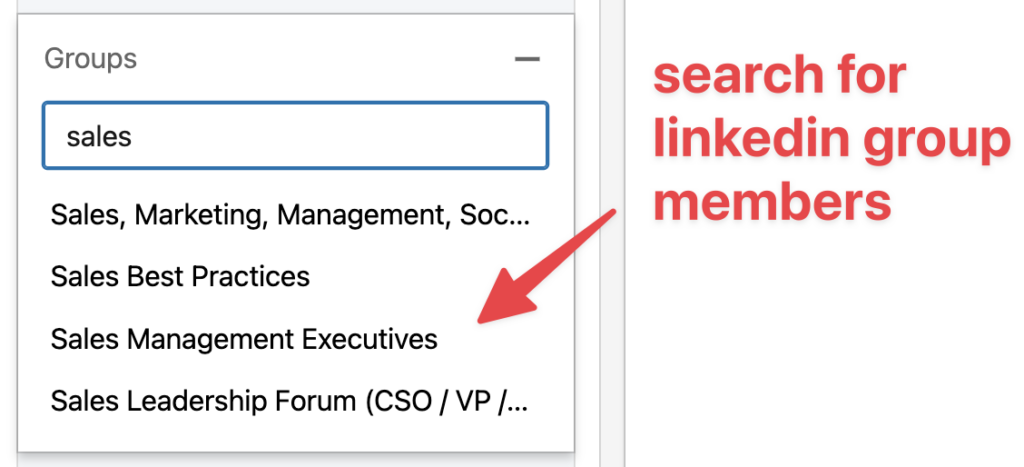
This is interesting to do interest-based targeting.
For example, you can target all the group members and mention that they are part of this group in your prospecting messages.
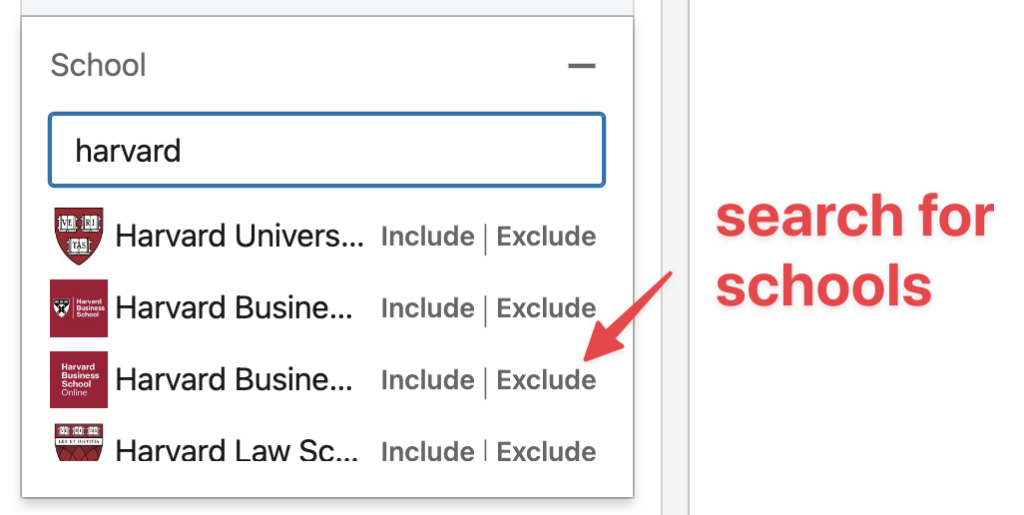
8. School
Looking to network with your alumni or recruit people from the best schools in your country?
The School filter is perfect for that need.
5. Buyer Intent
This filter category relates to finding leads most likely to respond to your outreach or express interest in your product or service.

There are 4 buyer intent filters:
- Account has buyer intent
- Category interest: Here, you can add product categories for leads who may be interested in your product category based on group membership, profile data, and other signals.
- Following your company
- Viewed your profile recently
6. Best path in
This category is for leveraging your network to find the best way into a company and uncover information to personalize your outreach.

It has 5 filter options:
- Connection
- Connections of
- TeamLink connections of
- Past colleague
- Shared experiences
1. Connection
This filter allows you to filter your lead list based on their degree of connection with you.
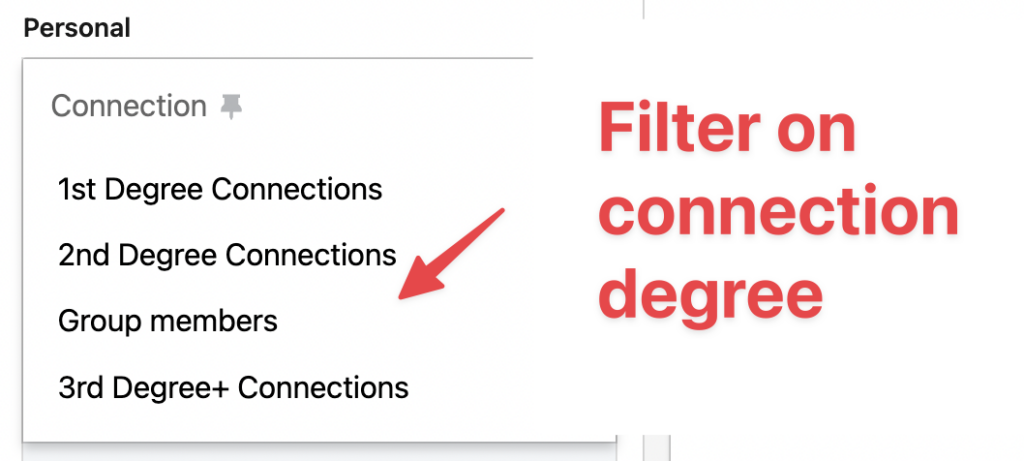
If you are doing LinkedIn lead generation, you want to select 2nd and 3rd degree connections because you want to contact people you haven’t connected with yet.
2. Connection of
This feature will display all the connections you have in common with someone.

You can leverage that to get warm introductions to people you just added to your network.
3. With Teamlink Intro
LinkedIn Teamlink is a Sales Navigator Advanced feature.
This filter lets you find new leads your teammate can introduce you to.
This filter displays leads that are:
- Shared mutual connection
- People on your contract who are connected to the lead
- People who have accepted a TeamLink Extend seat for your contract (or a contract linked to your contract via TeamLink Groups)
4. Past colleague
You got it. This feature identifies all the people that used to work with you.

These people can be from your previous or current company who no longer work there.
5. Shared experiences
With this filter, you can find leads who share with you:
- The same groups
- Schools
- Or past/current companies.

This gives you a personal connection to leverage when reaching out.
LinkedIn data shows that nearly nine out of 10 (88%) salespeople say it’s easier to break the ice when they identify common connections when cold-calling or sending InMails to a lead.
7. Recent updates
Here, you can find 3 filters.

These filters help you refine your search and target leads who have:
- Changed jobs
- Posted on LinkedIn
- Mentioned in news
1. Changed jobs
This filter allows targeting of people who recently took a new position (in the last 90 days).

You can use this filter to target decision-makers who have just arrived in their companies.
They usually want to implement new things, making them more likely to buy new products or services.
2. Posted on LinkedIn
Same thing here. LinkedIn posts are a great way to build relationships with someone more easily.

In this case, you can:
- Like the post
- Leave a comment
- Send a message mentioning the post
You are sure to get a good reply rate with this technique.
3. Mentioned in the news
This filter gives excellent icebreaker ideas for your messages and follow-ups on LinkedIn.
You can target leads mentioned in the news in the last 30 days.

You can mention the news displayed on LinkedIn to craft super-personalized messages.
You can access over 800 news sources that ensure excellent industry and geographic coverage.
8. Workflow

- Persona
- Account lists
- Lead lists
- People in CRM
- People you interacted with
- Saved leads and accounts
1. Persona
With this filter, you can categorize the Sales Navigator Personas you previously set up.

This new feature allows you to combine the Persona filter with others to narrow down leads who match your Buyer Persona by function, seniority, job title, and geography.
2. Account lists
You can use the Account list filter to find leads that match your “all accounts lists” or custom accounts lists.

This filter helps you to narrow down your searches of decision-makers in the companies that match your ICP.
3. Lead lists
This filter works the same way as the Account lists filter.

The only difference is that you can filter by the leads within your “all leads lists” or custom lead lists.
4. People in CRM
This filter is only available to the Sales Navigator Advanced Plus (Enterprise) subscribers.
You must connect your CRM to Sales Navigator to filter your search by leads or contacts in your connected CRM.
5. People you interacted with
This filter is a great way to reconnect and build relationships with leads you’ve saved, contacted before, viewed their profile (in the last 90 days), or sent a message (in the last 2 years).

6. Saved leads and accounts
Here, you can filter the lead and account lists created in Sales Navigator, where you’ve manually added profiles from LinkedIn.

When you save a lead or an account, Sales Navigator automatically adds them to “Saved searches”.
LinkedIn Sales Navigator Accounts Search Filters
There are 4 types of account filters on Sales Navigator to find accounts:
- Keyword Filter
- Company Attributes Filters
- Spotlights Filters
- Workflow Filters
1. Keyword Filter
You can find the account keyword filter at the top of your account search results.

The keyword filter will look into the Overview and Specialties fields:

The keyword filter lists any LinkedIn accounts that contain an exact or partial match of the word you type anywhere in their profile.
This means you can use it to filter LinkedIn Sales Navigator contacts by company name keywords.
For instance, if you want to find people working at companies with “auto” or “SaaS” in their name, just type that keyword into the keyword field and it will return accounts where the company name includes that term.
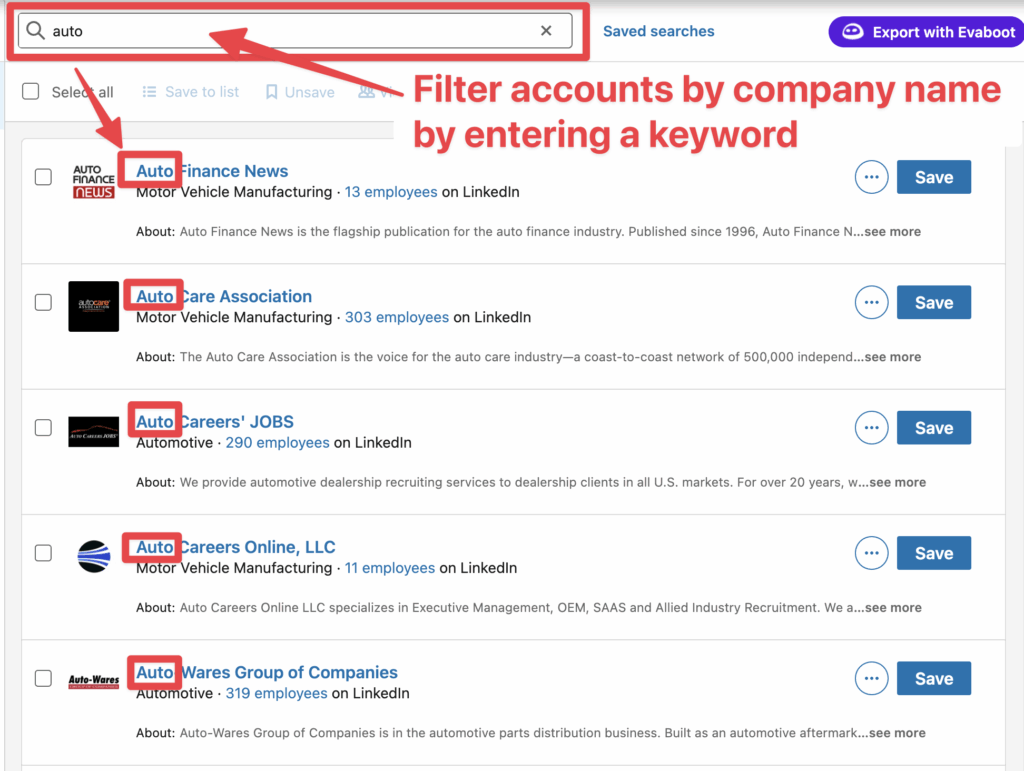
While it’s not a dedicated “company name” filter, this workaround effectively narrows down results to companies matching your keyword criteria.
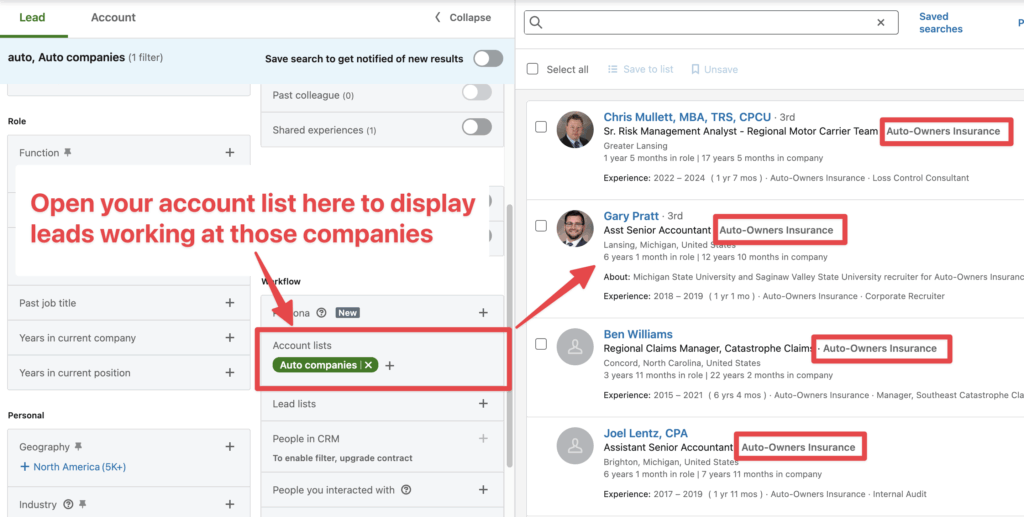
Next, save those accounts to an Account List and open that list using the “Account Lists” filter in the Lead Filters page.
You’ll now see all the employees working at those companies.
2. Company Attributes Filters
10 company attributes filters on Sales Navigator:
- Annual revenue
- Company headcount
- Company headcount growth
- Headquarters location
- Industry
- Number of followers
- Department headcount
- Department headcount growth
- Fortune
- Technologies used
1. Annual Revenue
This filter allows you to filter accounts based on the estimation of their annual revenue given by LinkedIn. For that, they use:
- Information from the web
- Extrapolations from LinkedIn data
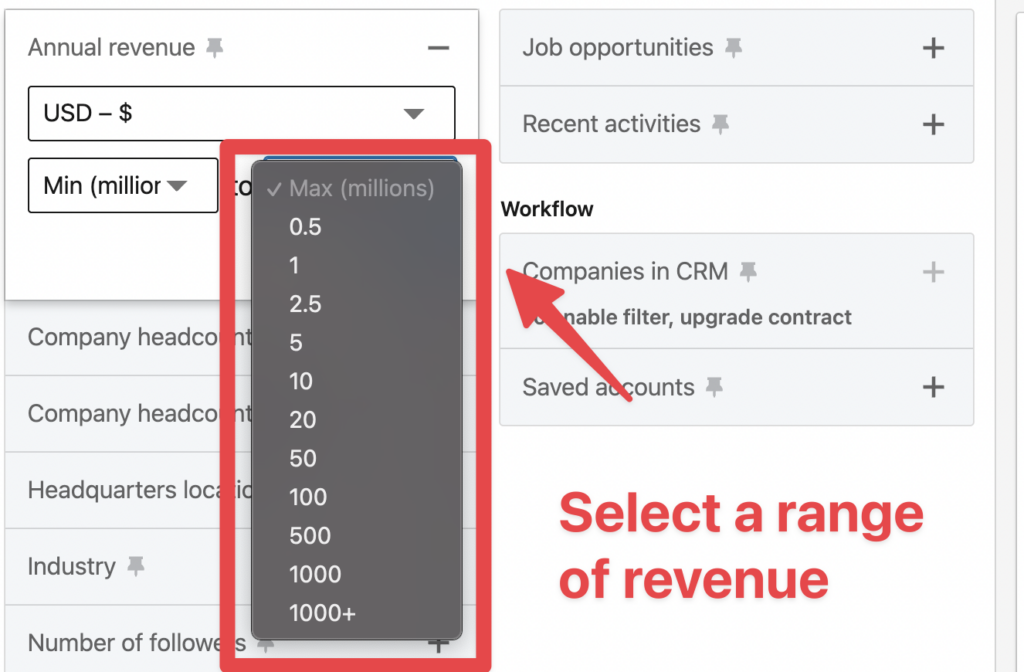
This is not always reliable.
For example, Lemlist publicly announced reaching $10M ARR, and LinkedIn classified them between $2.5 and $5M in revenue.

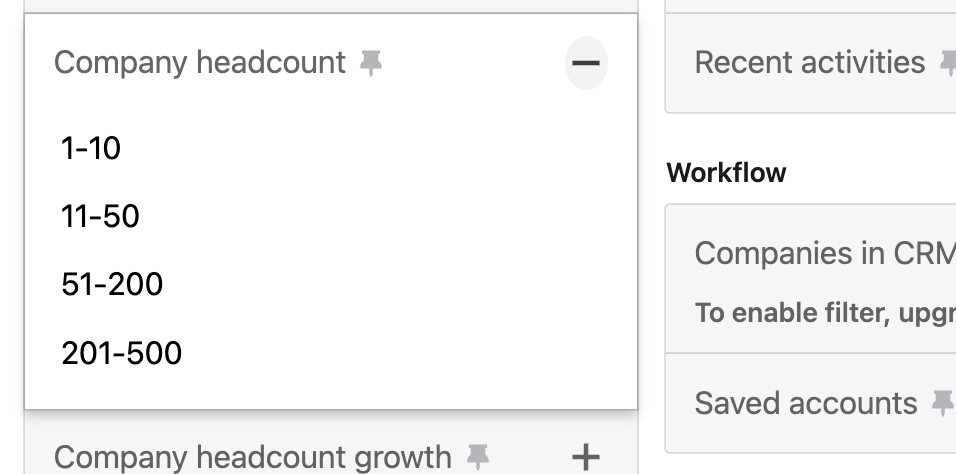
2. Company Headcount
Like on the lead search, you can filter companies based on the number of people working.
3. Company Headcount Growth
This filter is super useful to find growing companies in good health.
You can, for example, target companies that grew at least 10% over the last year.
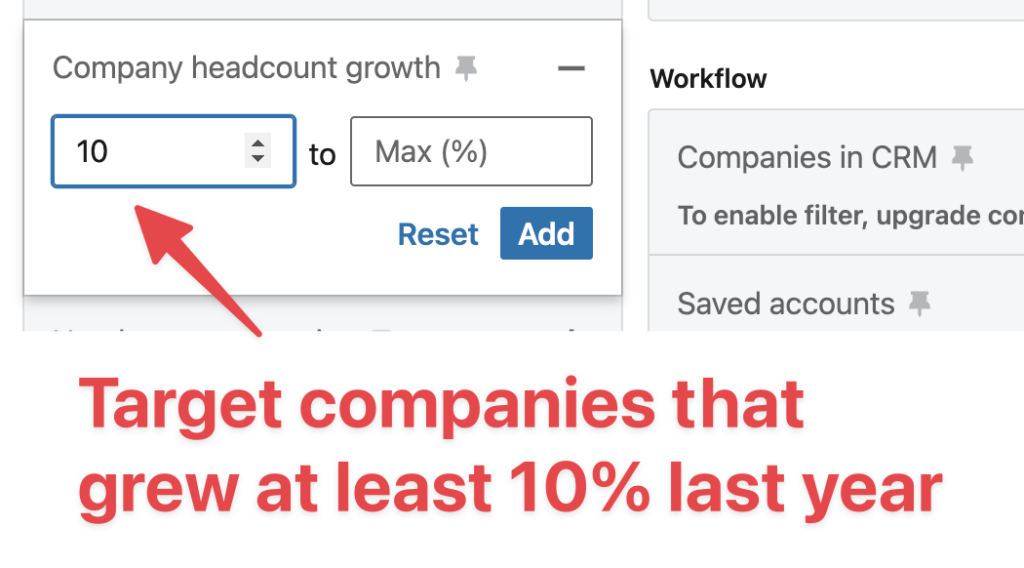
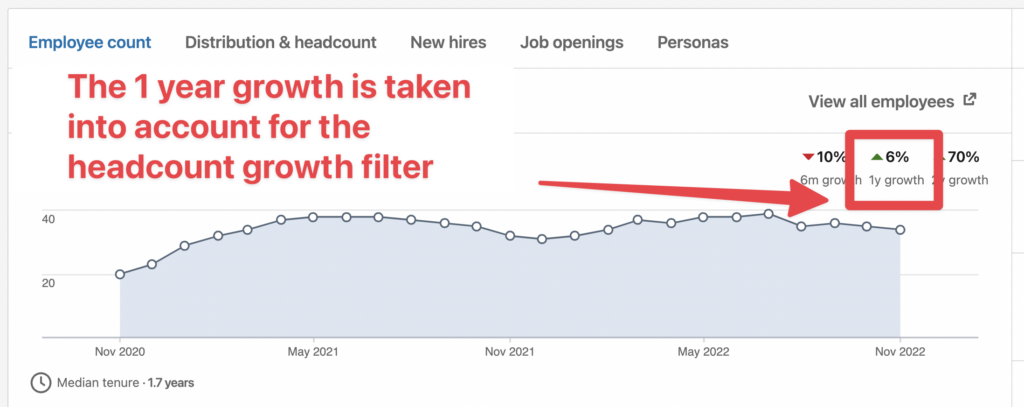
Remember that this growth is calculated on the headcount, not the revenue.
To be precise, the number is taken from here.
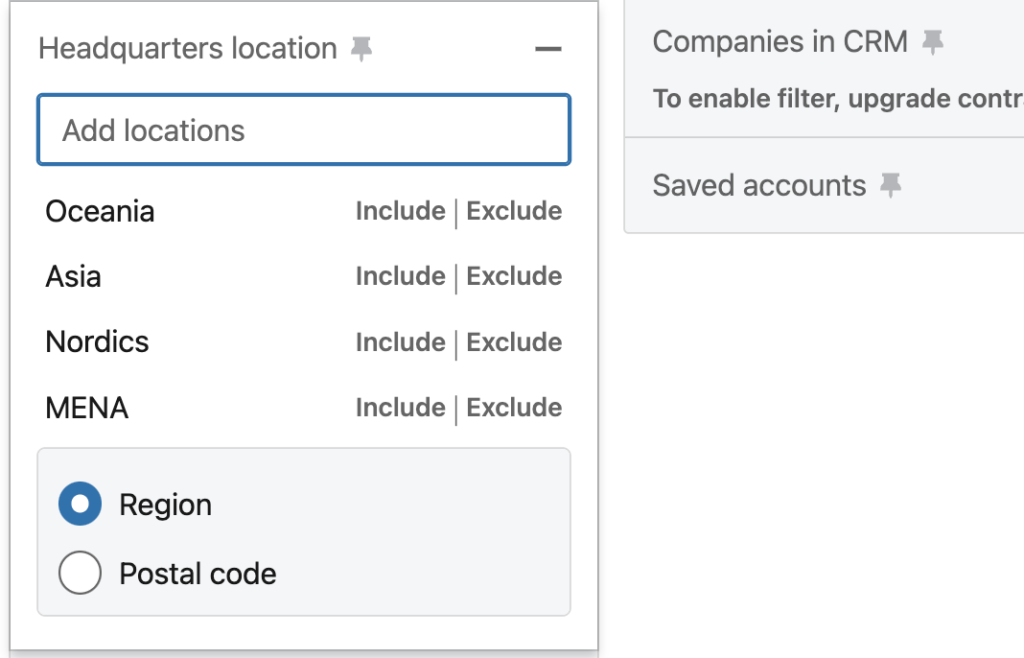
4. Headquarter Location
This filter allows you to target companies based on the location of their headquarters.
5. Industry
This filter allows you to target accounts based on the industry they have selected on their company page.
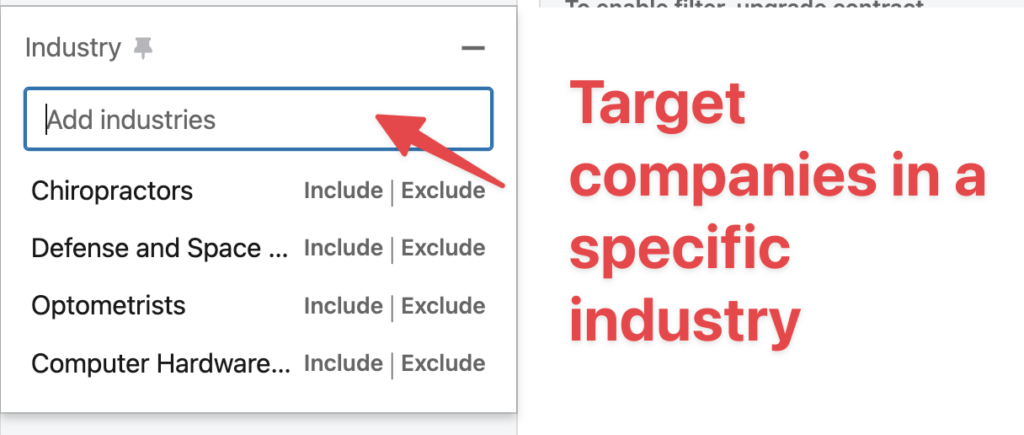
You can see this info here:

6. Number of Followers
This filter allows you to filter companies based on their numbers of followers.
The only use I can see for this one is to select companies with at least 100 followers.
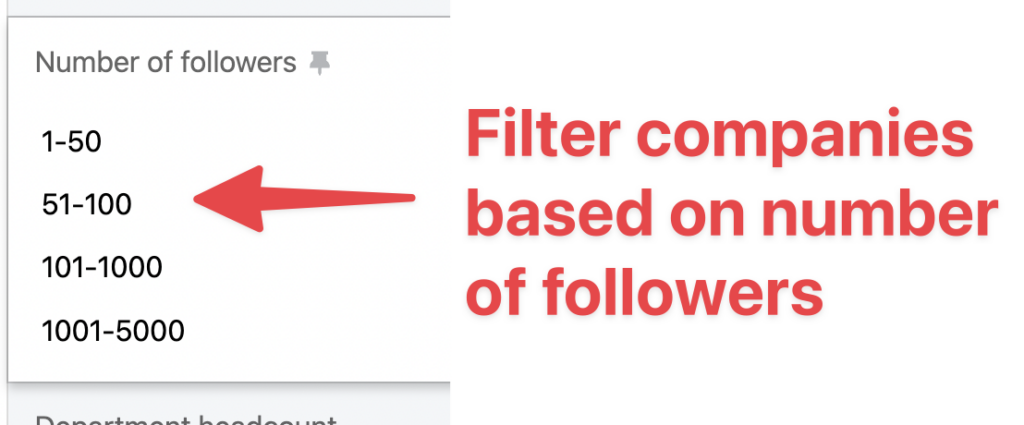
That can be a sign that they have a legitimate business.
People might manage company pages with more than 100 followers without the budget to pay you.
7. Department Headcount
This filter is super useful if you sell a product or service that targets specific departments in companies like Accounting, Sales, or Engineering.
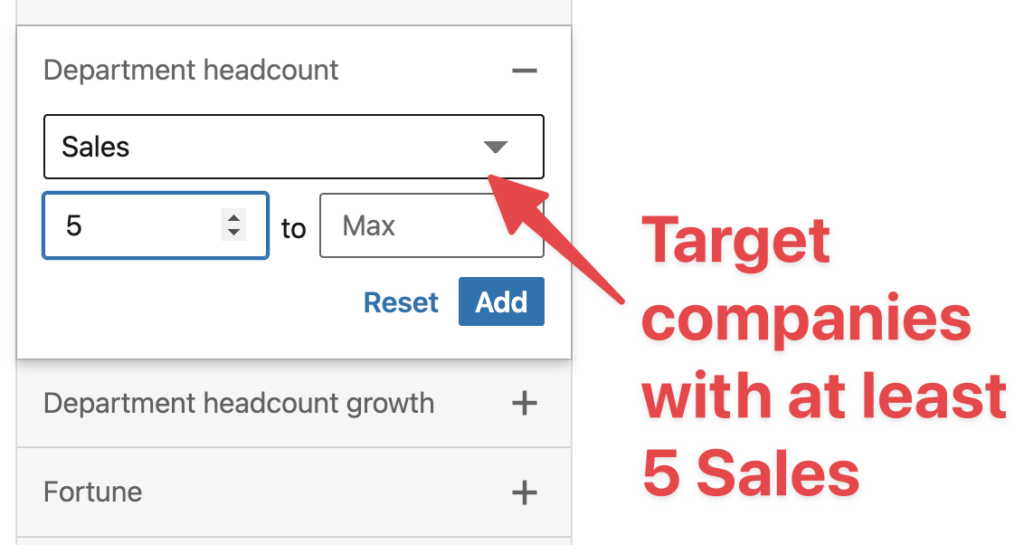
For example, you can use it to target companies with at least 5 salespeople in their Sales team.
8. Department Headcount Growth
Like Headcount Growth, you can detect if a specific department is growing quickly inside a company.
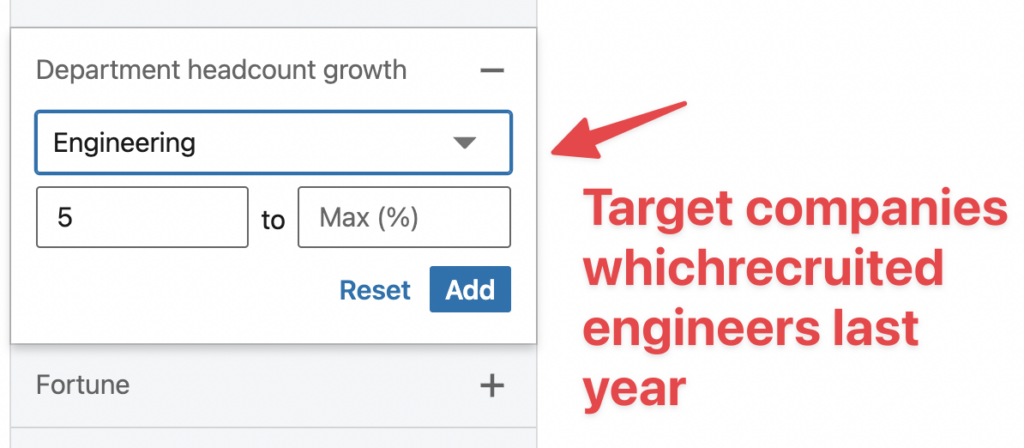
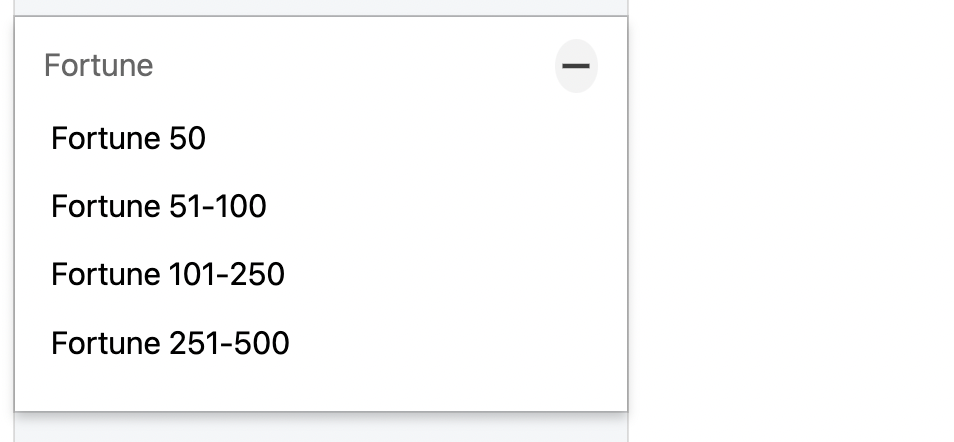
9. Fortune
Fortune filter helps you to filter companies based on their ranking.
10. Technologies Used
This filter is a good idea, but it doesn’t work that well.
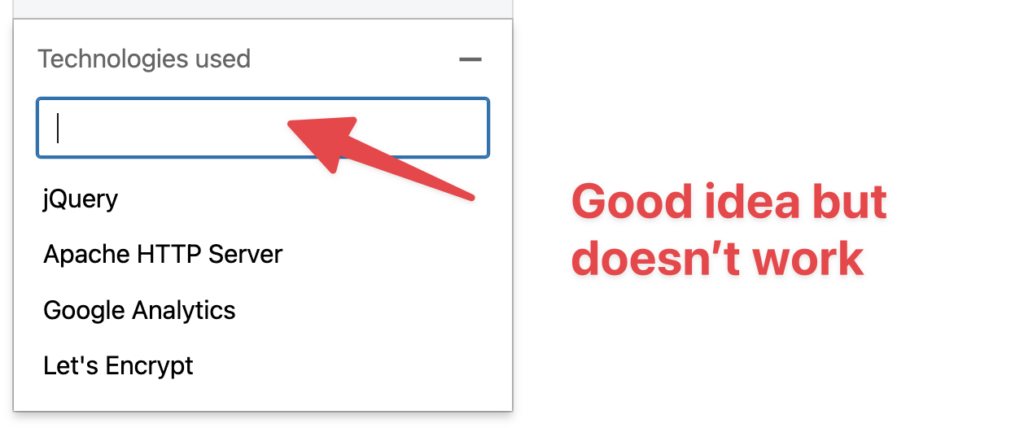
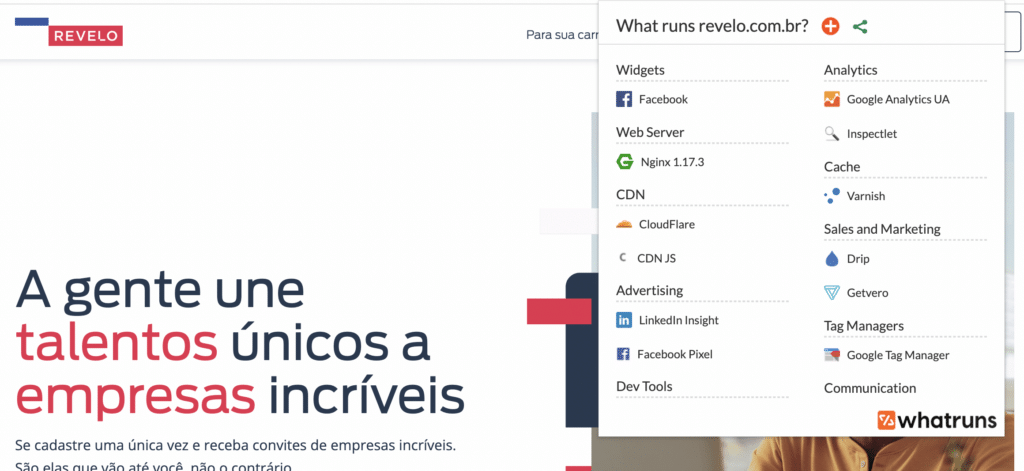
There is no information on LinkedIn’s documentation about how they find technologies used by companies.
It makes it hard to trust them on this.

If I use What’s Run, a reliable plugin for finding technologies used on a website, it doesn’t mention Webflow on the website to detect.
Do you want to target companies based on which technology they use?
You can use services built especially for that, like Wappalyzer or BuiltWith.
You can see the process and details in the 3rd part of this video
This example concerns finding an e-commerce business using Shopify, but you can apply this technique to any technology.
3. Spotlight Filters
There are 4 Spotlight filters on Sales Navigator:
- Job opportunities
- Recent activities
- Connection
- Buyer intent
1. Job opportunities
This filter is also a good way to detect if a company is growing.
If a company has job opportunities, it’s in good health and has the budget to pay you.
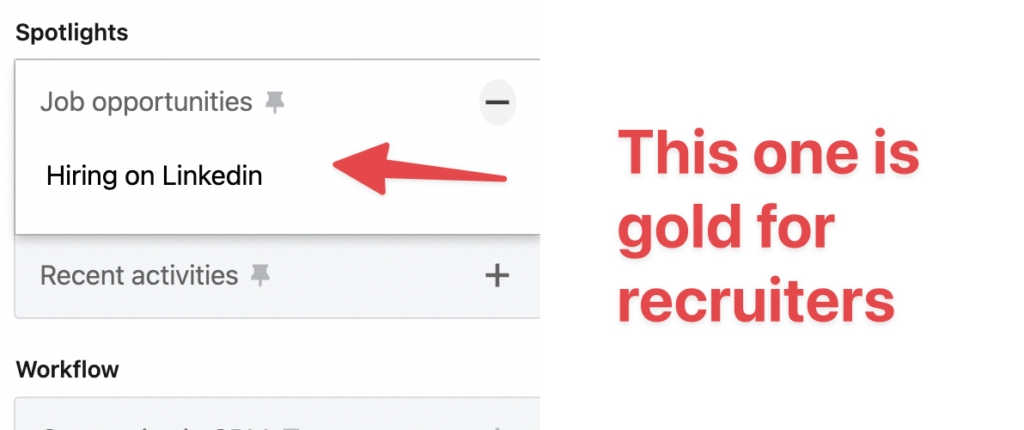
This filter will show all the companies with at least one job offer posted on LinkedIn Jobs.
2. Recent Activities
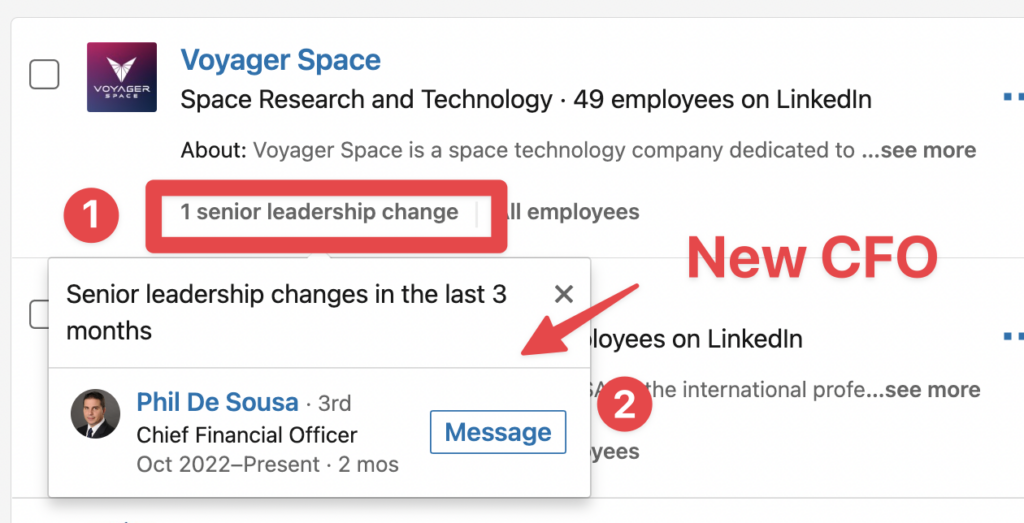
The arrival of a new senior executive in a company is a great time to propose your product or service.
Indeed, newcomers like to implement their ideas and try new things.
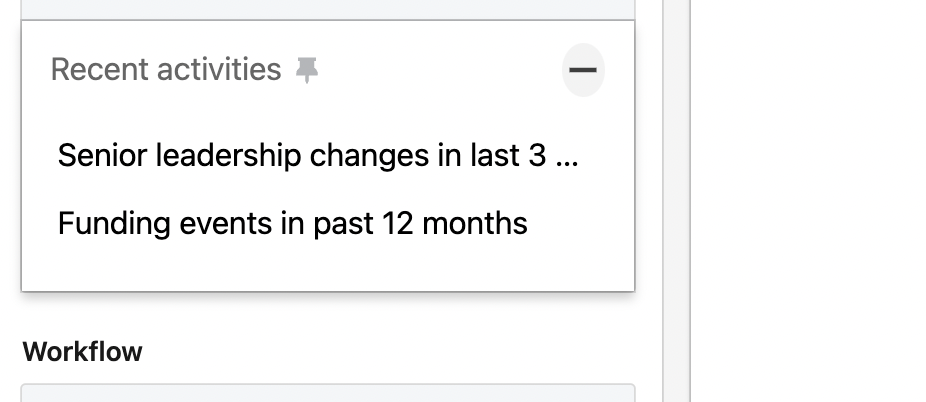
With this filter, you can easily identify which companies have seen recent changes in their top management and even identify the decision-maker who just arrived.
When a company raises funds, it means it’s about to burn cash. Would it be better to burn cash on your product or service?
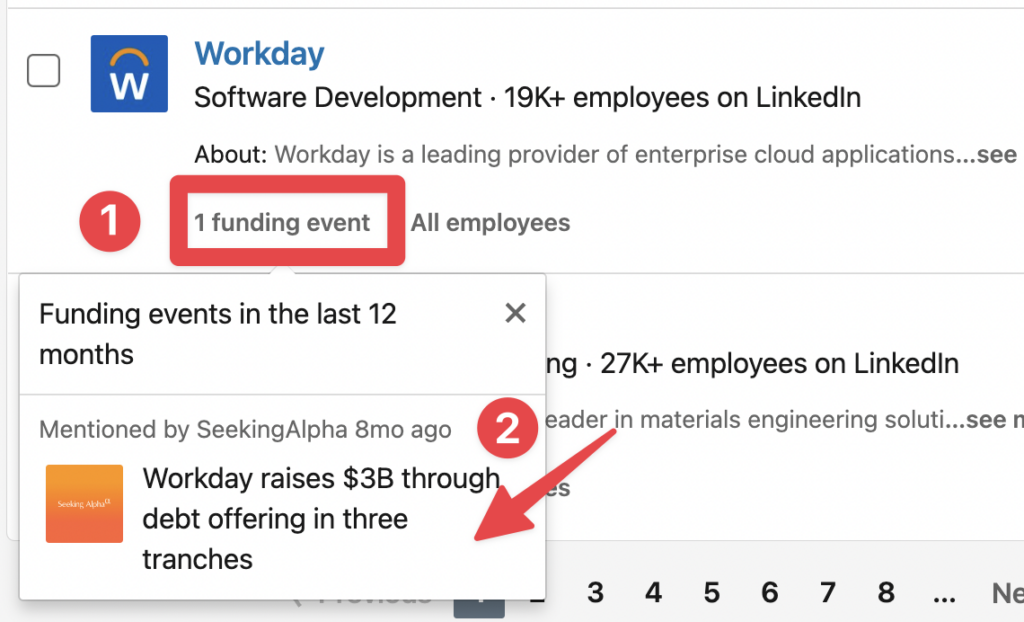
LinkedIn identifies companies raising funds by scanning the web. Every time they find an article about fundraising, they add it to the list and give you the link to the article.
You can use these articles as icebreakers by sending them to your prospects and congratulating them on the fundraising.
4. Connections
This filter allows you to know which companies you have first-degree connections with.

This filter can be useful if you are looking for ways to contact an account or get warm introductions.
4. Buyer intent
Use it to filter accounts to show those that have demonstrated a moderate/high level of interest in your company.

The key factors are employee interactions, InMail acceptances, ad engagement, or company page engagement, which are used to label them as such.
5. Workflow
In this section, there are 3 main filters:
- Companies in CRM
- Saved accounts
- Account lists

1. Companies in CRM
This filter can be used only by Sales Navigator Advanced Plus (Enterprise) users.
You must connect your CRM to Sales Navigator to filter your search by leads or contacts in your connected CRM.
2. Saved accounts
All saved LinkedIn Company Pages, including those you’ve manually saved to your account, are concentrated in the “All Saved Accounts” section.
In addition, whenever you save a lead, Sales Navigator automatically includes the lead’s current company in this section.
You can also apply various account filters to refine the All Saved Accounts list.
3. Account lists
Here, you can filter companies from any custom account list or all account lists at once and apply filters to those companies.

Advanced Techniques for Sales Navigator Search
Here are my 5 pro tips for mastering Sales Navigator advanced filters:
- Use Boolean search
- Use saved searches
- Use account-based searches
- Use blacklists
- Upload CSV files
- Use Evaboot to find emails
1. Use Boolean search
Sales Navigator Boolean search is a simple programmatic language that makes your searches more precise.
It works with a combination of logical connectors and punctuation:
- AND
- OR
- NOT
- Parentheses
- Quotes
This is a very effective way to refine your search queries and find the leads you are looking for more accurately.
Here is an example where I searched for “Sales Operations” OR “Sales Ops”:

However, crafting Boolean strings manually can be time-consuming and prone to small syntax errors.
To save time, you can use our LinkedIn Boolean Search Generator.
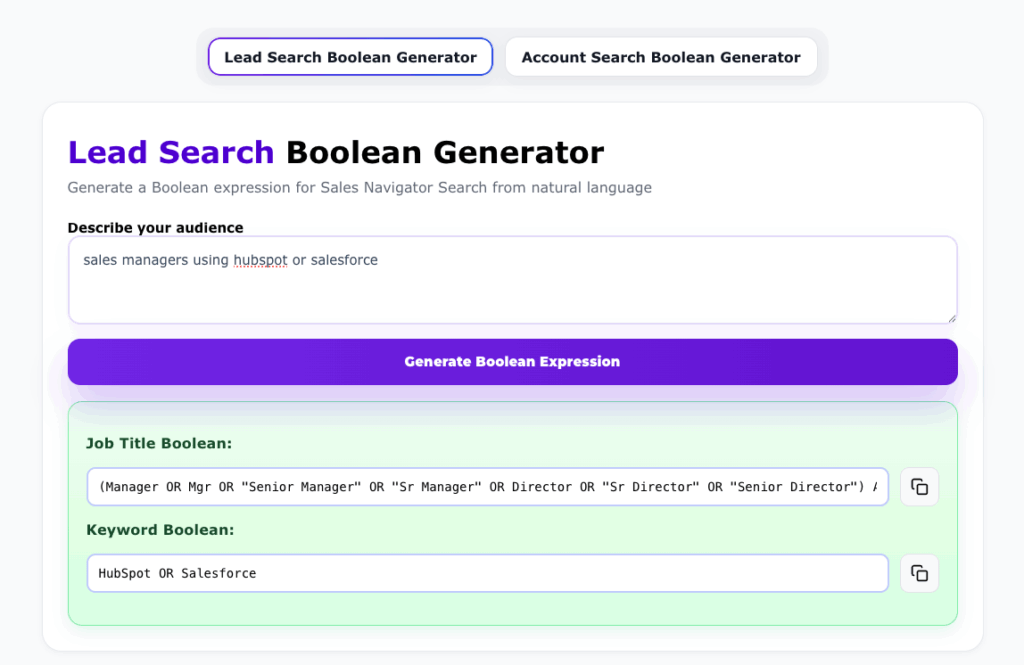
It automatically builds perfectly structured Boolean queries from a simple description of your target audience.
2. Use saved searches
You can save the results in your Sales Navigator account whenever you use multiple filters to target a specific group of leads or accounts.
To save a search, click “Save Search” on the top right of the search interface.

One of the perks of this Sales Navigator Hack is that the “Save Searches” feature lets you be notified when new people match your search queries.
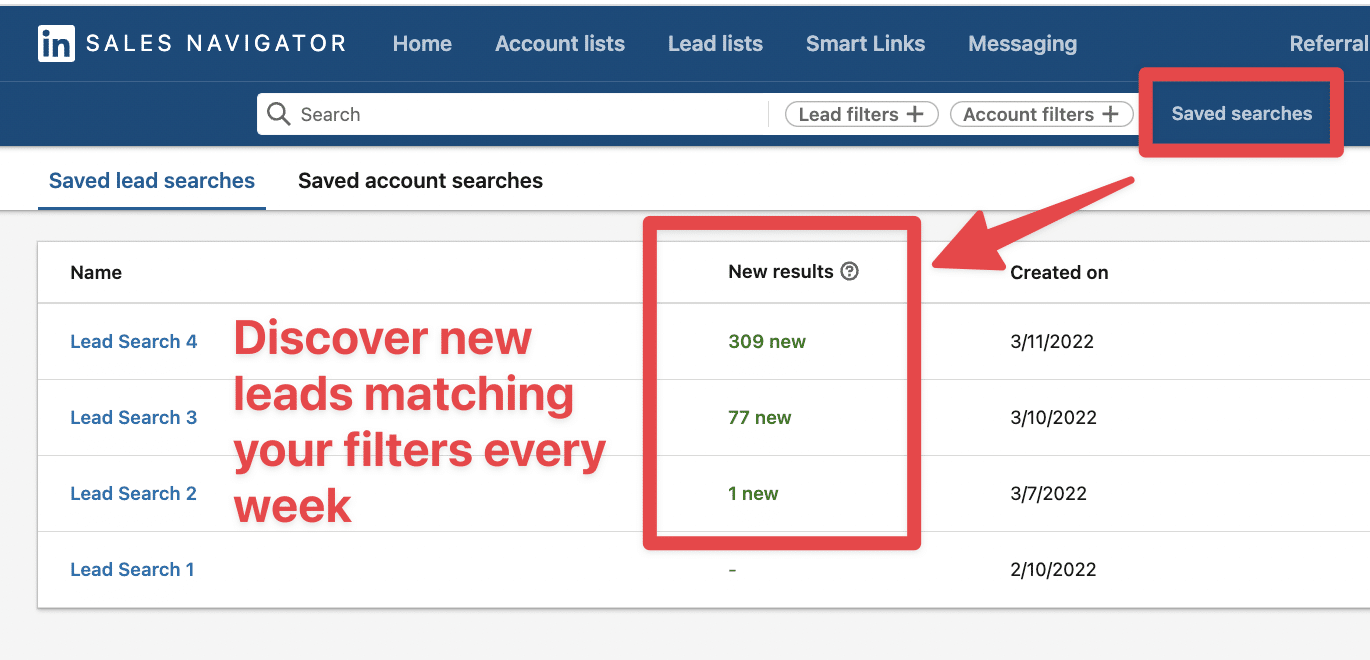
It is a great way to automate the identification of new opportunities and get in contact with people as soon as they get into their new position.
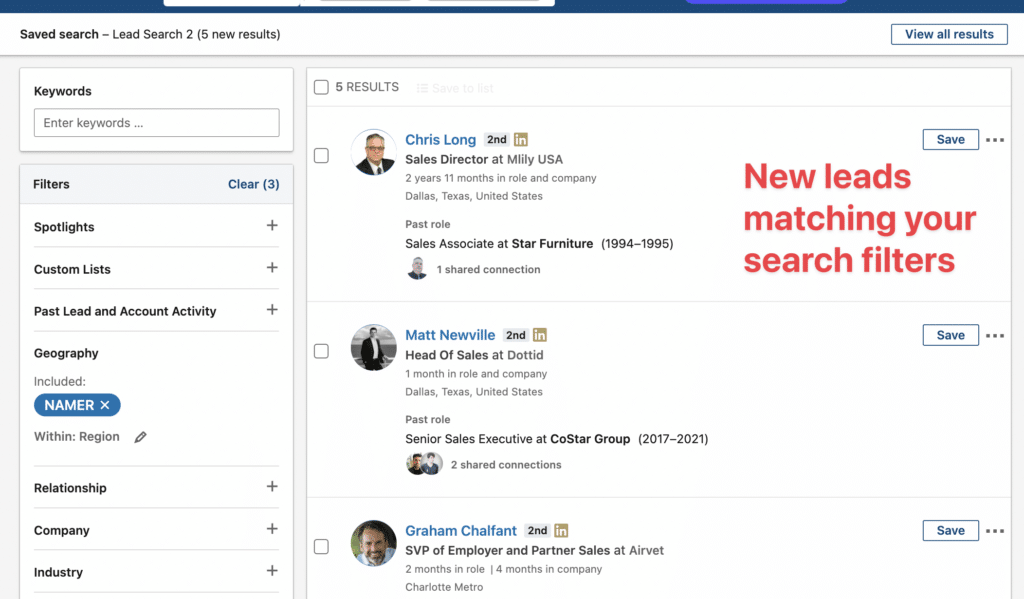
If you click on the New, you will get access to the list of leads that recently matched your search filters.
3. Use account-based searches
Here’s how to find decision-makers within an account list using Sales Navigator:
- Go to the lead search:
- Go to Workflow
- Open the filter Account List
- Select your account list
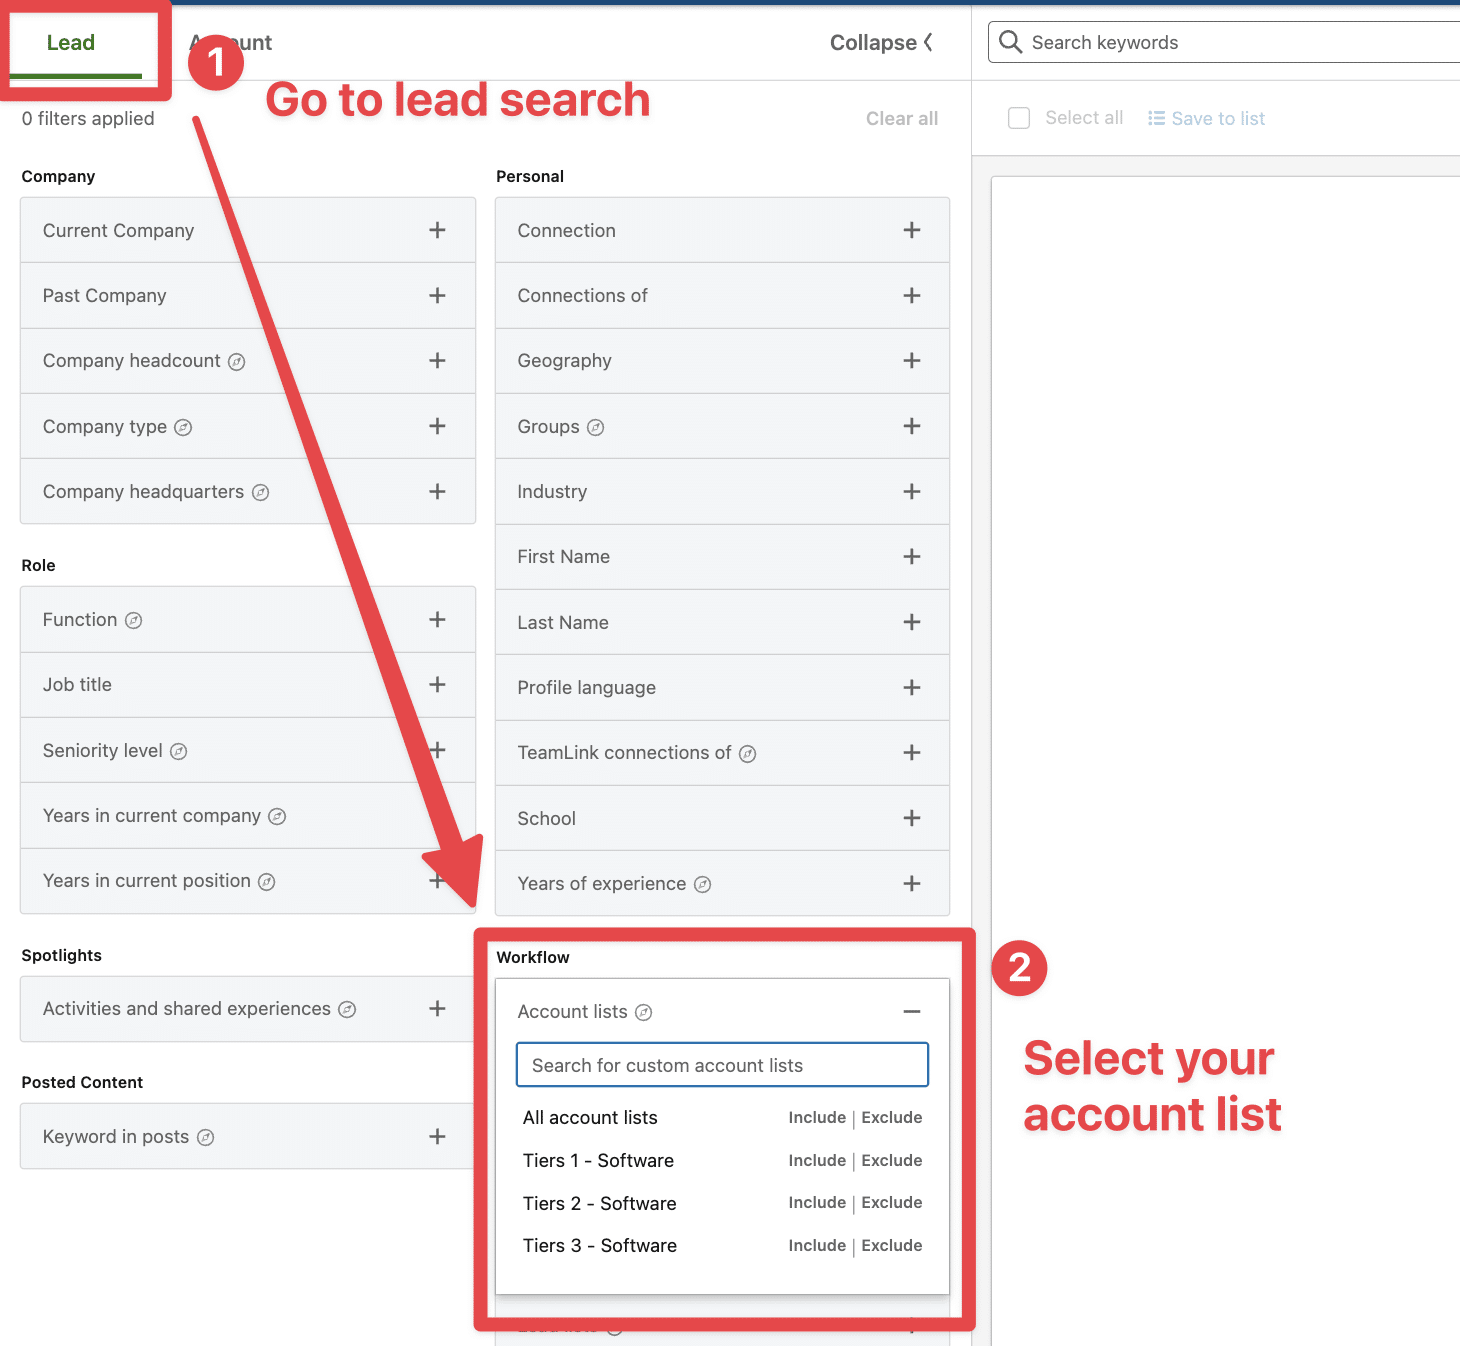
Once you have selected your account list, all the people working at these companies will appear in the search results.
Your job is now to add filters to get the right decision-makers.
Obviously, the job title filter is a great way to do that.
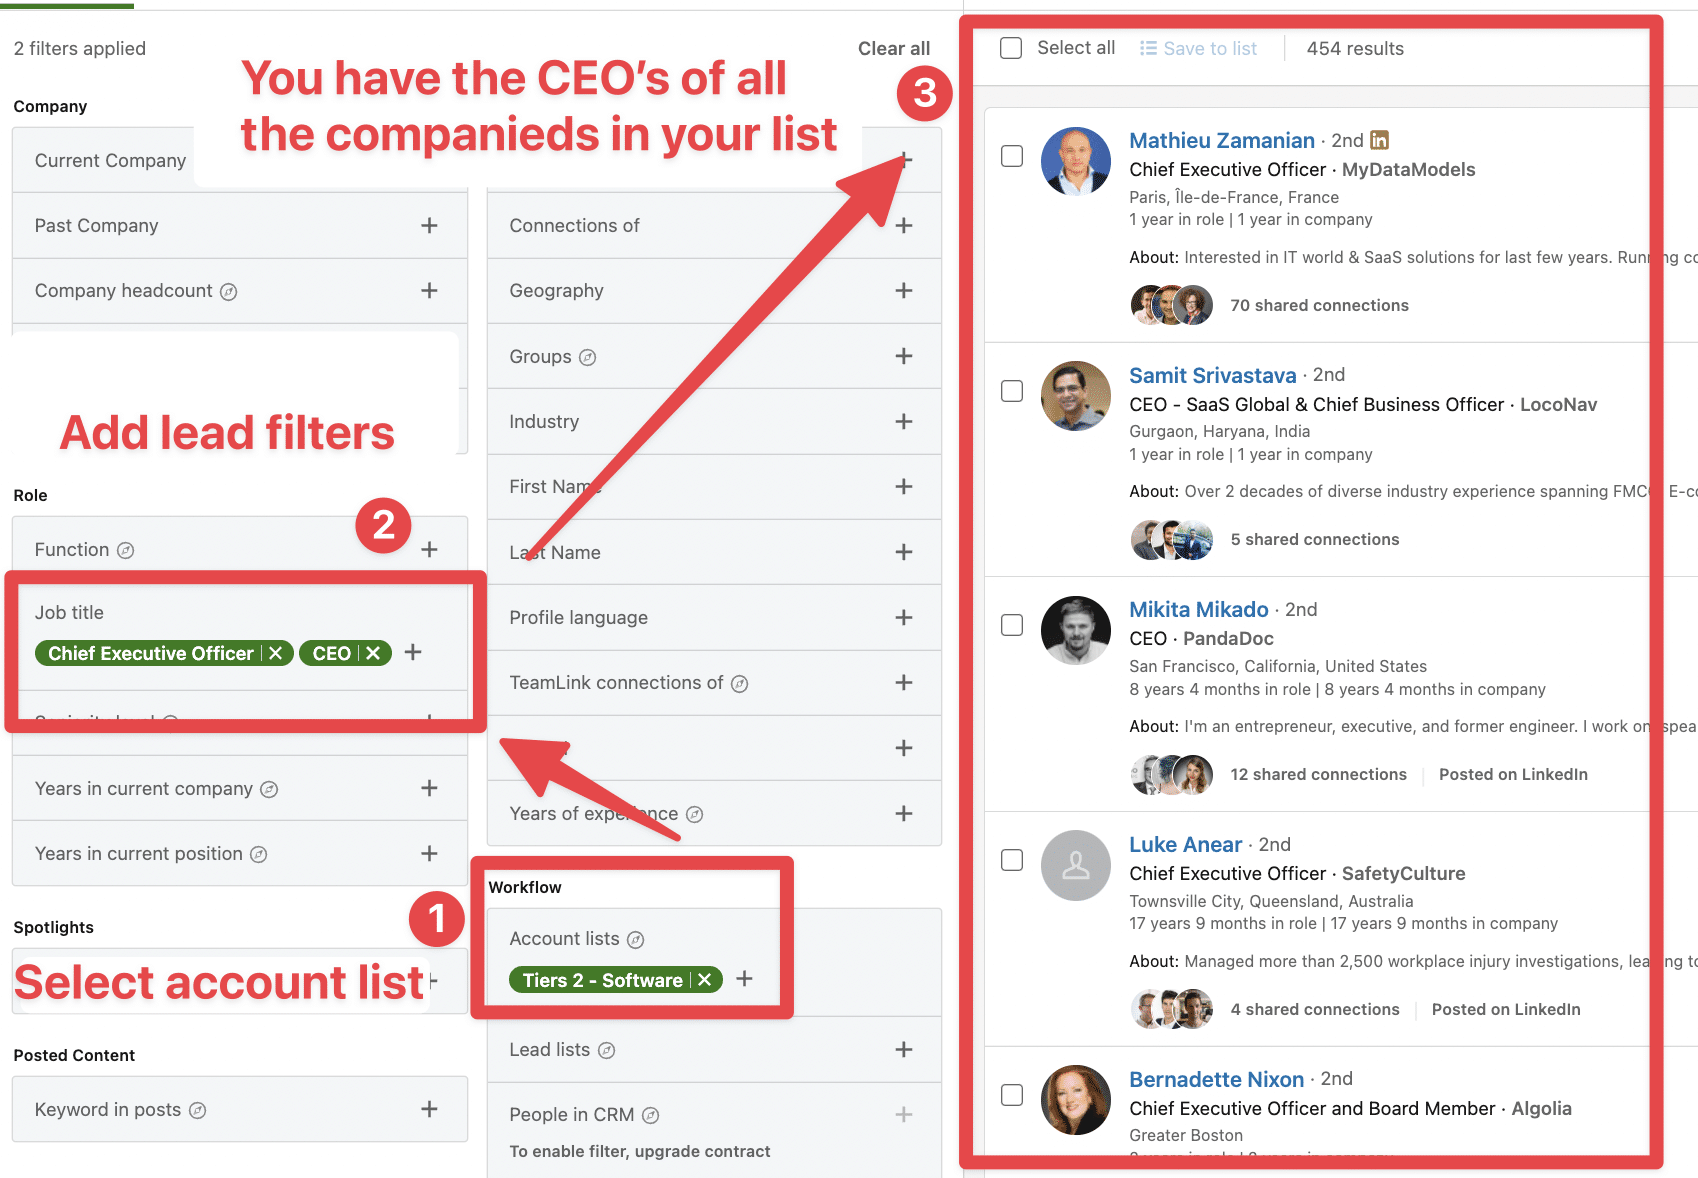
Congrats, you found the right decision-makers inside the companies on your account lists in just 2 clicks.
4. Use blacklists
When you are doing LinkedIn outreach, you should avoid contacting your past or current clients or your competitors.
To avoid this awkward situation, you can:
- Look for your clients and competitors
- Add them into an account list
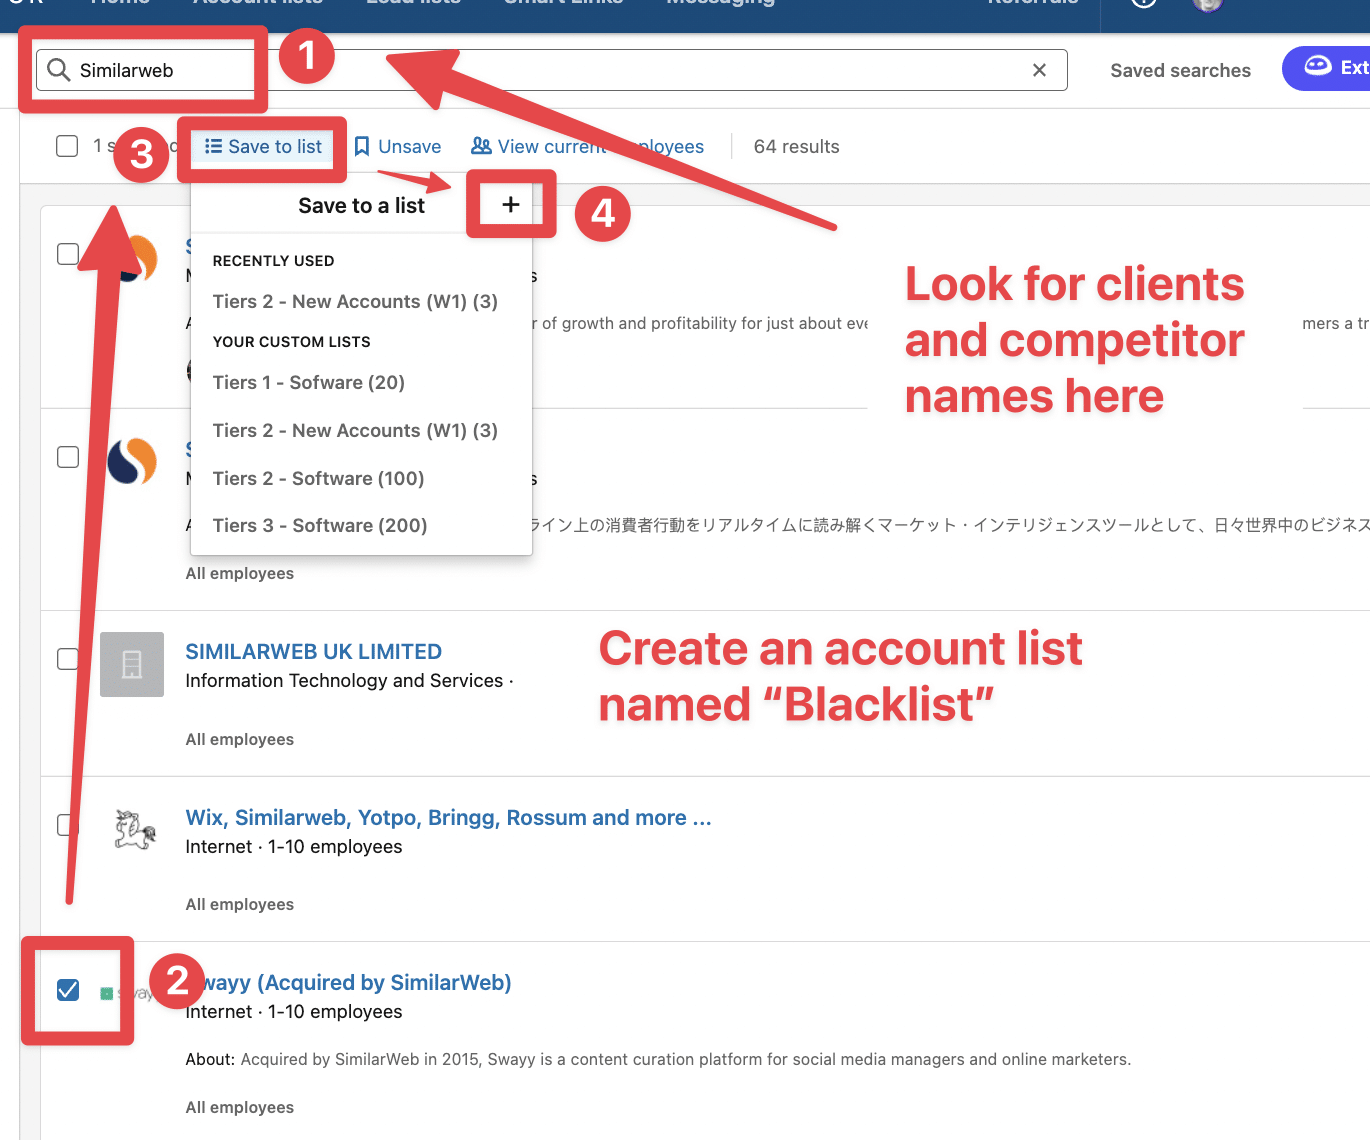
Then, when you are on the lead search:
- Go to Workflow
- Select the blacklist
- Click on Exclude
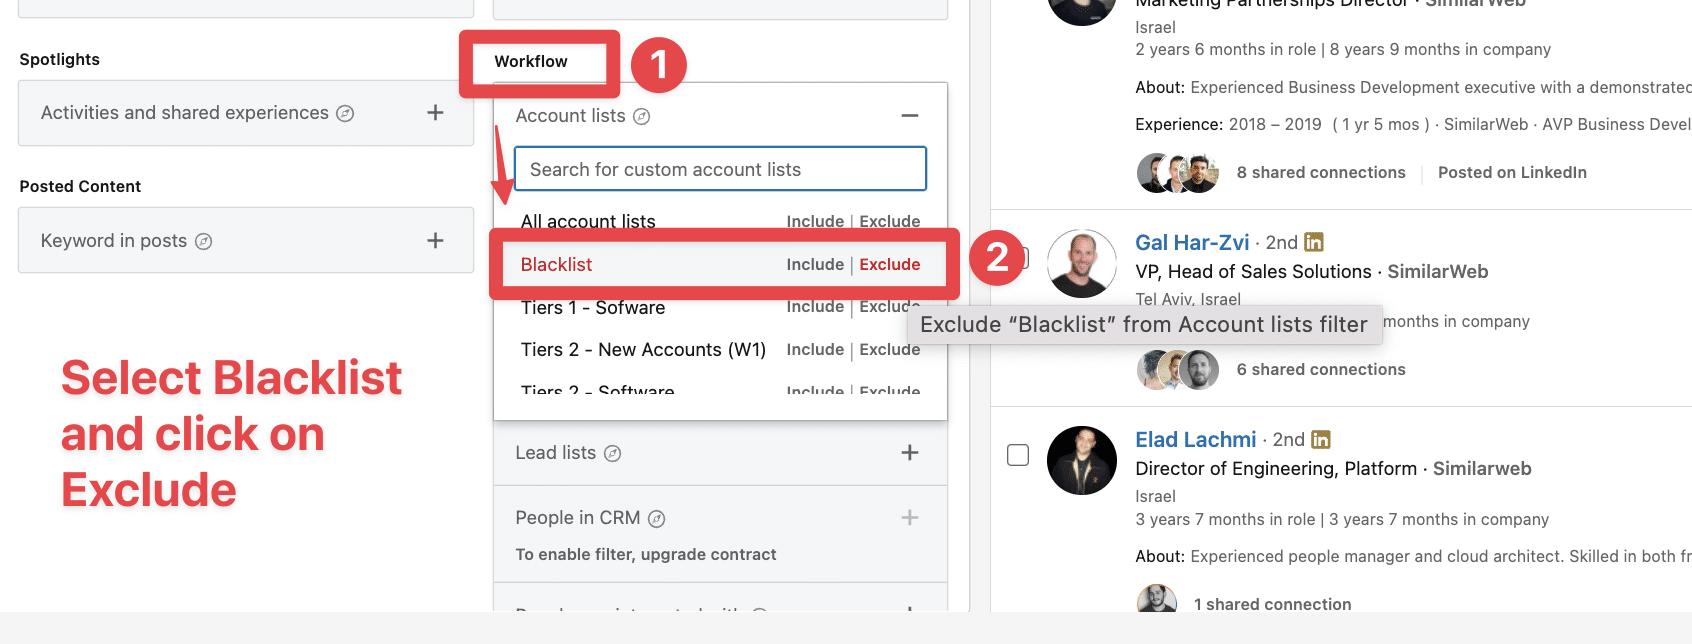
All those working in the companies on your account list will be excluded.
This is a time-saving tactic for targeting new leads and accounts that are unrelated to your competitors or past and current clients.
5. Upload CSV files
If you’re using other data sources than LinkedIn to identify accounts, this feature can change your life.
Account upload allows importing CSV files with account information, which LinkedIn can use to try to find these accounts in its database.
Here is a video tutorial:
This process can automate Account list building and allow you to identify decision-makers inside companies you have scraped on:
- Crunchbase
- Madyness
- Job boards
If you can get the LinkedIn URL of the company page for every account, the match rate will be 100%!
6. Use Evaboot to find emails
Once you have your lead list or lead search ready, you might want to find their emails to start sending prospecting them.
This process is super simple with Evaboot.
Here is a video tutorial:
Evaboot will also:
- Double-check every profile to see if Sales Navigator correctly applied your Boolean Search filters.
- Clean the names of your prospects. People love to add emojis or capital letters to their names. Evaboot cleans the rubbish in the data so that you get clean names for your CRM and cold outreach campaigns.
Combining Sales Navigator’s advanced search filters and Evaboot is a great combo to start getting results with LinkedIn prospecting.
How To Optimize LinkedIn Search Filters with AI
Creating the perfect search filter combination on LinkedIn Sales Navigator can be time-consuming and often requires multiple iterations to get right.
This is where artificial intelligence can dramatically improve your workflow and results.
Let’s explore how to leverage AI for creating advanced LinkedIn Sales Navigator search filters.
- Using ChatGPT to Generate Advanced Boolean Search Strings
- Example of a Conversation with ChatGPT
- Benefits of Using AI for Search Filter Creation
1. Using ChatGPT to Generate Advanced Boolean Search Strings
ChatGPT excels at understanding the logic behind Boolean search operators and can help you create complex search strings.
Here’s how to use ChatGPT effectively for this purpose:
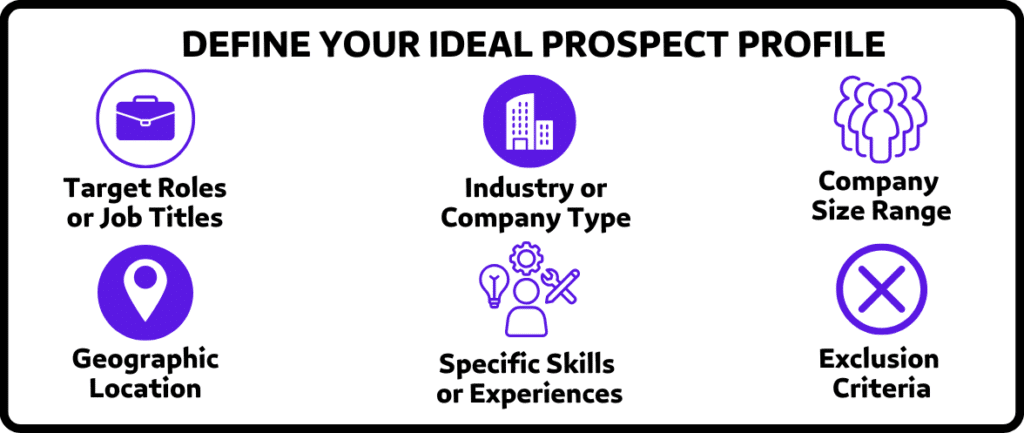
Step 1: Define your ideal prospect profile
Before prompting ChatGPT, clearly define:
- Target roles or job titles
- Industry or company type
- Company size range
- Geographic location
- Specific skills or experiences
- Exclusion criteria
Step 2: Create an effective prompt
Use this template to get the best results from ChatGPT:
Create 3 LinkedIn Sales Navigator Boolean search strings to find [target_role] at [company_type] companies who [specific_criteria].

Include these parameters:
- Must include job titles: [list relevant titles]
- Must be at companies with: [company criteria]
- Must have skills/experience in: [relevant skills]
- Must exclude: [roles or companies to exclude]
- Location: [target geography]

For each search string:
1. Optimize for seniority level
2. Provide a brief explanation of what the search targets
3. Suggest 1-2 variations to test
Step 3: Analyze the results
After receiving ChatGPT’s suggestions:
- Test each search string in Sales Navigator
- Note which strings produce the most relevant results
- If needed, ask ChatGPT to refine based on actual results

2. Example of a Conversation with ChatGPT
Let’s say you’re looking for potential clients for your marketing automation software.
Here’s how a conversation with ChatGPT might look:
Your prompt:
Create 3 LinkedIn Sales Navigator Boolean search strings to find Marketing Directors at B2B SaaS companies who are responsible for lead generation.

Include these parameters:
- Must include job titles: Marketing Director, Director of Marketing, Head of Marketing
- Must be at companies with: 50-500 employees, SaaS or software in description
- Must have skills/experience in: lead generation, marketing automation, demand generation
- Must exclude: agencies, consultants
- Location: United States

For each search string:
1. Optimize for seniority level
2. Provide a brief explanation of what the search targets
3. Suggest 1-2 variations to test
ChatGPT’s response might be:
Search String #1:
("Marketing Director" OR "Director of Marketing" OR "Head of Marketing") AND ("lead generation" OR "demand generation") AND ("marketing automation") NOT ("agency" OR "consultant" OR "consulting")

Explanation: This search targets senior marketing leaders specifically mentioning lead generation and marketing automation in their profiles, while excluding agency or consulting professionals.

Variations:
- Add "VP of Marketing" to capture slightly higher seniority
- Add "marketing operations" to include those with operational focus
3. Benefits of Using AI for Search Filter Creation
Using AI to generate your LinkedIn Sales Navigator search filters offers several advantages:
- Time efficiency: Create complex search strings in seconds rather than spending hours manually crafting them
- Comprehensive coverage: AI can suggest combinations of keywords and filters you might not have considered
- Systematic testing: Generate multiple variations to test and optimize your search results
- Continuous improvement: Feed results back to the AI to refine searches based on what’s working
- Scalability: Quickly create targeted search strings for different prospect segments or territories

By incorporating AI into your LinkedIn Sales Navigator search strategy, you’ll not only save significant time but also discover more qualified prospects that your manual searches might have missed.
This approach allows you to focus your energy on meaningful conversations rather than search string syntax.
Speaking of meaningful conversations… what if AI could also tell you what to say — not just who to target?
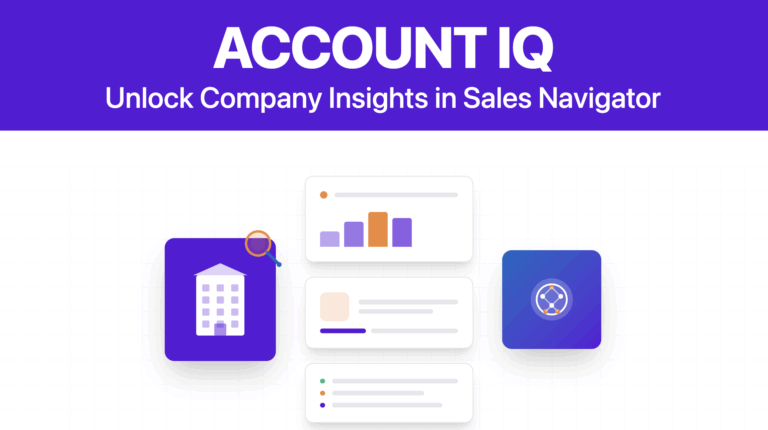
Account IQ: Turn Search Into Insight-Driven Outreach
Once you’ve built your account lists with advanced filters, Account IQ helps you understand those companies in seconds.
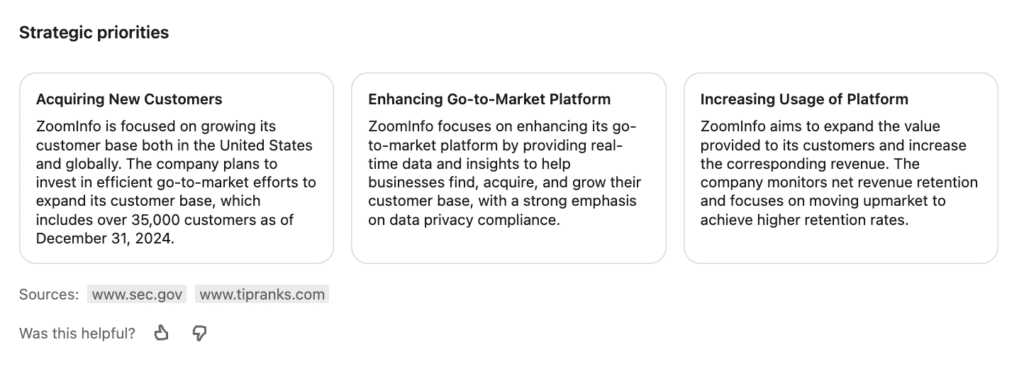
This AI-powered feature, available on Advanced and Advanced Plus plans, sits at the top of company pages and shows:
- AI-generated pitch suggestions: Account IQ suggests different ways your product could help based on what you sell.
- Business model & revenue estimates: Understand how the company makes money, who they serve, and how big they are.
- Strategic priorities & business challenges: Get a snapshot of what’s keeping them up at night, and where your solution fits.
- Org chart & executive insights: Identify key decision-makers, recent job changes, and executive posts to reference in outreach.
- Hiring trends & growth signals: Spot departments with strong headcount growth — a key signal of need or pain.
- Competitive landscape: See how the company positions itself and who it’s up against.
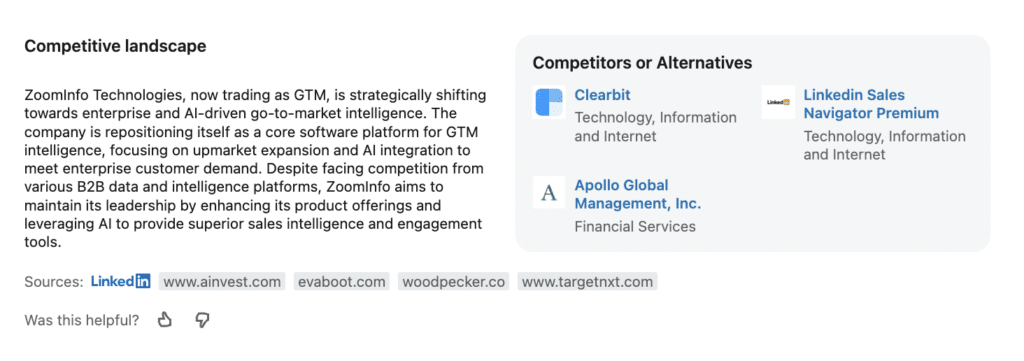
Pro tip: Use the AI-generated insights to write hyper-personalized cold emails with ChatGPT.
Simply click on “Generate insights” to see a detailed list of different ways you could help the company you’re targeting:
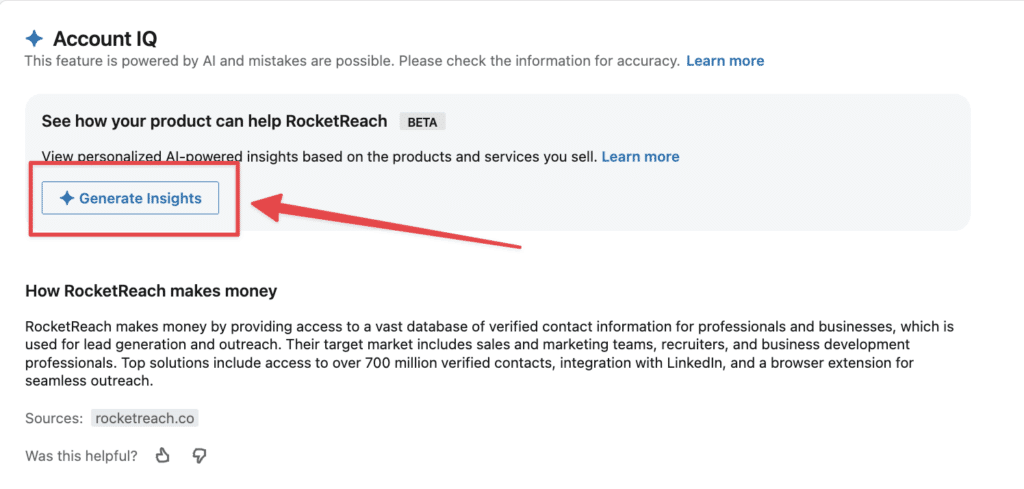
Copy the “3 ways your product can help” block…
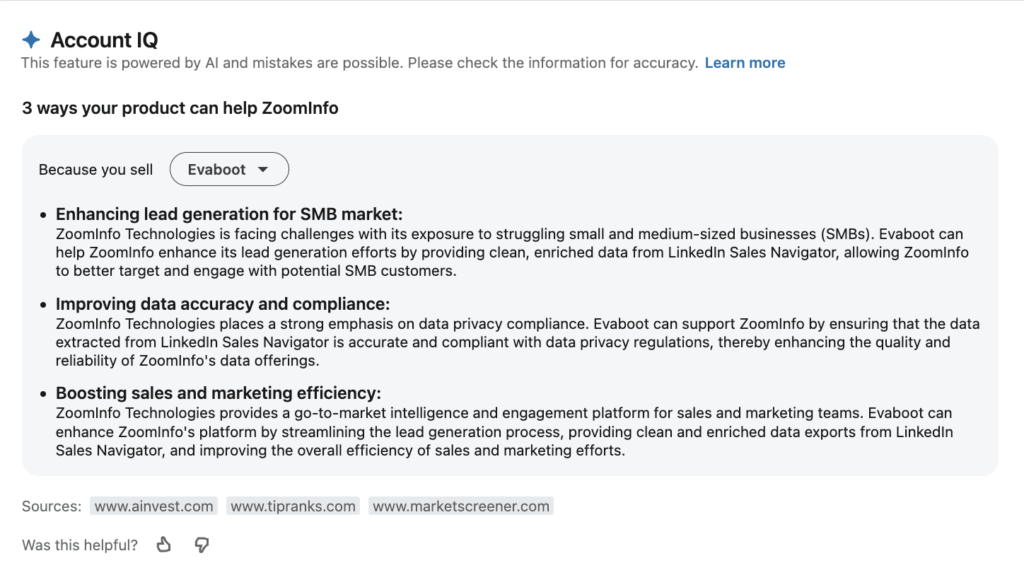
And prompt ChatGPT like this:
Write a short cold email to ZoomInfo, pitching Evaboot. Use the RABT framework:
– Reason for outreach
– Ask a qualifying question
– Backup with data
– Tease the solution
Tailor the message to ZoomInfo’s challenges based on the following insights:
[Insert your insights here]
Example output:
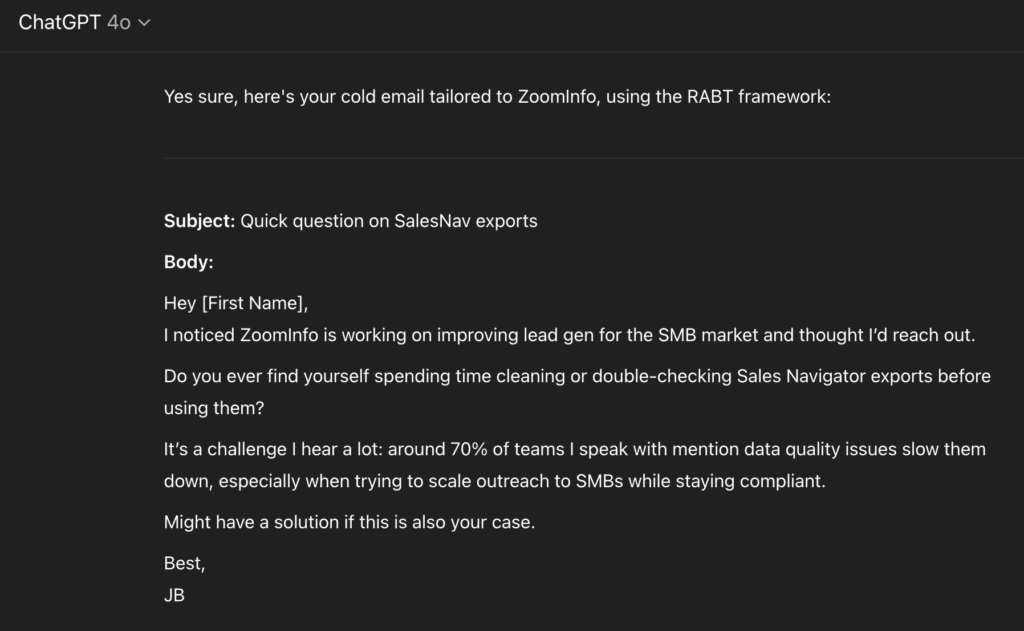
That’s how you turn AI insights into high-performing cold messages in seconds.
Conclusion
Mastering LinkedIn Sales Navigator Advanced searches can greatly enhance your lead generation efforts.
By efficiently saving, managing, and updating your search results and integrating them with your CRM, you can streamline your workflow and achieve your sales goals by getting the most out of LinkedIn Sales Navigator.
FAQ
How do I edit a saved search in Sales Navigator?
- In the Saved searches window, click the Lead or Account tab.
- Hover over the search name you want to edit and click the Edit icon.
- Change the search name and click Save.
To save a new search based on one you’ve already created, go to that saved search and update the filters accordingly.
When you click Save Search above the filters on the left, you’ll be prompted for a new saved search title. The previously saved search parameters will not be changed.
How do you filter on Sales Navigator?
To filter on Sales Navigator, go to your Sales Navigator homepage and click “Lead filters” or “Account filters” to access all the filters.
These advanced filters help you find LinkedIn users who match your ideal customer profile more precisely.
How do I search for filters on LinkedIn?
To search for filters on LinkedIn, run a search and click “Show filters” on the left to expand the search filters.
Click the “Custom filters” dropdown above the search filters on the left rail, then select a custom filter to add those saved parameters to your search results.


![LinkedIn InMail Credits: Meaning, Cost and How To Get More in [year] 161 linkedin inmail credits](https://evaboot.com/wp-content/uploads/2021/11/linkedin-inmail-credits-768x432.png)
![How To Convert Sales Navigator URL To LinkedIn URL in [year]? 163 convert sales navigator url to linkedin url (2)](https://evaboot.com/wp-content/uploads/2022/07/convert-sales-navigator-url-to-linkedin-url-2-1-768x432.png)
![How to Use LinkedIn Sales Navigator Boolean Search? ([year]) 165 linkedin sales navigator boolean search](https://evaboot.com/wp-content/uploads/2021/11/linkedin-sales-navigator-boolean-search-768x432.png)
![11 Uplead Alternatives and Competitors in [year] 166 uplead alternatives](https://evaboot.com/wp-content/uploads/2024/04/UPLEAD-ALTERNATIVES-768x434.png)