How To Use LinkedIn Sales Navigator Saved Searches?
Contents
Are you looking to significantly boost your lead generation and outreach capabilities with LinkedIn Sales Navigator?
In the digital era of social selling, using advanced search tools such as the LinkedIn Sales Navigator saved searches feature is a game changer.
If you’re in sales, it’s crucial to understand how to use LinkedIn Sales Navigator to put your lead generation on autopilot.

So, prepare to enhance your sales outreach by exploring:
- What Are LinkedIn Sales Navigator Saved Searches?
- Where To Find Saved Searches on LinkedIn Sales Navigator?
- How To Save Searches on LinkedIn Sales Navigator?
- How To Export Saved Searches in Sales Navigator?
- How To Use Saved Searches to Generate Leads?
- How To Delete Saved Searches in Sales Navigator?
Let’s dive into it.
What Are LinkedIn Sales Navigator Saved Searches?
Saved lead and account searches are Sales Navigator features that allow you to save your search criteria to run that search at any time quickly.

This helps you stay current with your target market and reach out to new prospects as soon as they appear on LinkedIn.
You can save up to 50 leads and 50 account searches on LinkedIn Sales Navigator.

With Saved Searches, you’ll receive weekly alerts when new people or accounts match your saved search criteria.
Where To Find Saved Searches On Sales Navigator?
To access your saved searches in Sales Navigator, simply click “Saved Searches” at the top right of your homepage, next to the search bar.
A sidebar will open on the right with all your saved searches.

You can also access them through the Lead or Account search pages.

The lists of your saved searches include their names, search criteria, and number of results.

This is where you can see how many new searches have been added to your lists since the last time you ran a search.
How To Save Searches On Sales Navigator?
To save a search in Sales Navigator, follow these steps:
- On the Sales Navigator homepage, click Lead filters or Account filters or enter specific leads or accounts in the search bar and press Enter.

- Refine your search by adding or removing filters, using Sales Navigator boolean search or other advanced searches on the screen. The search results will update in real-time.

- Once you have fine-tuned your search to view the desired results, toggle “Get notified of new lead or account results” in the top right corner of the search filters panel.

- You’ll see a pop-up confirming that your search is saved, and you’ll receive weekly email alerts with new results.
- Click on “Saved searches” next to the search bar to access your search.

- A sidebar will appear. Click on the pen icon to edit the name of your newly saved search.
And there you go. Now you have a well-organized lead and account search lists.
Every time a new lead matches your search categories, you will receive a notification that it has been added to your list.
How To Export Saved Searches in Sales Navigator?
Even though LinkedIn Sales Navigator is a great sales tool, it’s got one drawback: you cannot export your leads directly from there.
That’s why if you want to export your saved searches in Sales Navigator, you should use a third party automation or tool, liked Evaboot.
Here is a step-by-step guide on how to export your leads with Evaboot.
- Create an Evaboot account
- Download the Chrome Extension
- Select your Sales Navigator lead lists
- Name and launch your export
- Download your cleaned list
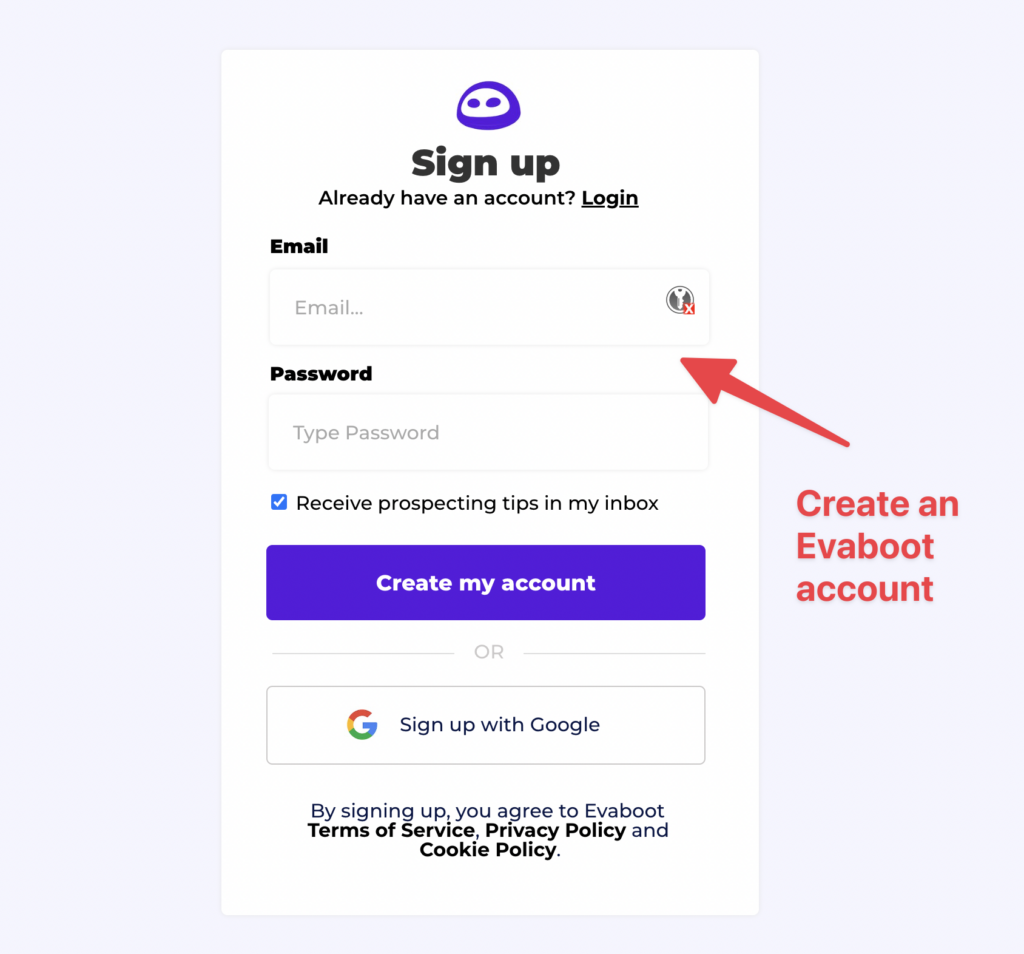
1. Create an Evaboot account
Step 1 is to go to Evaboot and click “Try for free”. Then, create an account.
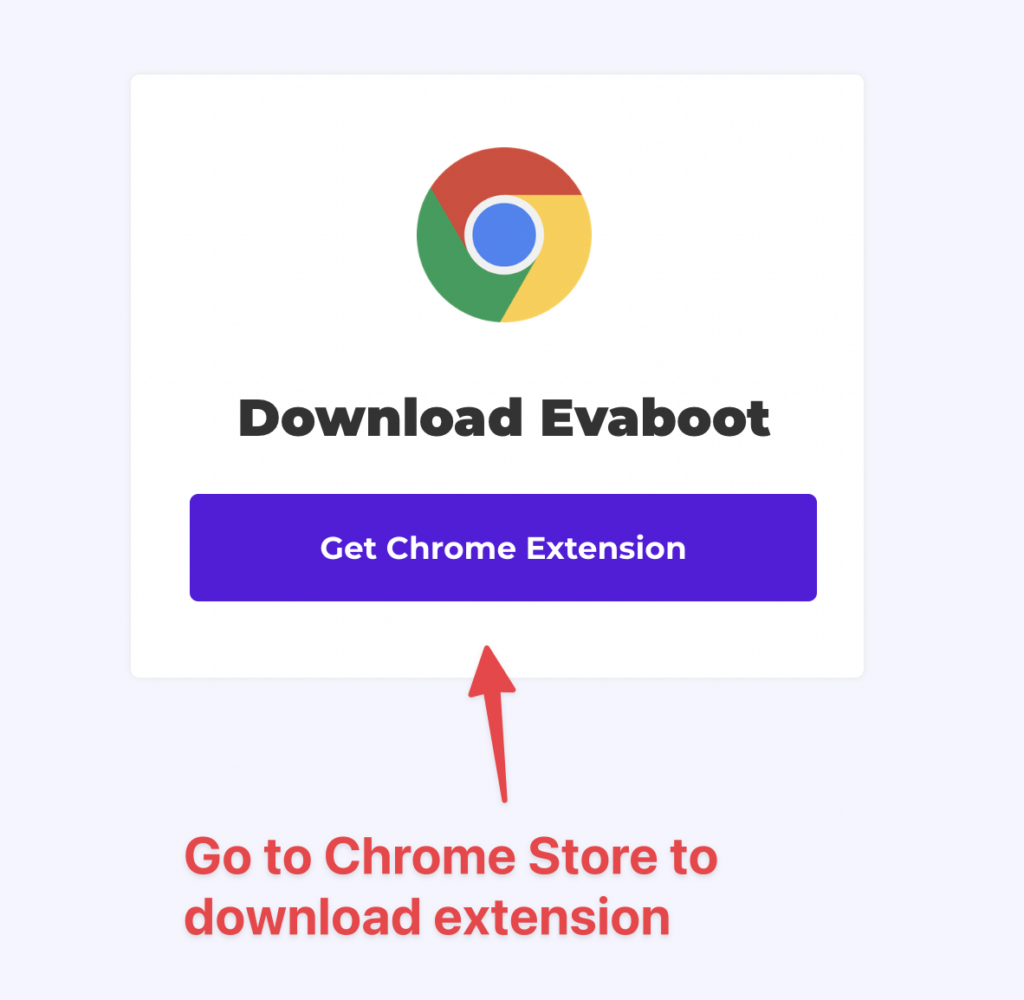
Once you’ve created your account, click on “Get Chrome Extension” to download it from the Chrome Web Store.
2. Download the Chrome Extension
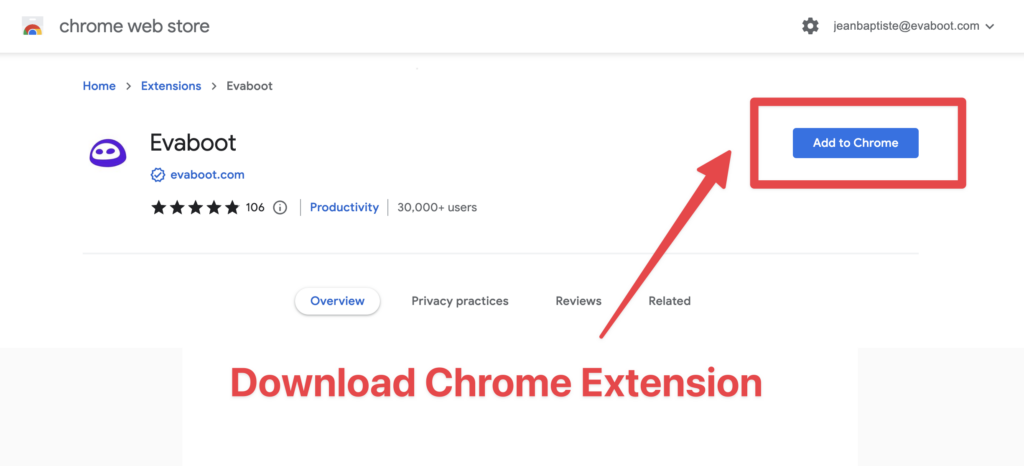
When on the Chrome Store page, click “Add to Chrome” to install the extension.
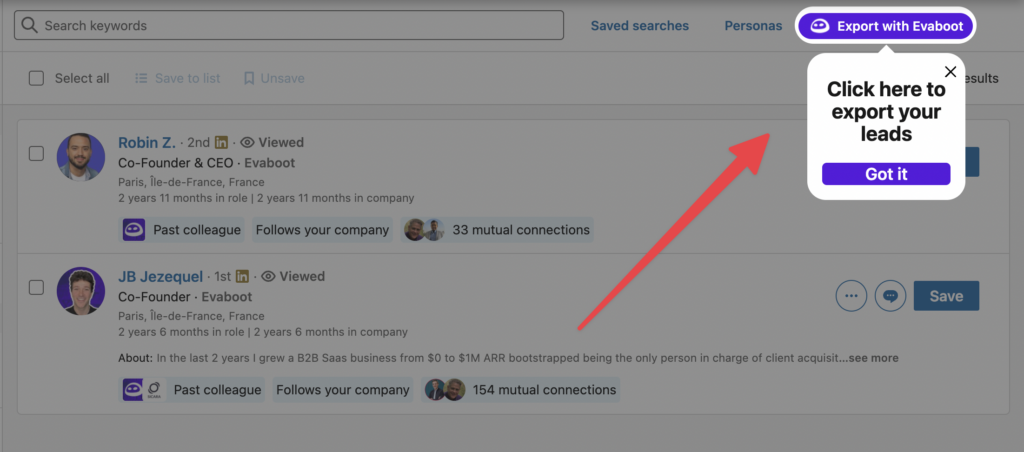
You’ll be automatically redirected to Sales Navigator. A popup will show you where the button is located.
3. Select your Sales Navigator lead list
Once the Chrome extension is installed, go to the list of leads you want to export. It can be:
- Lead searches
- Lead lists
- Account searches
- Account lists
- Saved Searches
Evaboot handles all the use cases. You will see the “Export with Evaboot“button on the top of these LinkedIn Sales Navigator pages.
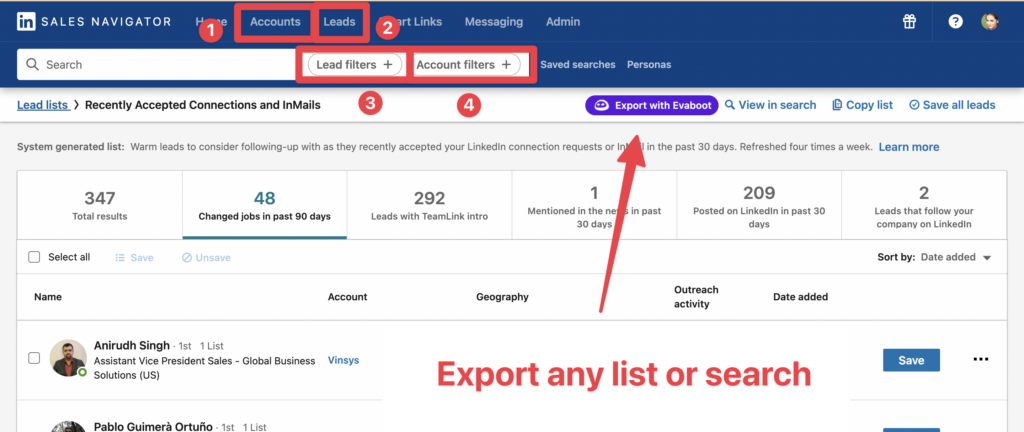
You can even export specific tabs in your lead lists, such as “Changed jobs in the past 90 days.”
4. Name and launch your export
When you click “Export with Evaboot,” you will be redirected to the Evaboot app.
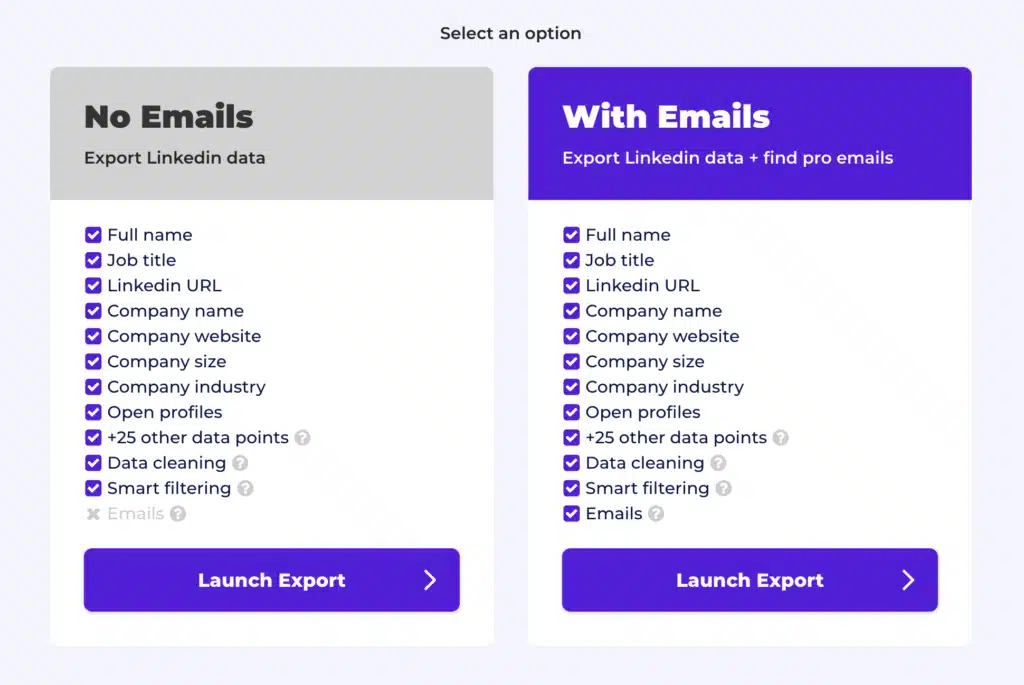
Select if you want to find emails for these leads or not.
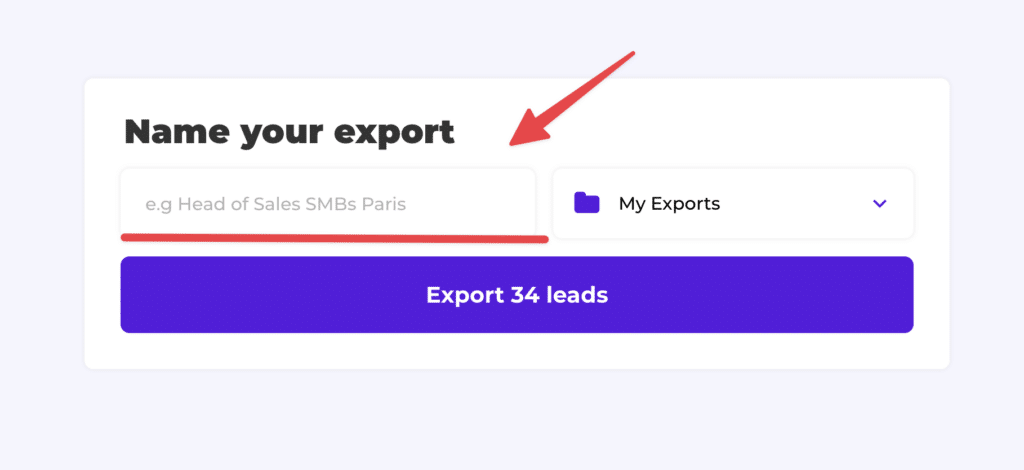
Give a name to your export and click on “Export leads”.
The estimated end date will appear on the left right after the export is launched.

Evaboot will export all these leads in real time. That makes your lead generation process GDPR-compliant, in opposition to using databases.
5. Download your cleaned list
Once the extraction is finished, you will receive an email notification containing a link to download the CSV file containing your lead list.
Evaboot does much more than export your list.
It also cleans all the names and company names of your LinkedIn contacts.
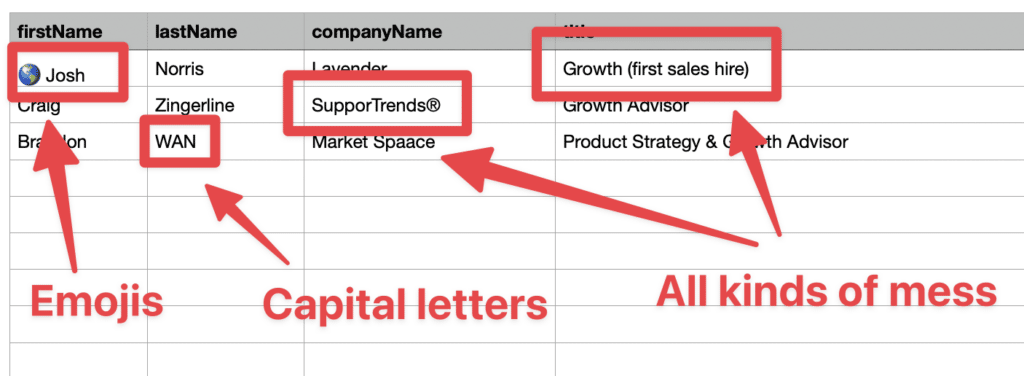
The data on LinkedIn is not clean.
Cleaning data from your sales navigator export can take hours if you do it manually.
Hopefully, the Evaboot cleaning algorithm takes care of all this work for you by automatically cleaning:
- First names
- Last names
- Company names
- Job titles
Nobody wants to spend hours cleaning Excel files. Better let robots do this boring job.
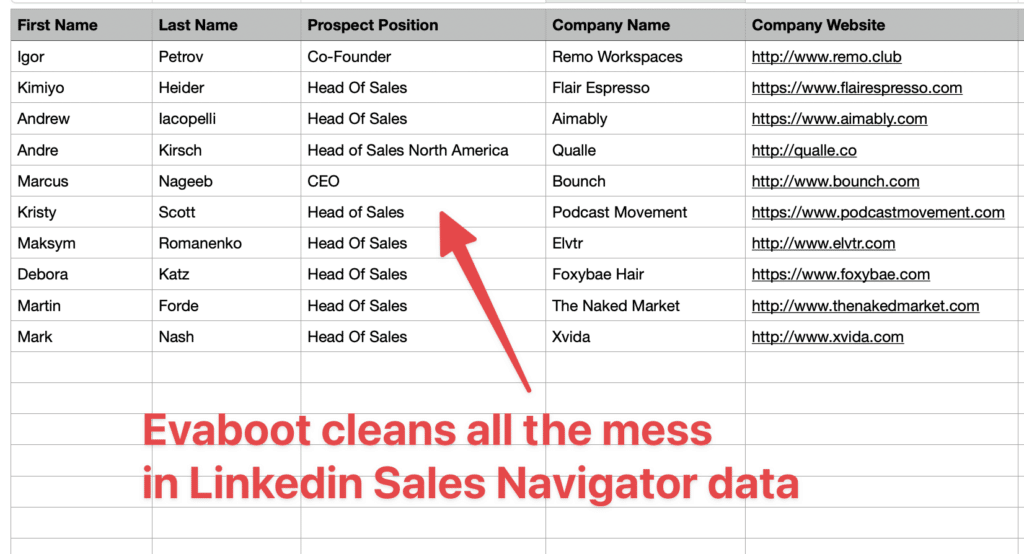
Plus, you will often find false-positive inside your LinkedIn Sales Navigator search results. Even if you’re using super precise LinkedIn search operators.

You will frequently find leads that don’t match the search filters you chose in the Sales Navigator search engine.
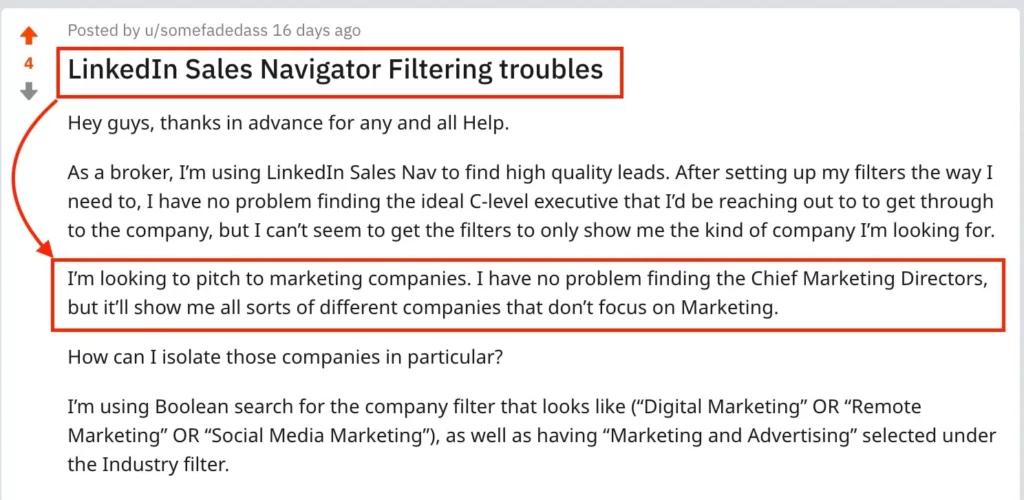
That’s why many people spend hours double-checking their search results manually. This is a painful task, but it’s no problem.
Evaboot is the smartest Sales Navigator scraper because our algorithm double-checks your leads to ensure they match the search filters you selected.

In this export, a column named “No Match Reasons” shows why your leads don’t match your search filters.
In this example, the leads have the wrong title because the initial search was looking for Growth Marketers.
That being said, lead data is not static.
B2B data decays by 2.1% per month, meaning 22.5% of your exported leads could be outdated within a year. Job titles change, companies evolve, and outdated information leads to wasted outreach efforts.
To solve this, Evaboot offers LinkedIn profile URL Enrichment: a tool allowing you to upload Linkedin URLs stored in your CRM to enrich your LinkedIn contacts with Sales Navigator data.
How it works:
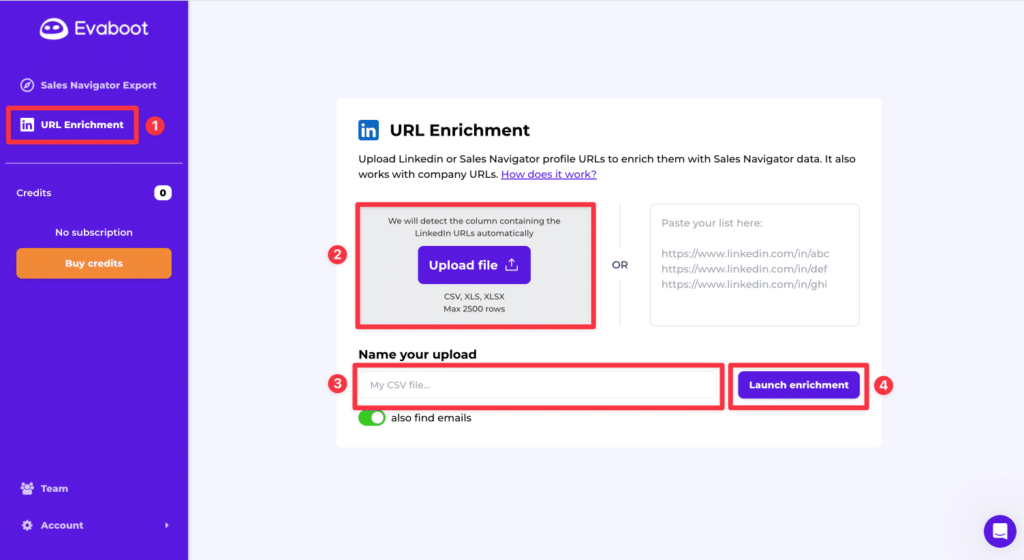
- Log in to your Evaboot account and go to the “URL Enrichment” feature.
- Upload an old list of LinkedIn or Sales Navigator URLs.
- Name your CSV file
- Launch enrichment.
- Wait a few minutes while the data updates, then download your refreshed list as a CSV file.

And here you go!
We recommend updating your lead lists every 3-6 months to maintain accuracy. This ensures your database stays fresh, relevant, and effective—so your sales efforts never go to waste.
For a visual step-by-step guide, check out the video tutorial:
How To Use Saved Searches To Generate Leads?
Saved searches are a way to save time and effort when searching for potential leads and accounts on Sales Navigator as well as a way to generate more leads on SN and opportunities for your business.
Here are some tips on how to use saved searches for lead generation:
1. How to use saved lead searches to generate leads?
The process is pretty straightforward.
Every week, Sales Navigator will send new leads corresponding to your search results.
It means that every Monday when you get to work you can these new leads to your LinkedIn outreach campaigns.
Simple as that.
But there is a trick to it.

You can make this technique even more efficient if you use specific filters.
I call them the “Icebreaker Filters”:
- Following your company
- View your profile recently
- Changed Jobs
- Posted on LinkedIn
- Mentioned in the news
The filters give you information on something that just happened to your prospect.
You can use this info to craft a message that will land at perfect time for your prospect
Example of icebreakers you can use with this filters
“Just notice you started following our company”
“Just noticed you visited my profile recently”
“Just noticed you started a new position. Congratulations.”
“I saw your last post on LinkedIn about X”
“I’ve come across this article in which you are mentioned”
Etc…
This will instantly make you stand out from the many bad LinkedIn prospecting messages your prospects receive daily.

Most importantly, you are saying something true about them, and that’s the best way to begin a relationship.

You can create one saved search per icebreaker filter. Every week, you will receive dozens of leads with ready-made icebreakers to contact them.

The icebreakers will be displayed on the lead lists for all the new leads in your search.
When you get these leads in your list, you can use Evaboot to export them into a CSV and get their emails.
2. How to use saved account searches to generate leads
The “Icebreakers Filters” also exist in the Account Search.
But it will require a bit more of manual work.
The Icebreaker Filters for accounts are:
- Hiring on LinkedIn
- Funding Events in the past 12 months
- Senior leadership changes in last 3 months

Same thing here, you can create a Saved search for every Account Icebreaker Filter.

Every week will get companies that just:
- Raised funds
- Started Hiring
- Hired new top executives

Examples of icebreakers you can send
“Just noticed you started hiring on LinkedIn for this position”
“Congratulations on your fundraising”
“Just noticed you recruited a new Head of Sales”
Etc..
You have the icebreakers, but now you must find the people to send them to.
For that, we are going to use the Account-Based-Search technique.
First, you must save the new leads in your saved search in an account list.

Then go back to the lead search and select the list you created in the “Account List” filter.
You will get all the people working in the specific companies on your list.

You can now add some filters to find the right decision-makers.
Likewise, you can export them into your favorite outreach tool and send them messages with the icebreaker advanced filters we’ve seen.
Repeat this process every week and you should get more meetings.
How To Delete Saved Searches In Sales Navigator?
To delete a saved search in Sales Navigator, you need to:
- Click “Saved Searches” next to the search bar.
- Click on “View” next to the saved list name.

- To delete a saved search, click the trash icon next to its name.

After you click the toggle, the saved search won’t appear on the list anymore.

Or, if you want to delete the list definitively:
- Click on the pen icon next to the “View” button.

- Then click “Delete”.

- Confirm your action by approving that you want to delete the list.
And the list will no longer be in your saved searches list.
Conclusion
Saved searches are one of the most powerful features of LinkedIn Sales Navigator that can help you find and connect with more leads and accounts for your business.
By saving your search criteria and getting notified of new results, you can stay ahead of your competition and reach out to prospects at the right time.
You can also use external tools like Evaboot to export and integrate your saved searches with other platforms.
FAQ
How Many Saved Searches Can You Have on Sales Navigator?
In Sales Navigator, you can save up to 50 lead and 50 account searches.
For all saved searches, you’ll receive weekly alerts. When searching for accounts, you can apply filters to match your criteria and get valuable results.
How do I find my saved searches on LinkedIn Recruiter?
To find your saved searches on LinkedIn Recruiter:

- Go to your Recruiter or Recruiter Lite homepage.
- Click Saved searches under the global search bar.
- Alternatively, click on the global search bar and select Saved searches from the dropdown menu.

How to see saved searches of LinkedIn Sales Navigator on mobile app?
To save a LinkedIn Sales Navigator search on your mobile device:
iOS:
- Tap the search bar at the top of the screen.
- Tap the Find Leads or Find Accounts icons.
- Refine your search by selecting the filters you want.
- Tap the Save Search button at the bottom right of the Leads page.
- To view saved searches, return to the Home screen, tap the search bar, and then tap the Saved Searches tab under Find Leads or Find Accounts.
Android:
- Tap the search bar at the top of the screen.
- Tap the Find Leads with Filters or Find Accounts with Filters icons.
- Refine your search by selecting the filters you want.
- Tap the Save Search button at the bottom right of the Leads page.
- To view saved searches, return to the Home page, tap the Search bar, and then tap the Saved Searches tab under Find Leads with Filters or Find Accounts with Filters.
Disclosure
This content was partly written by AI (ChatGPT 4), I added my own perspective, fact-checked it and made sure it is helpful for you.


![How to Use LinkedIn Sales Navigator Boolean Search? ([year]) 57 linkedin sales navigator boolean search](https://evaboot.com/wp-content/uploads/2021/11/linkedin-sales-navigator-boolean-search-768x432.png)
![11 Kaspr Alternatives and Competitors in [year] (Free and Paid) 58 kaspr alternatives](https://evaboot.com/wp-content/uploads/2024/03/KASPR-ALTERNATIVES-768x434.png)
![How To Use LinkedIn Sales Navigator Alerts? ([year]) 60 linkedin sales navigator alerts?](https://evaboot.com/wp-content/uploads/2023/11/LinkedIn-Sales-Navigator-Alerts-768x432.jpg)
![What are Sales Navigator Smart Links? [[year] Tutorial] 62 smartlinks linkedin sales navigator](https://evaboot.com/wp-content/uploads/2021/11/smartlinks-linkedin-sales-navigator-768x432.png)