How To Send Email While Avoid Being Marked As Spam in 2026
Contents
Getting marked as spam is the digital version of being ghosted—and it’s costing you opens, clicks, and revenue.
You spend time writing the perfect email. You hit send. And it vanishes into the spam folder abyss.
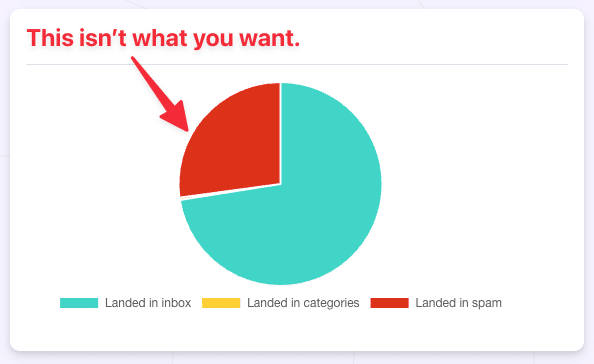
Frustrating, right?
Whether you’re sending cold emails, follow-ups, or newsletter campaigns, landing in the inbox should be your first KPI.
In this guide, we’ll break down everything you need to know about how to send email while avoid being marked as spam:
- What Makes Your Emails End Up In The Spam Folder
- Best Practices To Keep Your Emails Out Of The Spam Folder
- 5 Tools To Verify Email Addresses
Let’s dive in.
What Makes Your Emails End Up In The Spam Folder
If your emails keep disappearing into spam, it’s not random, it’s algorithmic. Spam filters are trained to protect users from unwanted messages.
They analyze everything: your sender domain, email content, sending behavior, and even how people react to your emails.
Here’s what triggers those filters:
- Missing Email Authentication (SPF, DKIM, DMARC)
- Spammy Subject Lines And Content
- Poor List Hygiene
- Too Many Complaints Or Bounces
- Inconsistent Sending Patterns
1. Missing Email Authentication (SPF, DKIM, DMARC)
If you’re not authenticating your emails, ISPs can’t trust you.
Without SPF, DKIM, and DMARC in place, your emails lack the digital signatures that prove they’re legitimate.

These authentication protocols verify that your messages are truly coming from your domain—not spoofed by someone else.
Without them, spam filters raise a red flag and most unauthenticated emails go straight to the spam folder.
2. Spammy Subject Lines And Content
Subject lines that scream “FREE OFFER!!!” or “WIN NOW” are a one-way ticket to the spam folder.

Same goes for emails full of spam trigger words, image-only content, or sketchy formatting (bold text everywhere, random colors, or too many links).
Spam filters assign a score to your content. The more spammy it looks, the higher the score—and if it crosses the limit, you’re out.
Tip: check out our guide on B2B cold email subject lines if you want to see your open rate go through the roof.
3. Poor List Hygiene
Sending to invalid or unengaged email addresses?
That’s how you hit spam traps. These are inactive or fake addresses used to catch bad senders.

Even if your content is perfect, sending to the wrong people tanks your email sender reputation—and filters start flagging everything you send.
4. Too Many Complaints Or Bounces
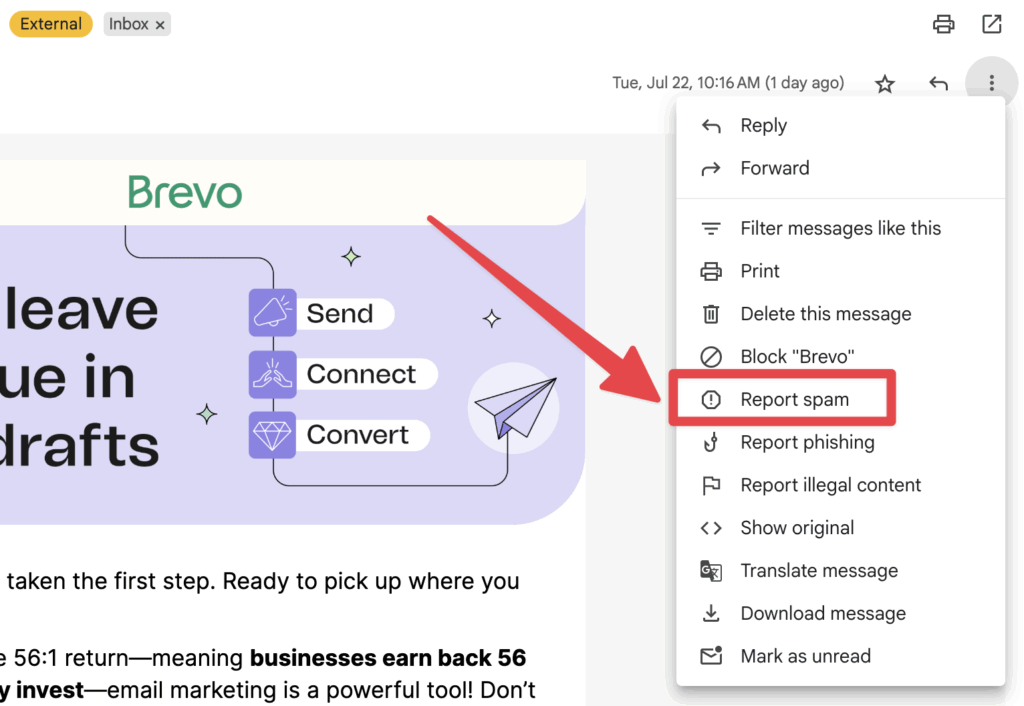
When users hit “Report spam”, that signal goes straight to ISPs. If enough people do it, your sender domain gets blacklisted.
Same goes for bounce rates. If your campaigns generate too many bounced emails—because you’re targeting non-existent inboxes—email providers will assume you’re not a legitimate sender.
5. Inconsistent Sending Patterns
Blasting out 1,000 emails in one go with a new domain? Looks like spam behavior.

Spam filters love consistency. Sudden spikes in volume, weird sending hours, or multiple emails from new addresses can make your emails look automated—and not in a good way.
Understanding these triggers is step one. Now let’s look at how to stop them from hurting your email deliverability.
Best Practices To Keep Your Emails Out Of The Spam Folder
Now that you know what triggers spam filters, let’s fix it.
These are the exact steps you need to take to make sure your emails land in the inbox:
- Set Up SPF, DKIM, And DMARC To Prove Your Email Is Legit
- Use A Verified Sending Domain
- Warm Up Your Email Account Before Sending At Scale
- Avoid Spam Trigger Words And Over-Styled Formatting
- Include A Visible Unsubscribe Link And Your Business Address
- Send To A Clean Email List Only
- Get Replies To Improve Your Sender Reputation
- Use Email Verification Tools
1. Set Up SPF, DKIM, And DMARC To Prove Your Email Is Legit
Email authentication isn’t optional: it’s step one.
Without SPF, DKIM, and DMARC, your messages look suspicious to Gmail, Outlook, and other email providers.
These protocols verify your sender domain and ensure your emails haven’t been tampered with.
- SPF: Lists the IPs allowed to send on your domain’s behalf.
- DKIM: Adds a digital signature to verify message integrity.
- DMARC: Tells receiving servers how to handle failed SPF or DKIM checks.

Set them up in your DNS settings. Most email tools (like SendGrid or Mailgun) provide ready-made records.
2. Use A Verified Sending Domain
Sending from a free email address like Gmail, Yahoo, or Outlook is one of the fastest ways to get flagged. These domains weren’t made for cold outreach or bulk sending.
Set up a custom domain that’s tied to your business and verified with proper authentication protocols.
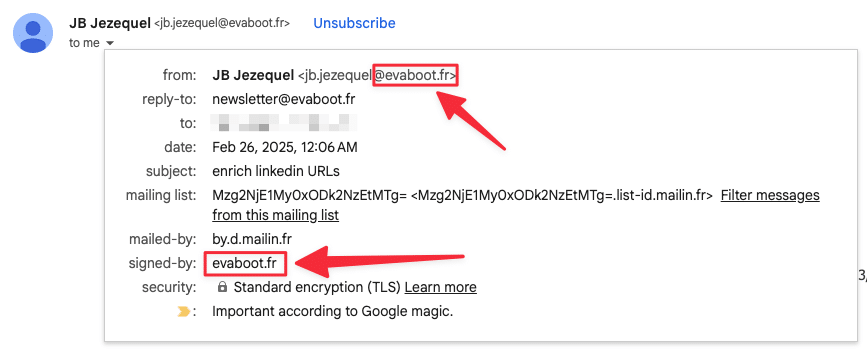
It builds trust with both spam filters and recipients, and that’s the only way to configure the DNS settings needed for authentication.
Bonus tip: check your domain reputation using tools like Spamhaus.
3. Warm Up Your Email Account Before Sending At Scale
If you go from 0 to 500 emails per day without a warm-up, you’ll trigger spam filters instantly.
Use warm-up tools like Lemwarm or Mailreach. They simulate human interactions and help build your sender reputation.
For example with Mailreach, you can gradually increase the number of emails you send daily. Here’s how to do it:
1. Go to your Mailreach and connect your email account.

2. Follow all the steps to set up your account if it’s a new email address.

Mailreach will guide you through all the steps of this process.

Ultimately, you’ll have warmed-up email lists ready to send emails without getting into spam and improve your overall deliverability.

This process helps to build your email sender reputation, as email providers see consistent, low-volume sending as a sign of legitimate activity.
4. Avoid Spam Trigger Words And Over-Styled Formatting
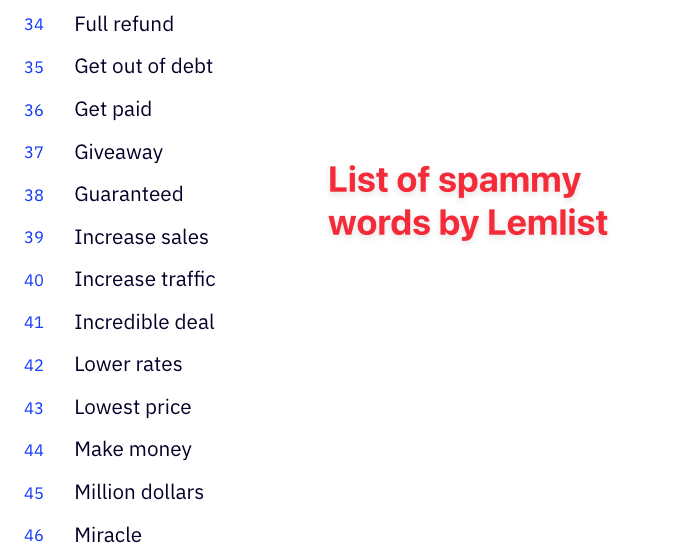
Spam filters look for red flags in your copy. Words like “guaranteed”, “make money fast”, or “limited time” can raise your spam score.

If you’re unsure what is and isn’t a spam trigger word, you can check this list by Lemlist.
Also, don’t overload your email with:
- Bold or colored text
- Large fonts or multiple font types
- One big image with no text
Stick to clean, minimal formatting. Use a proper text-to-image ratio, and always include alt text.
5. Include A Visible Unsubscribe Link And Your Business Address
Making it hard to unsubscribe is a surefire way to get flagged.
Place the unsubscribe link at the bottom of your emails.

Also, include your physical mailing address.
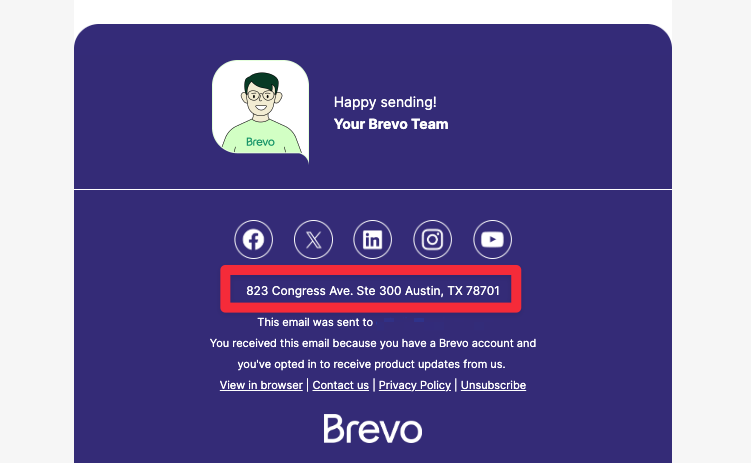
It’s required by law (CAN-SPAM), and helps you look trustworthy to filters.
6. Send To A Clean Email List Only
Sending to outdated, purchased, or scraped lists will destroy your deliverability.
If you don’t want to suffer later, you better start building high-quality email lists now.
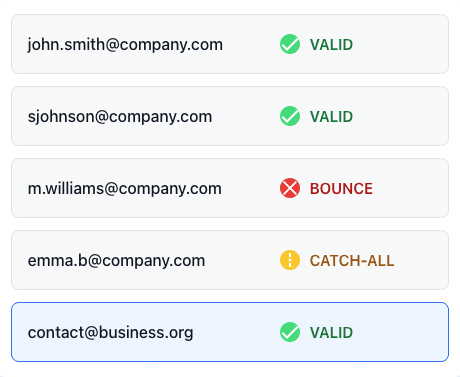
Always use GDPR-compliant scraping tools like Evaboot that gather accurate, verified email data.
And collect addresses through legitimate, consent-based methods such as opt-in forms, newsletter subscriptions, or in-person events.
7. Get Replies To Improve Your Sender Reputation
No one replies to spam. But if your emails get responses, ISPs take that as a positive signal.
Ask questions. Start conversations. End your emails with a CTA that encourages a reply.
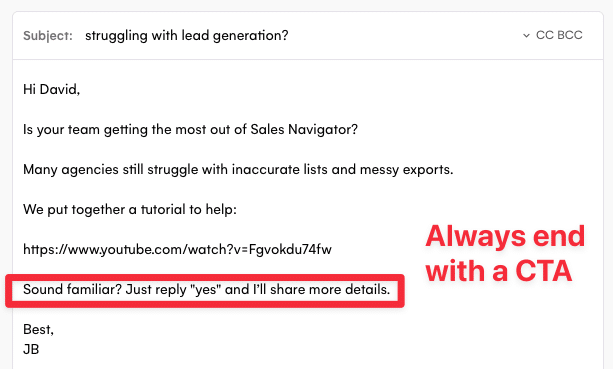
Even a few genuine replies can boost your deliverability across the board.
8. Use Email Verification Tools
Even with perfect email setup and clean content, you can’t get good deliverability if your contact list is full of invalid or risky email addresses.
That’s where email verification tools come in.
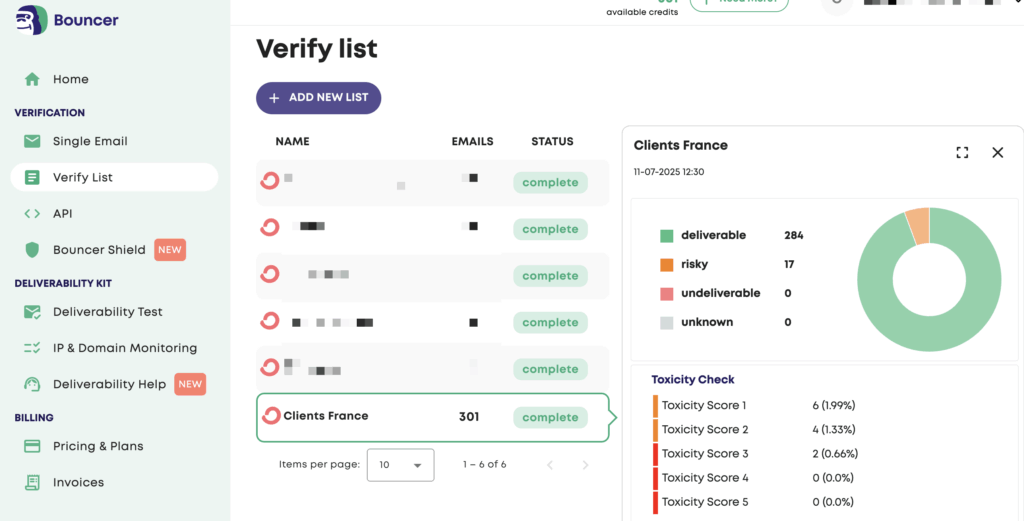
These tools help you remove:
- Invalid email addresses
- Spam traps
- Catch-all domains
- Temporary emails and hard bounces
Cleaning your list before each campaign improves your sender score, reduces bounce rates, and helps you avoid being flagged as spam.
In the next section, we’ll explore some of the most effective tools for bulk email list verification.
5 Tools To Verify Email Addresses
Email verification tools are the best way to save time when building email lists for your marketing and scale campaigns.
Here are the top tools we recommend:
- Evaboot
- ZeroBounce
- Hunter
- EmailListVerify
- NeverBounce
1. Evaboot
Evaboot Chrome extension is a smart data scraper designed to export verified emails and up-to-date contact data from LinkedIn Sales Navigator.
Its main features include:
- Find professional emails
- Verify emails
- Export leads from LinkedIn Sales Navigator
- Export company profiles
- Export LinkedIn profile URLs
- Clean the data (emojis, capital letters, typos…)
- Detect false positives in your search results
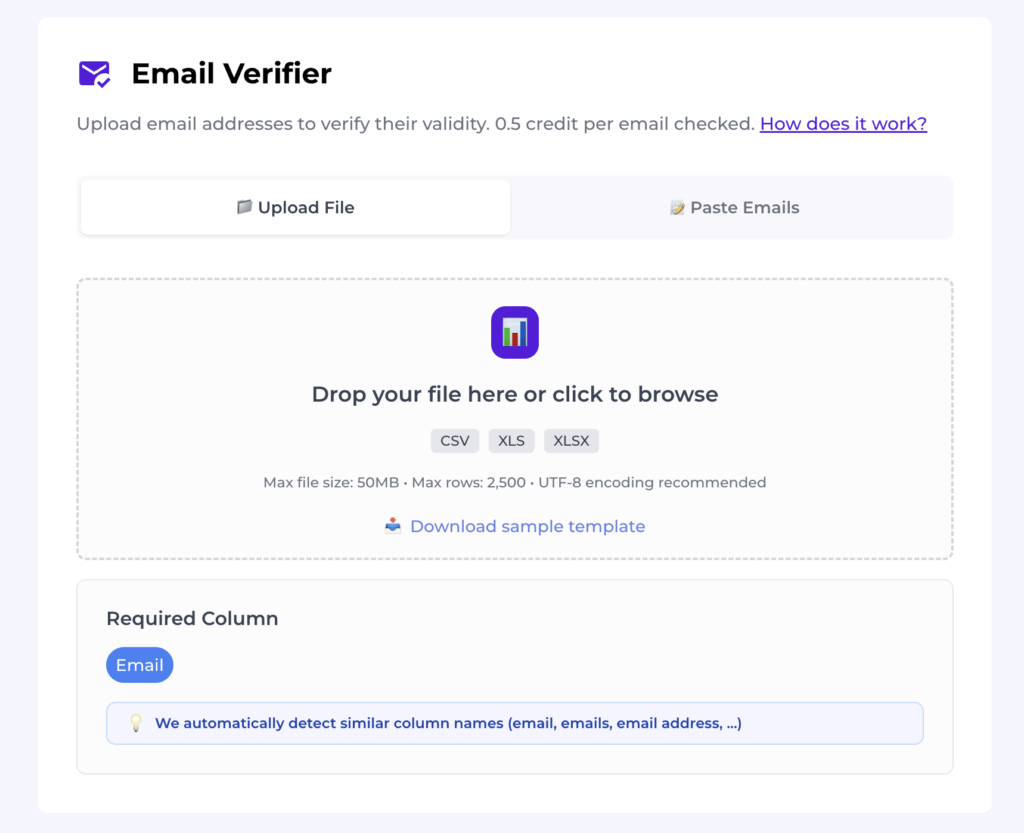
The Email Verifier feature allows you to verify email addresses in bulk and instantly clean your contact lists.
It’s very easy to use:
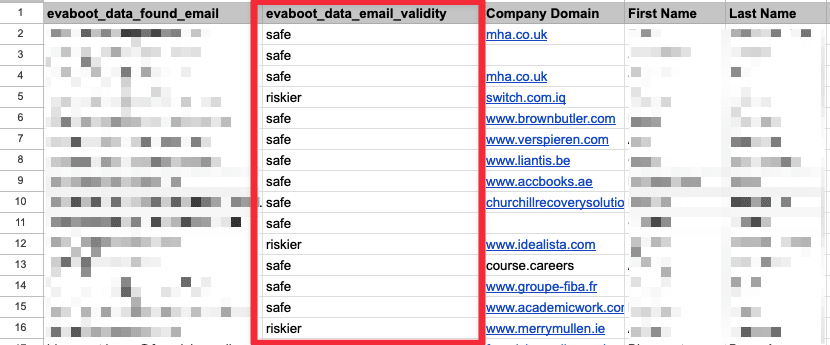
Drop your CSV file (up to 2,500 rows), and Evaboot will process the list: verifying and labeling emails in one go.
You’ll get back a file with “safe” vs. “riskier” annotations based on bounce likelihood.
Here’s a video tutorial if you prefer to watch how it works:
And if you don’t already have an email list to verify, you can use Evaboot to scrape your lead data from LinkedIn Sales Navigator.
It’s the perfect solution if you want to create lead lists from your LinkedIn network and enrich them with real-time verified emails.
It provides you with ready-for-outreach Excel files in just one click.
Here’s how it works:
1. Click the extension button on the top right of your Sales Navigator page.

2. It’ll redirect to the Evaboot dashboard, where you can launch the export.

Once the export is done, you can download the email lists with all the other lead information needed to personalize your outreach messages.
To better understand how it works, you can also watch this video showing the full process of exporting Sales Navigator leads to Excel:
With Evaboot, you don’t have to worry about the quality and legality of the data.
You’ll have GDPR-compliant and verified emails ready to exploit in your next outreach campaign.

Evaboot’s pricing is credit-based.
The most basic plan starts at $9 for 100 credits.
2. ZeroBounce
ZeroBounce is an easy-to-use email verification tool with a user-friendly interface and high accuracy.

It’s a great starting point for those new to email verification.
The tool checks for invalid addresses, spam traps, and syntax errors to ensure your email list is clean and deliverable.

ZeroBounce provides email validation and an email finder API, which is available in 13 languages, including PHP, iOS, Scala, Javascript, and more.
Installing the verification API on your preferred system, platform, and website will allow you to validate emails automatically using your software or application.

Their pricing is built for businesses of all sizes.
They offer a free trial, and their prices are credit-based, with a price per credit of $0.009.
3. Hunter
Hunter.io is a leading email search engine specializing in discovering and verifying professional email addresses across the web.
Hunter finds and verifies emails via any company domain, company name, prospect name, Bulk email finder, API, Google Sheets Add-on, or Hunter plugin.


Hunter’s main features are:
- Finding professional email addresses associated with any domain
- Domain search to find all the publicly available email addresses associated with it
- Integrate Hunter.io with your CRM, such as HubSpot or Salesforce, to automate lead generation
- Perform bulk searches to find multiple email addresses at once
- Use the Hunter API to find emails
- Email Finder extension to find emails from the website you use

You can try Hunter.io for free, which offers 25 searches and 50 verifications per month. The Starter Plan starts at €49/month, including 50

4. EmailListVerify
EmailListVerify is an email list cleaning and verification tool that ensures the addresses on your list are valid, deliverable, and safe to send to.

This helps improve email deliverability, reduce bounce rates, and protect your sender’s reputation.
Key features include:
- Bulk email verification
- Syntax checking
- Domain and MX record validation
- Disposable and role-based email detection
- Spam trap and abusive email detection

The pricing is based on the number of emails you want to check, with options ranging from pay-as-you-go credits to monthly subscriptions.

5. NeverBounce
NeverBounce is an email verification and list-cleaning service that ensures your email lists are accurate and up-to-date.

Verifying email addresses in real-time and cleaning bulk lists helps reduce bounce rates and improve email deliverability, ensuring your emails reach their intended recipients.
Main Features:
- Real-time email verification
- Bulk email list cleaning
- Automated list cleaning via integrations
- Instant bounce analysis
- Seamless API for developers

NeverBounce offers a price-per-email pricing model. This means that you pay for the number of emails you verify.
This model lets you verify or clean as many emails as you want.
Conclusion
Learning how to send email while avoid being marked as spam isn’t just about tweaking one thing—it’s about creating trust across every part of your sending process.
From setting up SPF, DKIM, and DMARC to writing better subject lines and cleaning your list, every detail plays a role in inbox placement.
If you ignore one, your message risks ending up where nobody sees it.
But once you get this right, your open rates go up and your start getting real results.

FAQs
Why Do My Emails Keep Getting Marked As Spam?
The most common reasons are: poor domain reputation, missing authentication, spam trigger words, unverified email lists, or sudden spikes in volume.
Even one of these can cause deliverability issues.
How Many Emails Can I Send Per Day Without Getting Flagged As Spam?
For new domains, stay under 100–150 emails per day. For warmed-up accounts, stay under 300–500.
Always scale gradually and avoid sending all emails at once.
What Happens When Someone Marks My Email As Spam?
That complaint goes to the email service provider and hurts your sender score.
High complaint rates can get your domain or IP blacklisted—meaning even legitimate emails will land in spam.
Is It Better To Use Text-Only Emails Or HTML?
Both are fine—what matters is balance. Avoid image-only emails, use plain-text fallbacks for HTML, and keep your formatting clean and minimal.


![Best Email Verification Tools Compared In [year] 78 best email verification tools](https://evaboot.com/wp-content/uploads/2025/04/best-email-verification-tools-1-768x431.png)
![How To Prevent Emails From Going To Spam In Gmail? [year] 80 stop gmail spam](https://evaboot.com/wp-content/uploads/2024/08/STOP-GMAIL-SPAM-768x432.png)